Linux may be a fantabulous subject in Microsoft Azure. During this article, we’ll see however the method of adding information disks to a Linux VM in Microsoft Azure works and the way we are able to manage the disk victimization Linux commands. The goal is to urge AN understanding of however Azure supports the Linux software package and brush au courant your skills for the Linux certifications (Red Hat or Linux Foundation Certified System Administrator).
We will specialize in the foremost orthodox strategies to manage a disk in Linux by employing a single disk, partitions, and filing system partitions. For virtual machines that need a lot of performance, IOPS, and outturn, the employment of Logical Volume Management (LVM) or RAID is that the suggested approach to require advantage of Azure. We’ll have another article here at Solutionviews to travel over that method.
Azure disks during a Linux VM and adding information disks:
The first step is to know however the Azure disks area unit diagrammatic to a VM in Microsoft Azure. During this article, we have a tendency to area unit victimization Red Hat Enterprise Linux (7.7), and also the initial Azure disks (operating system and temporary) are diagrammatic as /dev/sda and /dev/sdb.
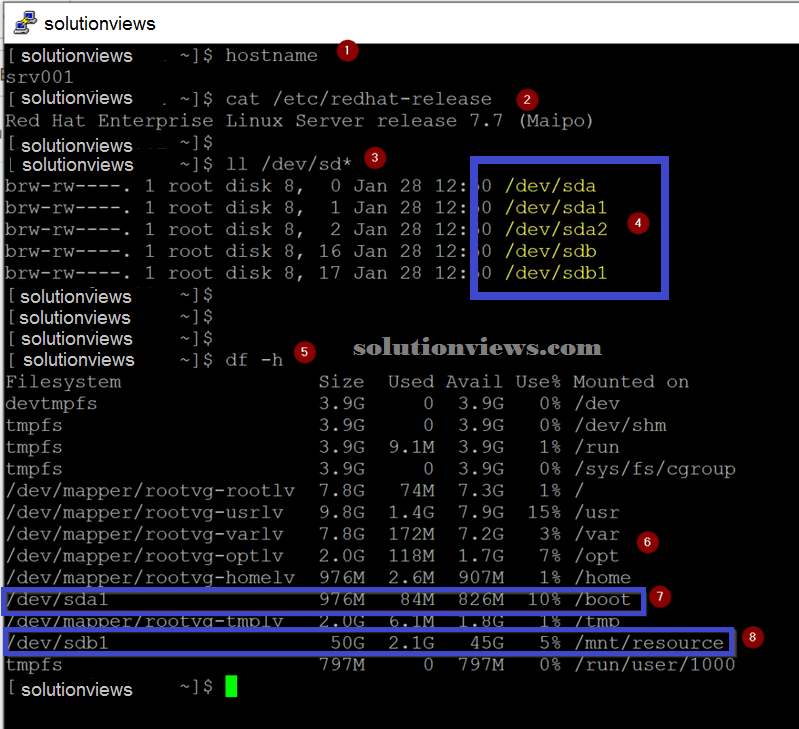
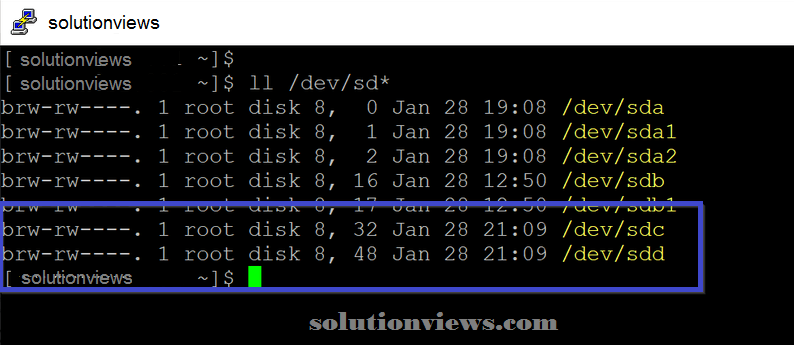
All partitions being created from those disks can receive AN progressive variety (1, 2, 3, and then forth). Within the image below, we’ve got the result from the code that we have a tendency to list below.
The first command (Item 1) can list this VM name. The second command can give this version of the software package (Item 2). The command to list the present disks (Item 3) can show all disks that came with the supply of the VM (Item 4). Finally, we’ll use the df utility (Item 5) to report the filing system (usage and mounted), and it’ll provide U.S. a clue wherever the disks area unit getting used.
Note: Red Hat uses the Logical Volume Management to prepare the software package structure.
hostname
cat/etc/red-hat-release
ll /dev/sd*
df -h
The process of adding disks to AN Azure VM is that the same freelance of the software package. We have a tendency to area unit reaching to add 2 disks: diskMBR (32GB) and diskGTP (64GB).
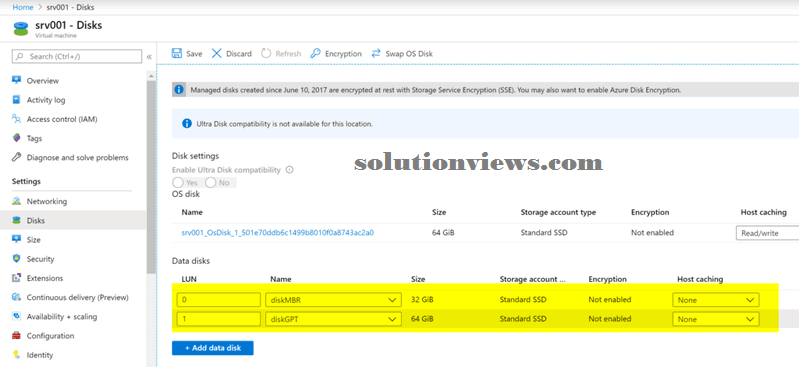
As before long as we have a tendency to save the new configuration, the disks can seem mechanically on your software package, as portrayed within the image below
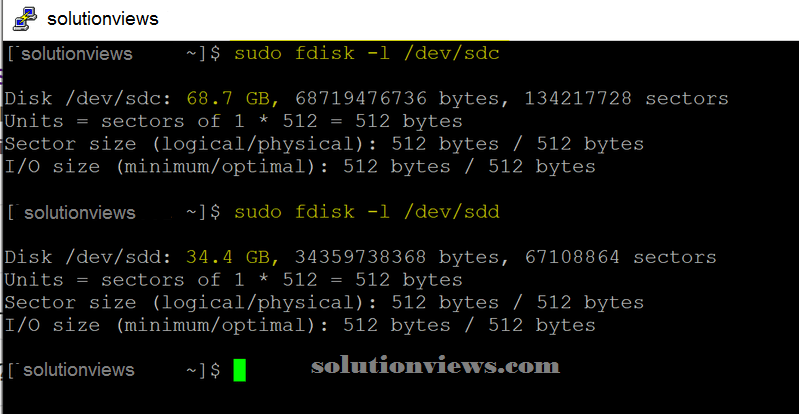
If we wish to examine that disk it absolutely was appointed, we are able to use sudo fdisk -l /dev/sdX, and it’ll give a lot of info. In our article, the MBR (Master Boot Record) disk has 32GBs. so sdd and also the GPT disk have 64GB that is sdc.
Managing partitions:
A Linux administrator, once employing a single disk, needs to decide the partition methodology to be used, and these days, it might be either MBR or GPT (GUID Partition Table). The primary is older, and it’s dated from the last decade that this author was born, and DOS 2.0 was on its heydays (just to allow the reader AN idea!).
The partition might facilitate to handle some common problems, like the employment of various file systems, logical separation of knowledge, and then forth.
The MBR is older, and it’s some limitations, like the utmost of 4 primary partitions during a disk, or 3 primaries and one extended that permits twelve logical partitions. However, the utmost partition size is 2TB. The GPT is a lot of versatile, permitting 128 partitions out of the box and just about eight zebibytes (ZiB).
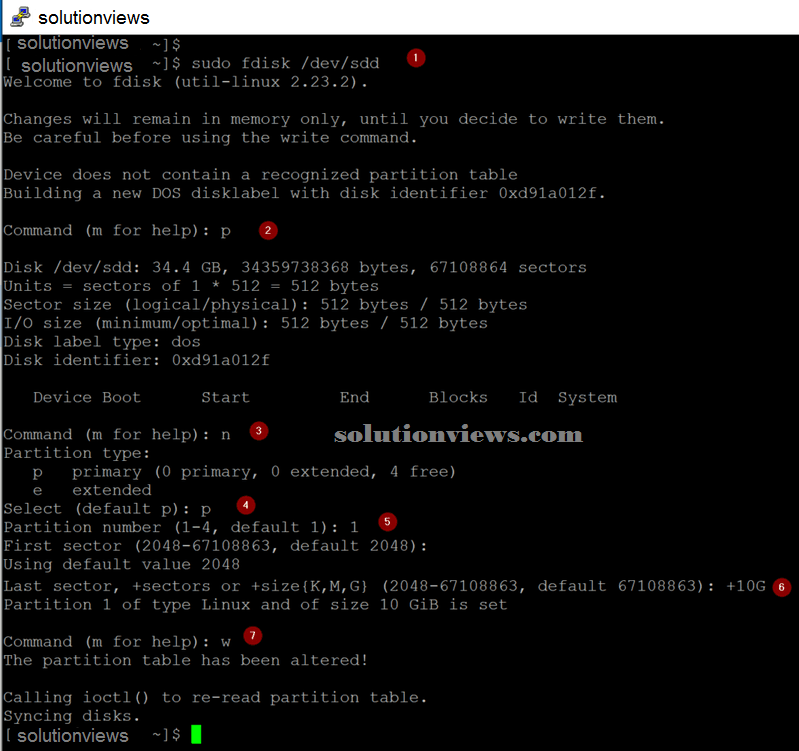
We area unit reaching to show the way to manage each partitions during this article. To manage MBR partitions, we are able to use the fdisk utility. The fdisk utility doesn’t commit the changes as we have a tendency to outline them. We’ll apply all the specified settings, and at the top, we’ll commit them during a single shot.
The first step (Item 1) is to pass the disk that we have a tendency to area unit reaching to work as a parameter for the fdisk utility. To print all existing partitions within the disk, we are able to kind p (Item 2).
To create a replacement partition, kind n (Item 3), a replacement set of queries are queued up. First, we want to outline the partition kind, choose p (primary, Item 4) and partition variety (in our case, the primary one, so price one, as shown in Item 5). Hit enter to outline the first sector out there, then set the dimensions (in our case 10GB, Item 6), we’ll kind +10G. Finally, to commit all changes performed to date, kind w and hit enter.
After managing a disk partition, it’s a decent follow to execute partprobe, that informs the Linux kernel concerning partition table changes, and it’ll trigger a kernel browse of the partition table, and any ultimate changes are synchronized.
We can repeat these steps to make further partitions to the disks.
What concerning the GPT partition? The method is identical, and also the solely distinction is that we have a tendency to use another utility referred to as gdisk. The choices area unit constant, however. Here may be a smart outline of the variations within the management method between those 2 forms of partitions.
|
MBR | GPT | |
| Utility name | fdisk | gdisk |
| List the partition from the command line | fdisk -l /dev/sdd | gdisk -l /dev/sdd |
| Print existing partition within the utility | p | p |
| Create a new partition from within the utility | n | n |
| Write the changes from within the utility | w | w |
Formatting and employing a new Linux partition:
Now that we’ve got our disks divided into logical partitions, we are able to assign a filing system partition to start out victimization it. There area unit lots of file systems out there in any given Linux software package.
The most standard these days area unit ext4 and xfs. Red Hat uses ext4 as default filing system partition.
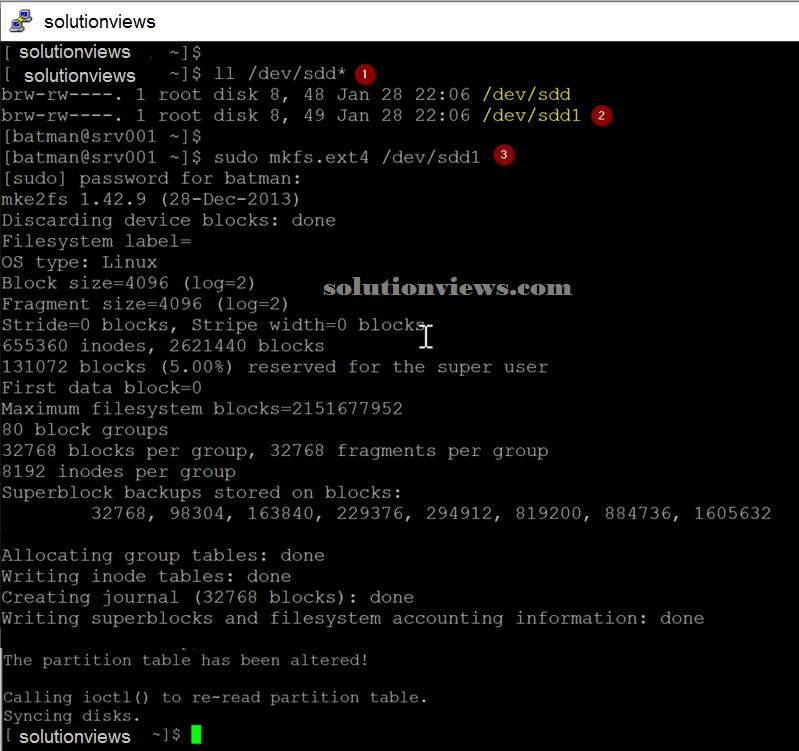
Our commencement is to form certain that we’ve got a partition and that we apprehend its identification. Within the previous step, we have a tendency to create the primary one on the /dev/sdd disk. We will list all sdd* files in /dev to possess a whole list (as portrayed within the image below). We are able to see the /dev/sdd1 being listed.
To create AN ext4 partition thereon disks, we want to execute the command sudo mkfs.ext4 /dev/sdd1, wait many moments, and also the partition are formatted and free to be used.
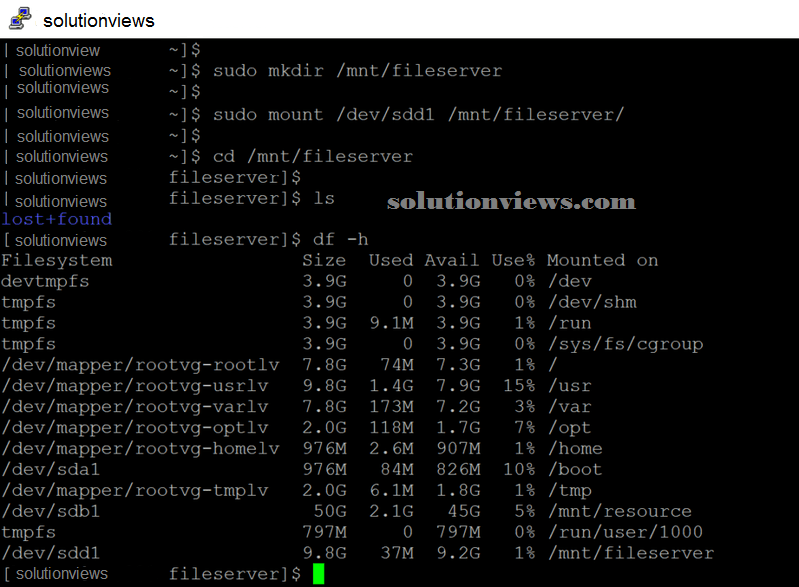
Our next logical step is to mount and use that partition. {we will|we’ll|we area unit reaching to} begin by making a folder wherever we have a tendency to are going to mount our new partition.
sudo mkdir /mnt/fileserver
The second step is to mount our new partition into the new folder.
sudo mount /dev/sdd1 /mnt/fileserver
To make certain that everything is mounted properly, we are able to run the subsequent command. The df utility can list all mounted partitions within the current Linux, together with their size and mount points. we are able to see that our 10GB partition is being related to the /mnt/fileserver.df -h
If you would like to unmount the partition, the subsequent command is often used. We should always try this as a result of we’ll check a persistent mount within the next section.
sudo umount /mnt/fileserver
Creating a persistent mount:
The /etc/fstab may be a configuration file to blame for mounting file ystems mechanically once the system starts up, together with the partitions needed employed by the system.
When victimization Microsoft Azure, you leverage the material redundancy to safeguard your information. to enhance your disk performance (when victimization premium disks), you must disable the barrier, which is finished by adding barrier=0 (if victimization ext3/ext4) on your /etc/fstab. If you’re victimization the XFS filing system, then you must use the nobarrier instead.
Although we are able to use the /dev/sdd name, that name might modification from time to time, particularly once disks area unit being added and removed. To avoid problems with that nature, we should always use the UUID that’s distinctive for every disk, and it’s keep within the data of the filing system.
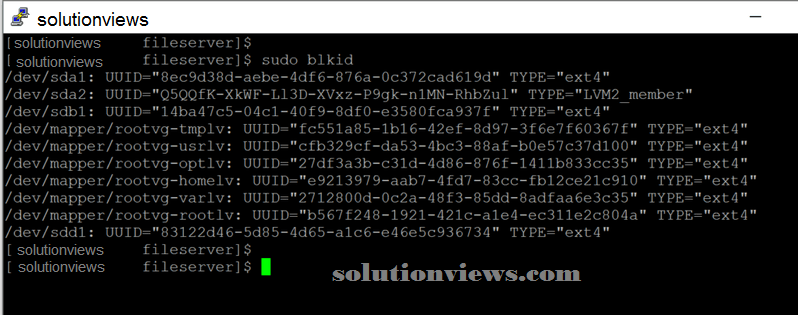
The first step is to retrieve the UUID, and it are often completed by victimization the sudo blkid command. Copy the content between quotes from the specified disk, in our case /dev/sdd1.
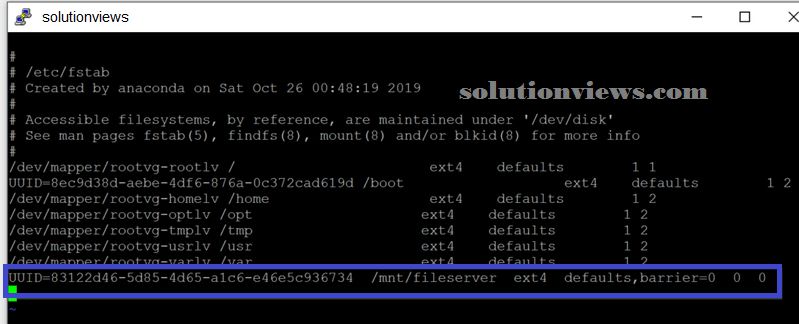
The second step needs a modification within the /etc/fstab, and that we are adding a replacement line to the file. The file starts with the UUID=, the mount purpose, the filing system kind, the mount purpose choices together with the simplest follow for Azure premium disks, dump frequency (when dump utility is used), and also the filing system check order.
UUID=83122d46-5d85-4d65-a1c6-e46e5c936734 /mnt/fileserver ext4 defaults,barrier=0 0 0
To validate if the new partition can mount of course within the next restart, run each of those commands. the primary one can mount something that’s outlined within the /etc/fstab, and also the second can list all mounted file systems within the system. The result ought to be the new mount purpose being listed.
mount --all
df -h
Azure and Linux: currently you recognize the filing system basics:
If you’re either exploring Microsoft Azure or finding out for your Linux certification, this text coated the fundamentals to manage disk partitions and filing system volumes during a Red Hat Enterprise Linux. We have a tendency to validate however it’s reaching to be the expertise of the Linux administrator once adding Azure disks to the running VMs.
If need any help in how to manage azure VMS with windows admin center click on the link given: