We’ll show you how to use Microsoft Deployment Toolkit to capture a reference Windows 10 image in this article (MDT). You may then use this Windows 10 image to deploy it across your organization’s machines.
You can achieve a quick installation of the operating system with a set of necessary applications on the users’ workstations by using a fully customized Windows 10 image for deployment on computers.
We’re assuming you’ve read the article Deploy Windows 10 with MDT 2013 and WDS and have MDT installed on your Windows Server 2012 R2/2016/2019.
Note. Install the latest version of the Windows ADK (Windows Assessment and Deployment Kit) on your Windows Server with the Microsoft Deployment Toolkit role installed before capturing a Windows 10 image. To capture a Windows 10 v2004 image, for example, you must first install the Windows ADK for Windows 10 2004.
Getting Ready for MDT Capture on a Windows 10 Reference Computer
Before you start capturing a Windows 10 image, make sure your Windows 10 PC is ready by installing the necessary drivers, apps, and Windows security updates, as well as performing any necessary system configuration. The Windows image will be captured on this computer.
Let’s take a look at the fundamentals of configuring a Windows 10 reference computer.
1-Install Windows 10 Pro or Enterprise edition on a test computer;
2-Install device drivers;
3- enable.NET 3.5 Framework support (using the DISM command Dism /online /Enable-Feature /FeatureName:”NetFx3″)
4-Download and install the most recent security updates using Windows Update.
5- Remove any built-in Universal Windows Platform (UWP) apps that aren’t needed (otherwise the sysprep mail fail). You can remove some of the unnecessary Windows 10 built-in Window Store Apps, such as Xbox and Games, with the following PowerShell script:
$AppsList = "Microsoft.3DBuilder","microsoft.windowscommunicationsapps","Microsoft.MicrosoftOfficeHub","Microsoft.SkypeApp","Microsoft.Getstarted","Microsoft.ZuneMusic","Microsoft.MicrosoftSolitaireCollection","Microsoft.ZuneVideo","Microsoft.Office.OneNote","Microsoft.People","Microsoft.XboxApp", "Microsoft.Messaging", "Microsoft.Microsoft3DViewer", "Microsoft.WindowsFeedbackHub", "Microsoft.GetHelp", "Microsoft.OneConnect"

ForEach ($App in $AppsList)

{

  $PackageFullName = (Get-AppxPackage $App).PackageFullName

  $ProPackageFullName = (Get-AppxProvisionedPackage -online | where {$_.Displayname -eq $App}).PackageName

if ($PackageFullName)

  {

   remove-AppxPackage -package $PackageFullName

  }

if ($ProPackageFullName)

  {

        Remove-AppxProvisionedPackage -online -packagename $ProPackageFullName

  }

  }
6- Install Visual C++ Redist, office software, and other tools used by your users.
7- Pinned apps on the Windows Start Menu and Taskbar can be customised, and settings can be copied to new user profiles:
$Path = "C:\PS\StartLayout.xml"

Export-StartLayout -path $Path

Copy-Item $Path -Destination “C:\Users\Default\AppData\Local\Microsoft\Windows\Shell”
8- MSFT Consumer Experience, First Logon Animation, and Windows Defender should all be disabled (if third party security solution is used). Use the PowerShell commands below.
# Disable the Microsoft Consumer Experience

New-Item -Path HKLM:\SOFTWARE\Policies\Microsoft\Windows\ -Name CloudContent

New-ItemProperty -Path 'HKLM:\SOFTWARE\Policies\Microsoft\Windows\CloudContent' -name 'DisableWindowsConsumerFeatures' -PropertyType DWORD -Value '1'

# Disable First logon Animation

New-ItemProperty -Path 'HKLM:\SOFTWARE\Microsoft\Windows\CurrentVersion\Policies\System' -name 'EnableFirstLogonAnimation' -PropertyType DWORD -Value '0'

#Disable Windows Defender

Set-MpPreference -DisableRealtimeMonitoring $TRUE

New-ItemProperty -Path “HKLM:\SOFTWARE\Policies\Microsoft\Windows Defender” -Name DisableAntiSpyware -Value 1 -PropertyType DWORD -Force
9- Using DISM, clean up the WinSXS component folder on Windows 10:
dism /Online /Cleanup-Image /AnalyzeComponentStore

dism /online /Cleanup-Image /StartComponentCleanup
10- Run Disk Cleanup on the system drive C:, delete any temporary files, and clear the Windows Update cache (C:\Windows\SoftwareDistribution\download folder).
Using MDT to create a Capture Task Sequence
The first step is to create a new Task Sequence that will handle the image capture.
1-Expand the branch in the Deployment Workbench console. Shares of Deployment > MDT Deployment Share; MDT Deployment Share; MDT Deployment Share
2- Right-click Task Sequence and choose New Task Sequence from the menu that appears.

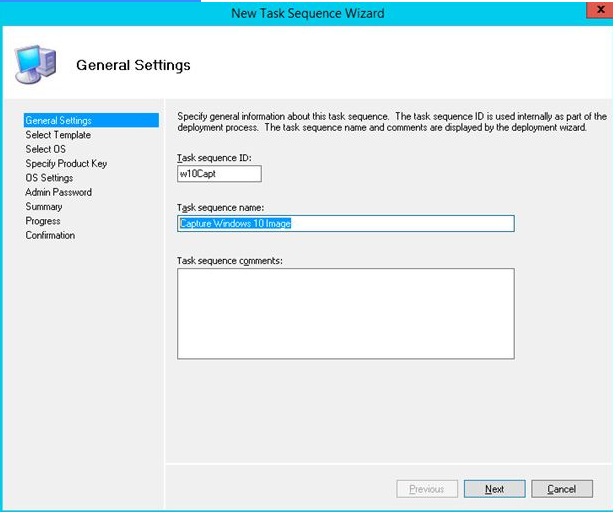
3- The Task Sequence Wizard is launched. Enter w10Capt as the Task Sequence ID and Capture Windows 10 Image as the Task Sequence Name.
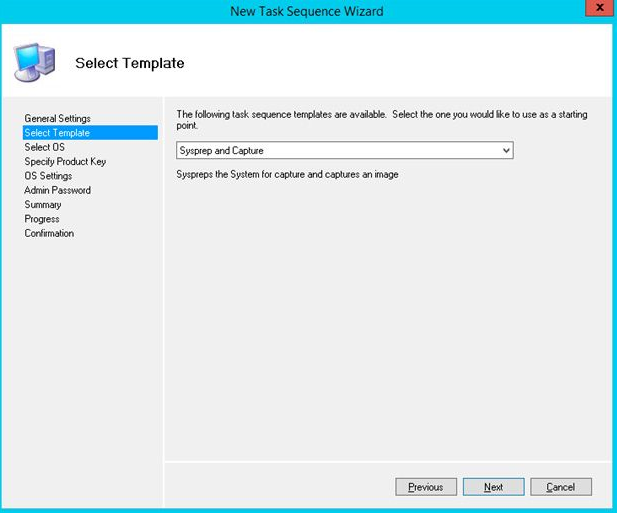
4- Click Next after selecting Sysprep and Capture from the list of predefined task sequence templates.
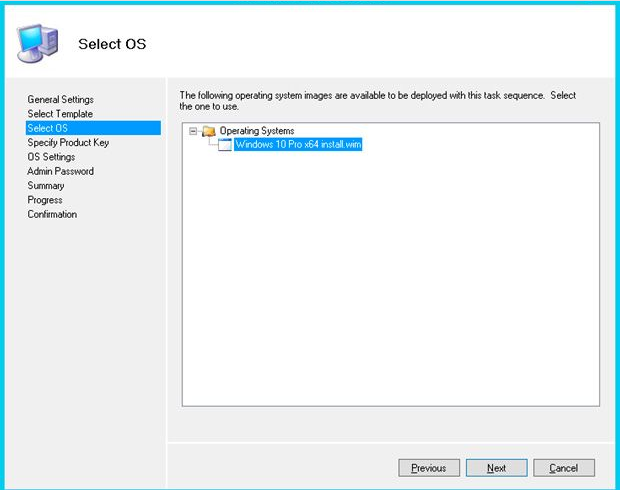
5- Select an operating system that corresponds to the version of the operating system installed on the reference computer. It’s Windows 10 Pro x64 install.wim in this case (the operating system has to be pre-imported into MDT);
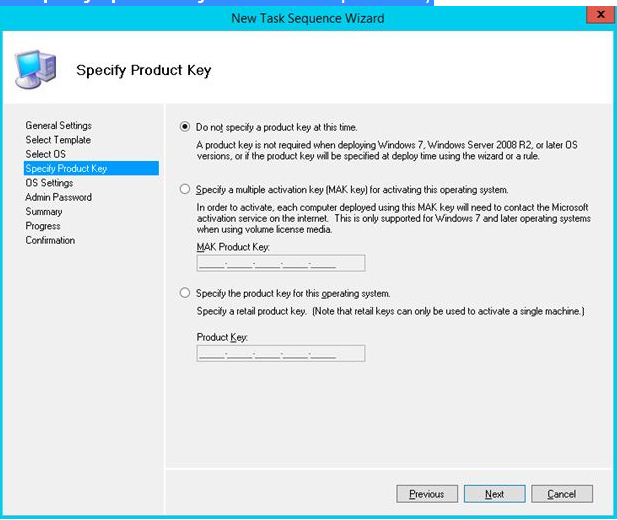
6- Press Next without specifying a product key at this time.
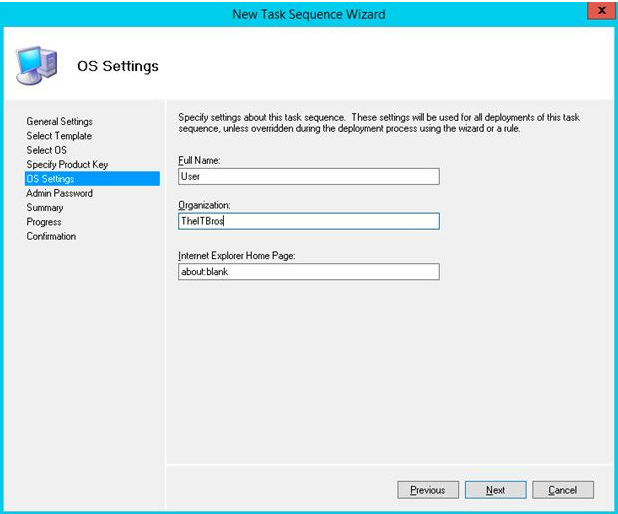
7- Click Next after filling in the fields Full Name and Organization.
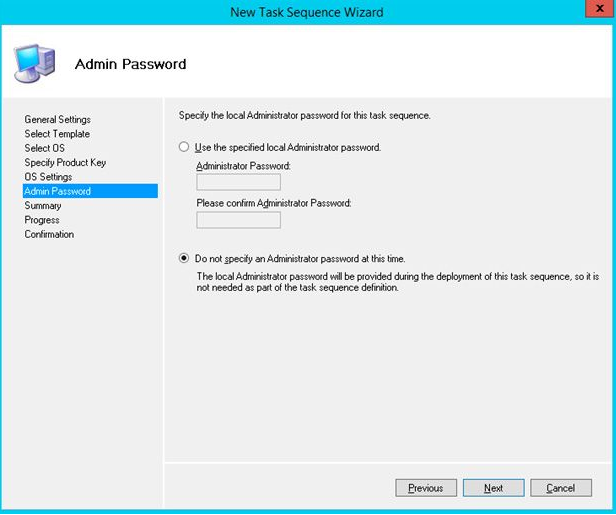
8- At this time, don’t specify an Administrator password.
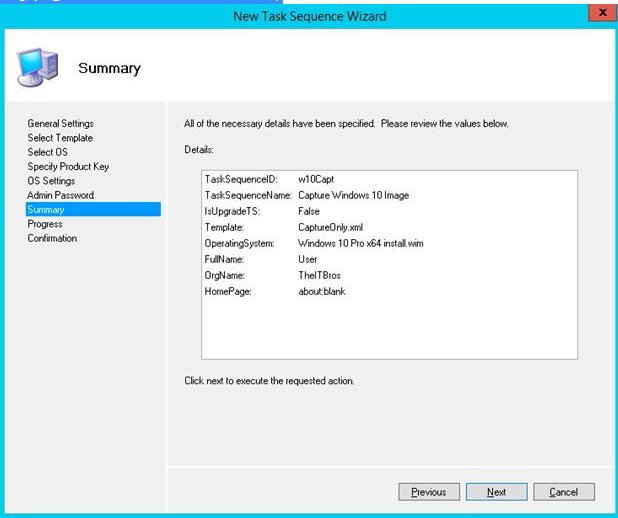
9- On Summary page click Next > Next > Finish;
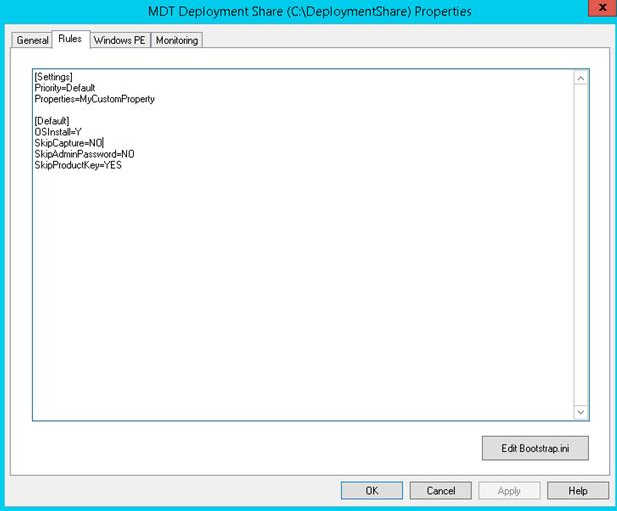
Hint: Check that the MDT server configuration allows you to capture the OS image before proceeding. To do so, go to the Rules tab in the MDT Deployment Share properties. The option SkipCapture must be set to NO.
To regenerate boot media with the WinPE environment, update the deployment share.
How to Use Microsoft Deployment Toolkit (MDT) to Capture a Windows 10 Reference Image
You’re now ready to capture a Windows 10 image that has already been installed on a client computer. Turn on the computer and start Windows 10 as usual. Check that all required applications, updates, and language packs are installed on Windows, that the Time Zone is set correctly, and that all other Windows settings are correct.
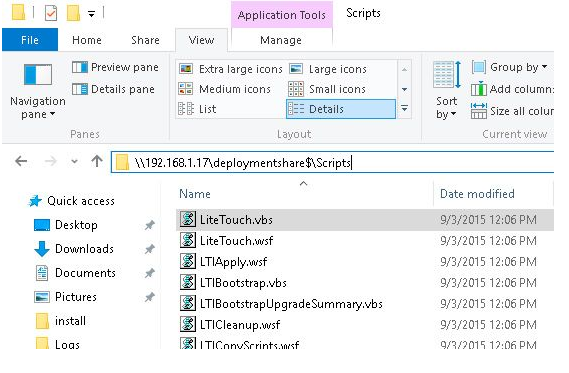
1- Open File Explorer and enter the network path to the MDT server’s DeploymentShare. The path looks like this in our case: 192.168.1.17deploymentshare$. To access a shared network folder on the MDT server, you may need to enter credentials.
2- Go to the Script folder and double-click the LiteTouch.vbs script file.
3- Wait for the Windows Deployment Wizard to start before proceeding.
4- From the task sequence list, choose Capture Windows 10 Image (which we created earlier);

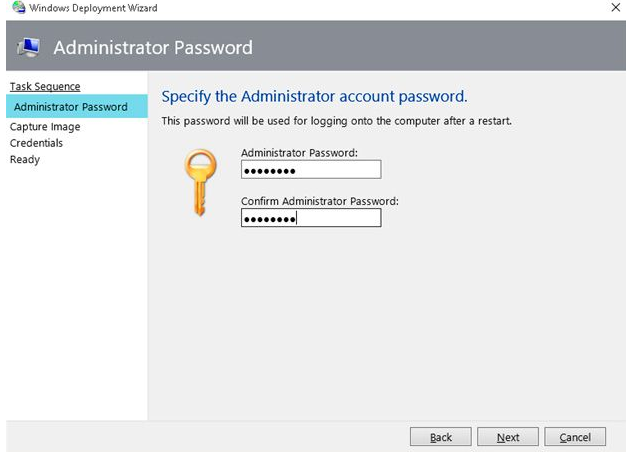
5- Type in the current local Administrator password, which will be used to log in to Windows after the reboot.
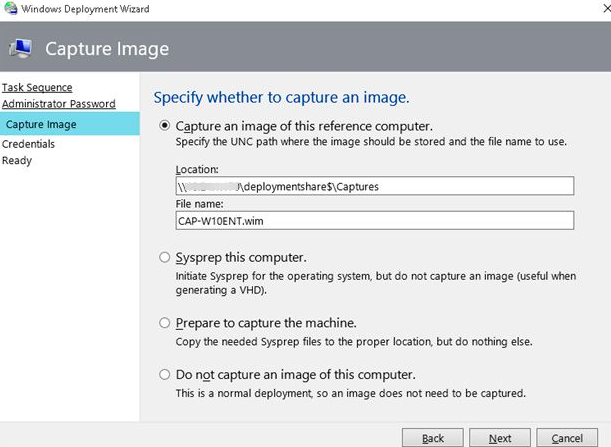
6- Choose Capture an image of this reference computer and double-check the UNC path to the MDT server folder where the Windows 10 WIM image file will be saved (in our case, 192.168.1.17deploymentshare$Captures). This folder should have read/write NTFS permissions. After that, type the name of the new.wim file;
7- To access a shared folder on the MDT server over the network, you must enter domain credentials on the next screen.
8- Begin Task Sequence after a wait
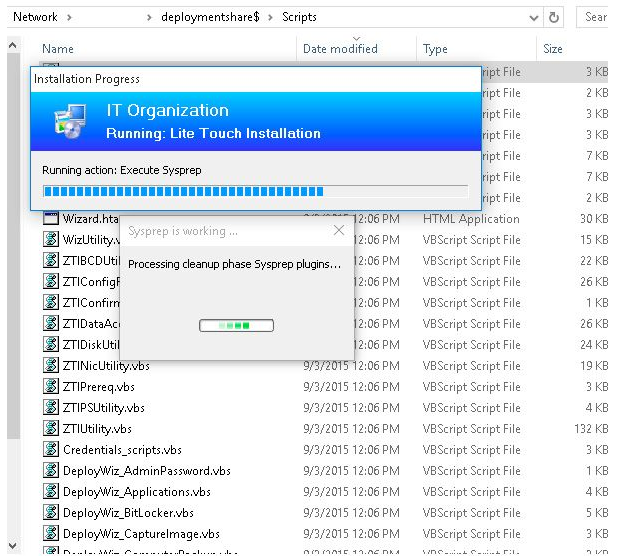
9- The Sysprep task begins after the preparations have been completed. The computer will then reboot into the WiNPE environment and begin capturing the system image (during the image creation process, the system will switch to the OOBE (Out-Of-Box Experience) sysprep mode, and the Windows 10 image will be captured with the DISM tool); Note. The LiteTouchPE x64.iso boot image (with WindowsPE environment) located in the Boot folder in the Deployment Shar on the WDS server will boot your Windows reference computer.
10 – The process of capturing a Windows 10 image takes a long time, and once completed, a wim file containing a Windows 10 image appears in the Captures folder on the deployment share.
Use the MDT parameter CopyProfile=TRUE if you want to make changes to the local administrator’s profile before capturing the reference image. When you deploy a Windows 10 image on the target computer, these changes will be transferred to the WIM system image and applied to the user’s profile. When configuring your reference Windows 10 device, the CopyProfile option allows you to make changes to the local administrator profile. During image capture, they are saved as a.wim file, which can then be applied to the default user profile on deployed machines. Otherwise, any changes made to the user’s profile, such as wallpaper, desktop icons, and Windows theme settings, will not be saved.
Later, you can use this WIM file to deploy Windows 10 to workstations using System Center Configuration Manager, Windows Deployment Services, or MDT. As a result, when installing drivers and applications on multiple computers, you save a lot of time.
In the Deployment Wizard, the Capture Image Window Task Sequence is not visible.
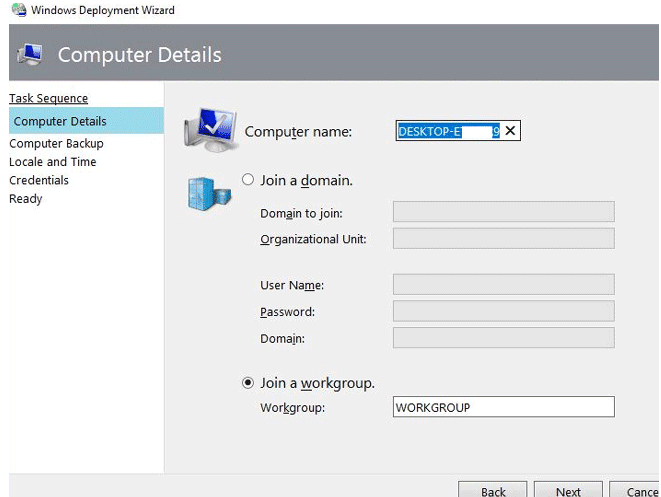
On some client computers, step 3 (Capture image) with the option to choose the start of image capture does not appear. The Windows Deployment Wizard simply skips the step where you must choose the option to “Capture an image of this reference computer.” Instead, the user is asked to provide computer information.
If this problem appeared after upgrading the MDT version, then most likely it is related to a bug that has been confirmed by Microsoft Premier support. The version of the script ZTIUtility.vbs contains an error. To fix it, you need to manually edit the ZTIUtility.vbs file, find the lines:
If (oTS.SelectSingleNode("//step[@type='BDD_InstallOS']") is nothing) and (oTS.SelectSingleNode("//step[@type='BDD_UpgradeOS']") is nothing) then
replace with:
If (oTS.SelectSingleNode("//step[@type='BDD_InstallOS' and @disable='false']") is nothing) and (oTS.SelectSingleNode("//step[@type='BDD_UpgradeOS' and @disable='false']") is nothing) then
Make sure the following option is selected in the customsettings.ini file:
[Default]

...

SkipCapture=NO
There’s also information that if the parameter is specified, the capture window will not appear:
SkipProductKey=NO
Change it to SkipProductKey=YES, or edit the DeployWiz_ProductKeyVista.vbs file. Replace the line of code:
if oProperties("DeploymentType") = "UPGRADE" then
Change to:
if Property("DeploymentType") = "UPGRADE" then
Then, on the client computer, repeat the Capture task sequence, making sure that the Capture Screen now appears in the Deployment Wizard.