In Windows Server 2012, data deduplication was introduced for the first time. The deduplication component in Windows Server 2016 is the third version, which has been considerably changed and improved. We’ll look at the new deduplication features, settings, and how they differ from earlier implementations in this article.
What’s New in Data Deduplication on Windows Server 2016
- The introduction of multi-threading is the first and most significant feature in Windows Server 2016 data deduplication. Deduplication in Windows Server 2012 R2 is single-threaded and can’t employ more than one CPU core on a single disc. This greatly limits speed, and the only way to get around it is to split the drives into multiple smaller volumes. The maximum size of the volume should not exceed 10TB.A redesigned engine on Windows Server 2016 can conduct deduplication jobs in multi-threaded mode, with each volume employing several computational threads and I/O queues. The introduction of multi-threading and other engine improvements had an impact on the file and volume size limits. In Windows Server 2016, you can utilise deduplication for a 64Tb volume since deduplication multithreading improves performance and avoids the requirement to divide a disc into numerous volumes. The maximum file size has also been increased, with file deduplication now supporting files up to 1TB.
- Virtualized backup apps are supported. There was just one form of deduplication in Windows Server 2012, and it was built primarily for file servers. Deduplication of a continually operating virtual machine is not possible since deduplication is unable to work with open files.Data deduplication in Windows Server 2012 R2 began to use VSS, and virtual machine deduplication began to be supported. There is a specific type of deduplication for such activities. Another sort of deduplication was implemented in Windows Server 2016, this time for virtualized backup servers (eg. DPM).
- Support for Nano Servers. Nano Server — this option allows you to install the Windows Server 2016 operating system with the fewest number of components possible. Deduplication is completely supported by Nano Server.
- Cluster OS Rolling Upgrade is supported. Cluster OS Rolling Upgrade is a new feature of Windows Server 2016 that allows you to upgrade the operating system on each cluster node from Server 2012 R2 to Server 2016 in a sequential manner without having to halt the cluster. This is made feasible by the cluster’s unique mixed-mode operation, which allows it to run both Windows Server 2012 R2 and Windows Server 2016.
Mixed mode deduplication means that the same data can be found at nodes with various deduplication versions. This option is supported by deduplication in Windows Server 2016 and enables access to deduplicated data during the cluster upgrading process.
How to Install and Enable the Windows 2016 Deduplication Feature
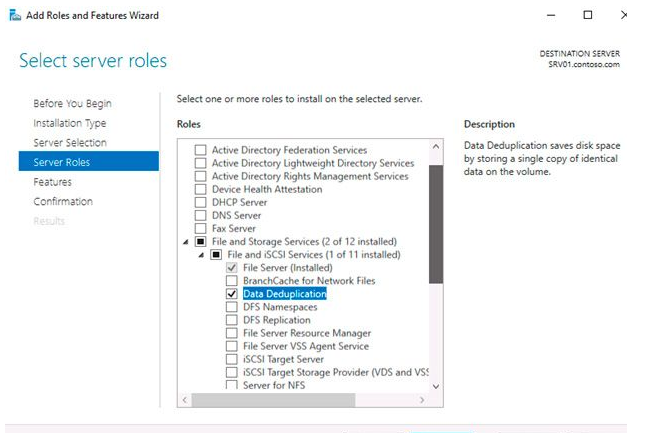
The first step in enabling deduplication is to install the necessary server role. You can use the programme “Server Manager.” Add the file server role with the component «Data Deduplication» to the Server Role wizard.
or use this command:
Install-WindowsFeature -Name FS-Data-Deduplication -IncludeAllSubfeature -IncludeManagementTools
Deduplication: How to Enable and Configure
You must enable deduplication for a specific volume after installing the components (or multiple volumes). This may be accomplished in two ways: using the graphics snap-in or with PowerShell.
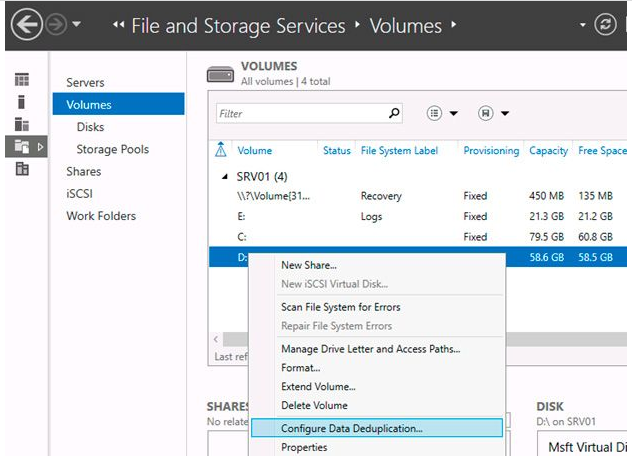
To use the GUI to setup the component, open the Server Manager, go to File and Storage Services -> Volumes, select the relevant volume, right-click, and select Configure Data Deduplication from the menu.
Then select the desired type of deduplication (General puprose file server, for example) and press Apply. Additionally, you can specify the types of files that should not be exposed to deduplication as well as to exclude certain directories.
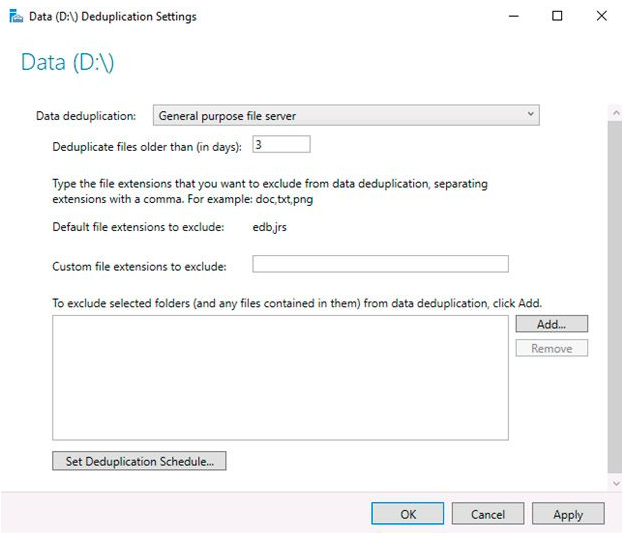
The next step is to create a schedule for the deduplication task to run on. Set the deduplication schedule by clicking the Set Deduplication Schedule button.
Background optimization is enabled by default, and you can define two extra throughput optimization jobs. There are simply a few options here – you can only choose a weekday, a start time, and a work duration.

PowerShell provides you with many options to customize the deduplication. To enable deduplication, use the following command:
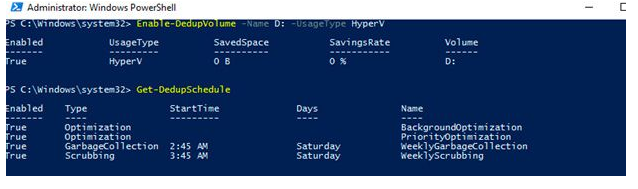
Enable-DedupVolume -Name D: -UsageType HyperV
List current deduplication jobs:
Get-DedupScheduleAs you can see, in the addition to the background task optimization, there are priority optimization job (PriorityOptimization), as well as jobs of garbage collection (GarbageCollection) and cleaning (Scrubbing). All these tasks can’t be seen from the GUI.
PowerShell allows you to fine-tune the parameters of the Dedup jobs. For example, create a new optimization task. The task should be started at 9 AM Monday through Friday and work for 11 hours, with normal priority, use no more than 20% of RAM and 20% CPU:
New-DedupSchedule -Name ThroughputOptimization -Type Optimization -Days @(1,2,3,4,5) -DurationHours 11 -Start (Get-Date ″12/8/2016 9:00 PM″) -Memory 20 -Cores 20 -Priority NormalAnd disable the priority optimization:
Set-DedupSchedule -Name PriorityOptimization -Enabled $falseManual Deduplication Run
If necessary, you can run deduplication job manually. For example, run a full optimization of the volume D with the highest priority:
Start-DedupJob -Volume D: -Type Optimization -Memory 75 -Cores 100 -Priority High -Full
Viewing the state of deduplication
The state of data deduplication for the volume can be seen with the following command:
Get-DedupVolume -Volume D: | flAs a result, you can see the volume’s essential parameters, such as the total volume size, used and saved space, compression level, and so on.

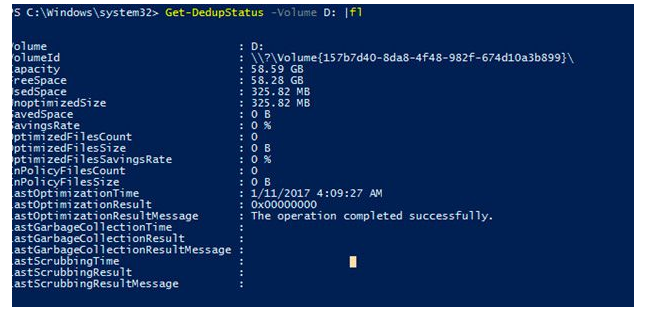
To check the status of deduplication job use the command:
Get-DedupStatus -Volume D: | fl
How to Disable Data Deduplication?
You can disable deduplication on a volume from GUI or by using PowerShell. For example:
Disable-DedupVolume -Name D:
When you turn off deduplication for a volume, all planned tasks are cancelled. It also prohibits any deduplication activities from running, with the exception of read-only operations (commands such as Get and unoptimization). The data can stay in the same state as before you disabled deduplication; simply disable deduplication for new files. Use the un-deduplication technique to restore the data to its original state. For example, to stop deduplication for Volume D at the fastest possible pace, use the following command:
Start-DedupJob -Volume D: -Type Unoptimization -Memory 100 -Cores 100 -Priority High -Full