The
great issue regarding Windows Admin Center
(WAC) you manage each Windows
Server doesn’t matter wherever it’s running. You’ll be able to manage Windows
Servers on-prem, in Azure or running at different cloud suppliers. Currently if you would like to use Windows
Admin Center to manage your virtual machines running in Azure, you’ll be able to use
either AN on-prem Wac installation or connecting
it employing a public scientific discipline address or
a VPN association; otherwise you will deploy and install Windows
Admin Center in Azure. This journal post can show you ways you’ll be able to deploy and install Windows Admin Center in an Azure virtual machine (VM).
How to deploy and install Windows Admin Center in an
Azure virtual machine (VM):
With this
guide, you’ll be able to directly
deploy and install a replacement Windows Admin
Center entranceway in
an Azure VM. If you have got already
a VM deployed, you’ll be able to conjointly follow this
guide to put in Windows
Admin Center manually. For the installation, we’ll use Azure Cloud Shell do run a PowerShell installation
script.
Preparation:
As
mentioned we’ll run
the installation script from Azure Cloud Shell. Optionally you’ll be able to conjointly install Azure
PowerShell on your location machine and run identical steps for the installation on your native machine.
- Set up Azure Cloud Shell if you haven’t done it however.
- Start the PowerShell expertise in Cloud Shell.
- Optional: If you would like to use your own
existing certificate, transfer the
certificate to Azure Key Vault.
Installation:
Now you’ll be able to begin with the installation method. First, you’ll got to transfer the installation script from the subsequent universal resource locator. Navigate to your home directory and transfer the file victimization PowerShell.
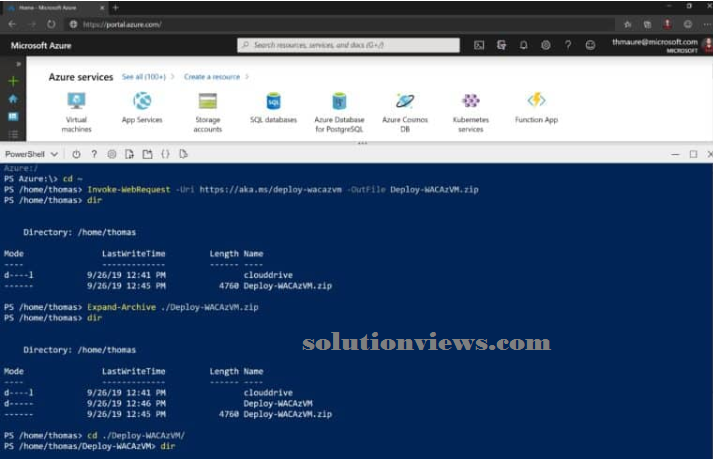
# Navigate to your home directory
cd ~
#
Download file
Invoke-WebRequest -Uri https://aka.ms/deploy-wacazvm -OutFile Deploy-WACAzVM.zip
#
Expand Zip file
Expand-Archive ./Deploy-WACAzVM.zip
#
Change Directory
cd Deploy-WACAzVM
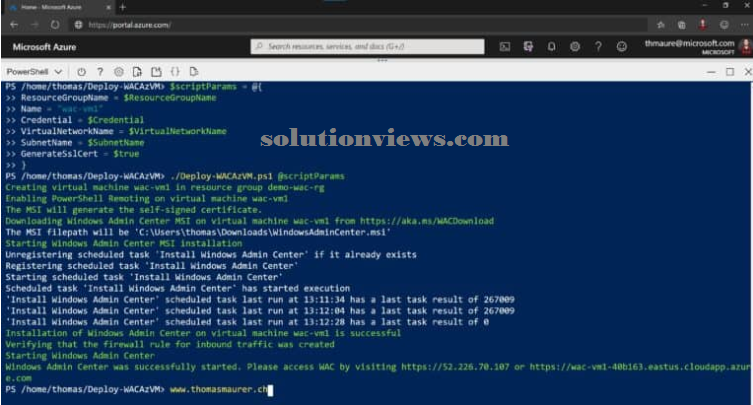
After with success downloading and unpacking the Windows Admin Center readying script, you’ll got to modify a few of parameters. i will be able to use the default parameters to deploy a replacement Windows Server 2019 and generate a self-signed certificate. However, if you would like to use different choices, cross-check the script parameter list.

$ResourceGroupName = "demo-wac-rg"
$VirtualNetworkName = "wac-vnet"
$SecurityGroupName = "wac-nsg"
$SubnetName = "wac-subnet"
$VaultName = "wac-key-vault"
$CertName = "wac-cert"
$Location = "westeurope"
$PublicIpAddressName = "wac-public-ip"
$Size = "Standard_D4s_v3"
$Image = "Win2019Datacenter"
$Credential = Get-Credential
$scriptParams = @{
ResourceGroupName = $ResourceGroupName
Name = "wac-vm1"
Credential = $Credential
VirtualNetworkName = $VirtualNetworkName
SubnetName = $SubnetName
Location = $Location
Size = $Size
Image = $Image
GenerateSslCert = $true
}
./Deploy-WACAzVM.ps1 @scriptParams
This will deploy a replacement Azure virtual machine with Windows Admin Center put in and open the particular port 443 on the general public scientific discipline address. You’ll be able to realize additional install choices ANd parameters to put in Wac on AN existing virtual machine or with an existing certificate on Microsoft Docs.
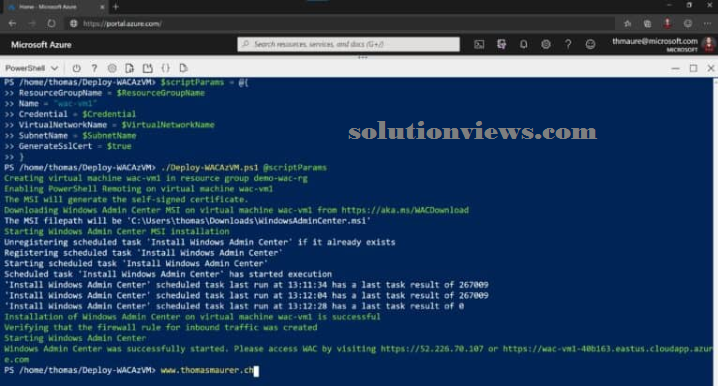
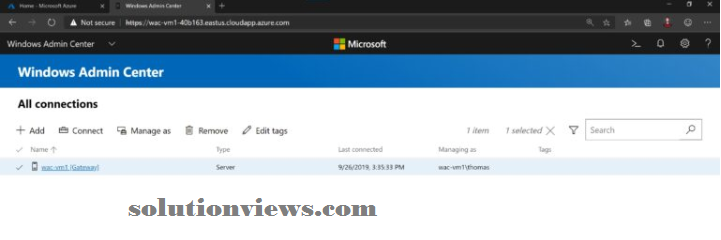
After the readying has finished, merely click on the universal resource locator or scientific discipline address and it’ll open the Windows Admin Center portal.
I hope this offers you an outline regarding however you’ll be able to deploy Windows Admin Center in AN Azure VM. If you have got any queries, please let Pine Tree State recognize within the comments.