An administrator or a user attempts to add a new Windows workstation to the domain. To do so, go to the workstation’s System Properties and select Change settings > Change. Enter a new computer name and choose whether or not this machine belongs to a certain domain. Enter the FQDN of your AD domain. You may see the following error after hitting the OK button:
It was not possible to contact an Active Directory Domain Controller (AD DC) for the domain “solutionviewscom.”
Check to see that the domain name is spelled correctly.
Click Details for troubleshooting information if the name is correct.

Click the Details button for more information about the error. In most cases, there you will see an error “DNS name does not exist” (error codes 0x0000232B RCODE_NAME_ERROR and 0x0000267C DNS_ERROR_NO_DNS_SERVER).
Check if the IP Settings on Your Computer Are Correct
This issue is most commonly caused by incorrect IP or DNS settings on your machine, DNS misconfiguration on the domain controller side, or firewall port blocking.
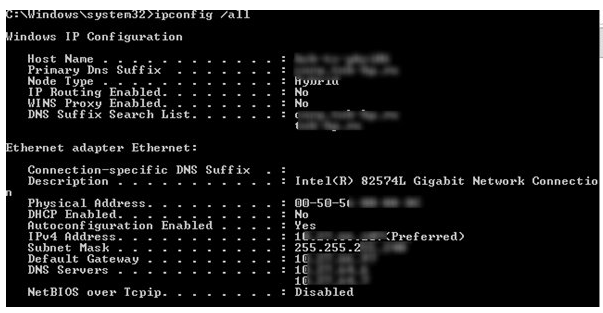
First, make sure your computer’s principal network interface has the right IP address. The IP address can be explicitly supplied in the network adapter settings or received from a DHCP server. The command: can be used to get the computer’s current network settings:
ipconfig /all
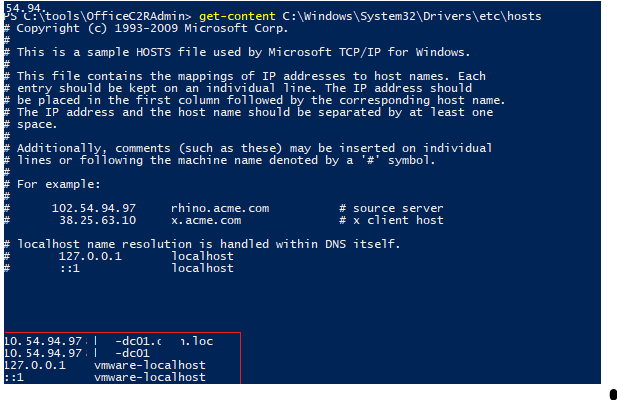
Open the hosts file (C:\Windows\System32\Drivers\etc\hosts) on the computer using notepad.exe or another text editor, and make sure there are no entries for your domain or domain controller name. If such entries exist, delete them.
You can display the contents of the hosts file with the command:
get-content C:\Windows\System32\Drivers\etc\hosts
Then clear the DNS cache, and restart the service from the elevated command prompt:
ipconfig /flushdns

net stop dnscache && net start dnscache
Next, check if the domain controller is accessible from the client. Open a command prompt, and run the following commands:
ping your_domain_name.comAnd:
tracert your_domain_name.comMake sure your domain controller is responding and reachable.
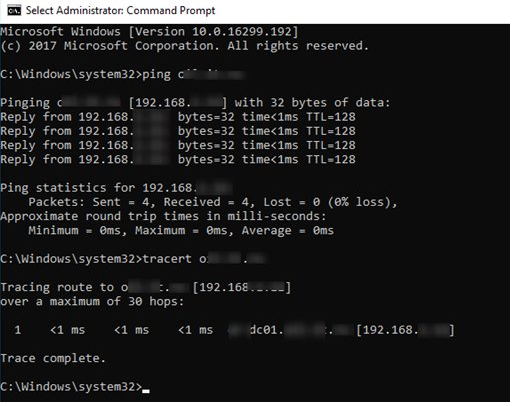
It’s also a good idea to check the domain controller’s availability from other workstations on the same IP network.
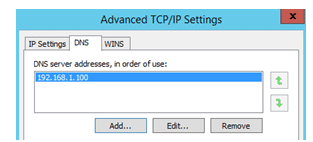
If the DC is reachable, try adding the received IP address as a DNS server in your network connection’s Advanced TCP/IP settings.

- Change adapter settings by going to Control Panel > Network and Internet > Network and Sharing Center.
2. Right-click on the network adapter that is linked to your corporate network and select Properties;
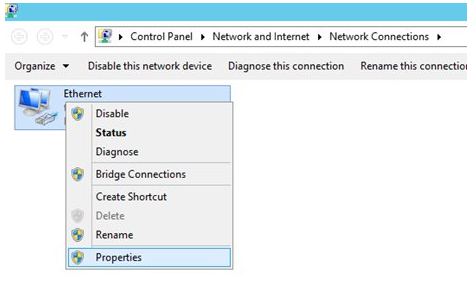
3.Click Properties on Internet Protocol Version 4 (TCP/IPv4);
- Go to the DNS tab by pressing the Advanced button;
- Click Add on the DNS tab and type in the IP address of your DNS server (domain controller)
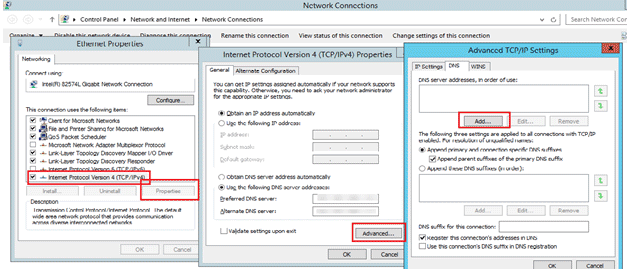
6.Click OK (if the DNS server list contains many IP addresses, place your DC’s IP address to the top of the list);
- Save your modifications and restart your computer.
- Join your workstation to the Active Directory domain.
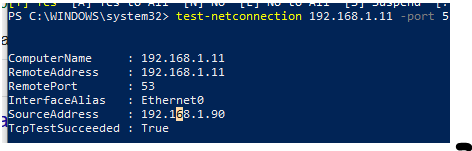
Check to see if firewalls are blocking access to the DNS service on the domain controller. PowerShell is the simplest approach to check if port 53 is available on a DC:
test-netconnection 192.168.1.11 -port 53In our example, TcpTestSucceeded: True means that the DNS service on the DC is accessible.
Also, check if your computer can resolve the domain name to the correct IP address of the domain controller. Use the Resolve-DNSName cmdlet with the FQDN of your domain to which you are trying to join your workstation:
Resolve-DNSName solutionviews.com

One or more DNS server entries should be returned by the command.
Additionally, ensure that the computer can communicate with the DNS server that hosts the DNS zone or resolve DNS names in that domain. Ascertain that the correct DNS server is configured on this client and that the client is connected to it. Confirm that you can find a domain and connect to the domain controller using the command:
nltest /dsgetdc:solutionviews.com
if your computer successfully discovered the domain and domain controller, the command should return information about the domain, AD site, and services running on the DC:
DC: \\DC01.solutionviews.com
Address: \\192.168.1.15
Dom Guid: 4216f343-2949-21c3-8caa-6d7cbcdb1690
Dom Name: solutionviews.com
Forest Name: solutionviews.com
Dc Site Name: NY
Our Site Name: NY
Flags: PDC GC DS LDAP KDC TIMESERV GTIMESERV WRITABLE DNS_DC DNS_DOMAIN DNS_FOREST CLOSE_SITE FULL_SECRET WS
The command completed successfully
Hint. “The RPC Server is Unavailable” is another useful tutorial for troubleshooting DC connectivity over RPC.
The Netsetup.log file may include useful information regarding issues encountered when joining a PC to an Active Directory domain. This log can be found in the percent windir% debugNetsetup.log directory. Examine the errors in the Netsetup.log file carefully; they may assist you in identifying the cause of the inability to connect to the Active Directory domain.
Also, consider temporarily disabling the built-in Windows Firewall, as well as any third-party antivirus/firewalls modules (Symantec, MacAfee, Windows Defender, and so on) that may block network ports used to connect to the domain controller. Attempt to join the computer to the domain after disarming the firewalls.
Check the Replication and DNS SRV Records on the Domain Controller
If the above method didn’t help, check if in the DNS zone of your domain controller there is an SRV record of the location of the DC.
Open an elevated Command prompt, and run the following commands:
nslookup

set type=all

_ldap._tcp.dc.msdcs.your_domain_name.com
Verify that the specified DNS server has an SRV record in the following form:
_ldap._tcp.dc._msdcs.your_domain_name.com SRV service location:
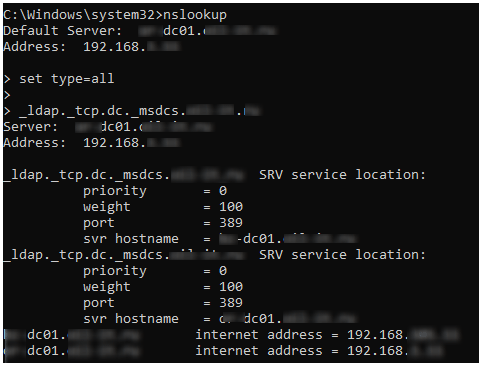
If the required SRV record is absent, your computer is set to use a DNS server that doesn’t have a valid SRV record for the domain controller’s location.
Check if the domain controller is configured to use the same DNS server as the client, or if the replication on the client’s DNS server is working (use the repadmin tool to check replication status). Make that the DNS server supports dynamic updates as well.
“net stop netlogon && net start netlogon” will restart the Netlogon service on the domain controller (or simply try to reboot the DC). It will attempt to register the necessary SRV records on the DNS server upon initialization.
Also, you can re-register domain controller DNS records using the command:
ipconfig /registerdnsWait for a while for the records to appear in DNS and replicate across the domain.
It is also recommended to verify that the SYSVOL and NETLOGON network shared folder is created and accessible on the domain controller (run the net share command on the closest DC).
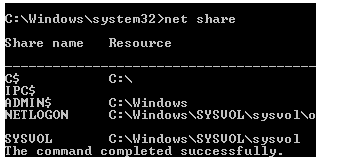
If the SYSVOL and NETLOGON directories are missing in the shares list:
- Check the IP and DNS settings on your DC (the domain controller shouldn’t receive an IP address from a DHCP server, use only a static IP address);
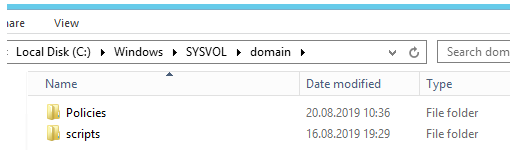
- Verify that the C:\Windows\SYSVOL domain directory contains Policies and Scripts folders;
3. To replicate Sysvol from the PDC to all DCs in the domain, you must halt the File Replication Service if you did not move Sysvol replication from FRS to DFS (net stop NtFrs). Then open regedit and navigate to the HKEY LOCAL MACHINESYSTEMCurrentControlSetServicesNtFrsParameters registry key. Change the value of the BurFlags DWORD parameter to D4 (hex) on the PDC and D2 (hex) on all additional domain controllers in Backup/RestoreProcess at Startup. After that, run net start NtFrs to start the service. Also, see if the DCName SYSVOL directory is visible and accessible on the problematic DC.
Accessing Legacy Domain Controllers Using the SMB v1 Protocol
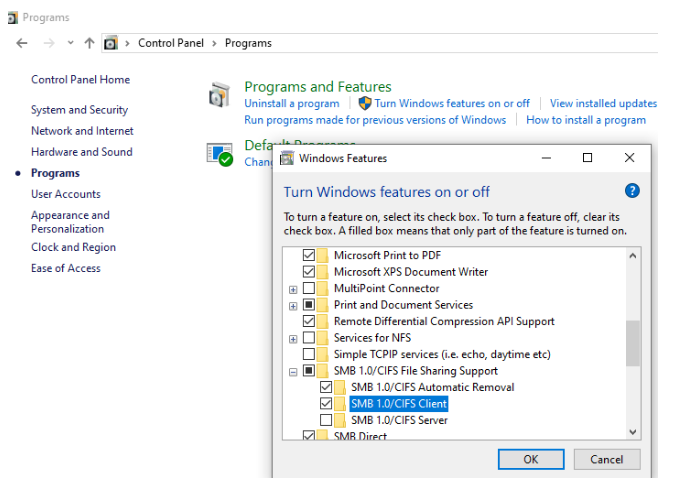
If you use domain controllers with Windows Server 2008 (or older), and you are trying to join Windows 10 1803 (or newer) to the domain or Windows Server 2019, you must enable SMBv1 protocol support on the client-side (this protocol is disabled by default in the newer Windows OS). The client SMB1Protocol-Client allows your computer to access legacy servers.
To enable SMBv1 support in Windows 10, go to Control Panel > Programs > Turn Windows features on or off. Expand the node SMB 1.0/CIFS File Sharing Support, enable the SMB 1.0/CIFS Client option, and save the changes.
You can check SMB 1.0/CIFS Client protocol status on your Windows 10 computer using the PowerShell command:
Get-WindowsOptionalFeature -Online -FeatureName "SMB1Protocol-Client"

If the SMB1Client protocol status is Disabled, you can enable it using:
Enable-WindowsOptionalFeature -Online -FeatureName SMB1Protocol-ClientOn Windows 7/Vista clients you can detect the SMBv1 protocol state using the command:
sc.exe qc lanmanworkstationIf you need to enable SMB v1 Client on Windows 7/Windows Server 2008 R2, run:
sc.exe config lanmanworkstation depend= bowser/mrxsmb10/mrxsmb20/nsi

sc.exe config mrxsmb10 start= auto