Converting with Microsoft Virtual Machine device:
Let’s contemplate changing of a VMware-based VM to a Hyper-V VM exploitation MVMC, as within the following example. The input parameters ar as follows: a VM (version 7) is running on ESXi vi.5. The VM has one essential disk, with no snaps. VMware Tools suite isn’t put in.
First, transfer the device from the Microsoft’s web site. The present version of MVMC is version three.1. There are 2 files accessible for transfer – Associate in nursing workable installer .miss file and a .doc file with an outline of the Windows PowerShell cmdlets that get put in on your system at the side of the device. The installation method is straightforward: run the installer, settle for the license agreement, choose the installation directory, and click on Install within the setup wizard.
Once the installation method is complete, run the device. Click begin > Microsoft Virtual Machine device to run the device. On the before you start screen, you’ll be able to browse a brief description; tick the don’t show this page once more checkbox if you don’t need to envision this screen when you run the device. Click Next to proceed.
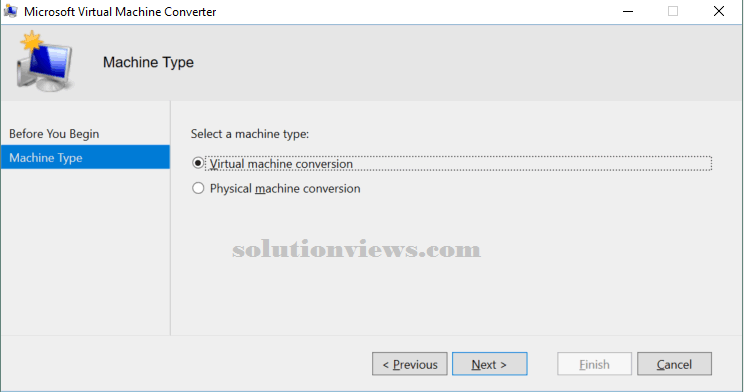
Machine kind. Choose the sort of the supply machine to be born-again. During this case, choose Virtual machine conversion. Click Next.
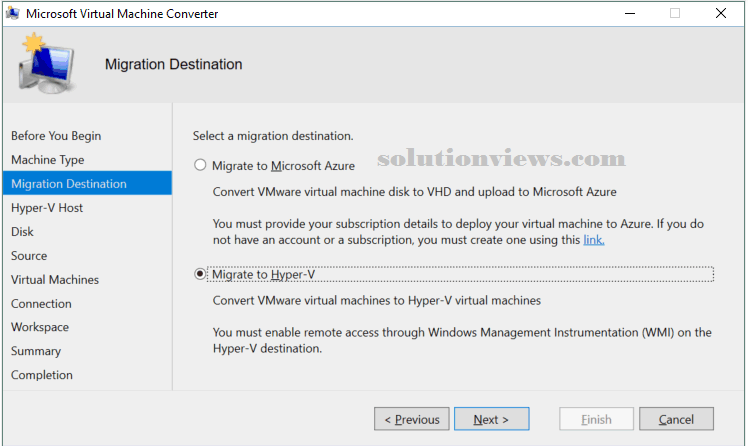
Select a migration destination. There ar 2 choices accessible at this stage: migration to Microsoft Azure cloud and migration to Hyper-V. This diary post covers conversion of a VMware VM to a Hyper-V VM, therefore the Migrate to Hyper-V choice ought to be hand-picked during this case. Click Next.
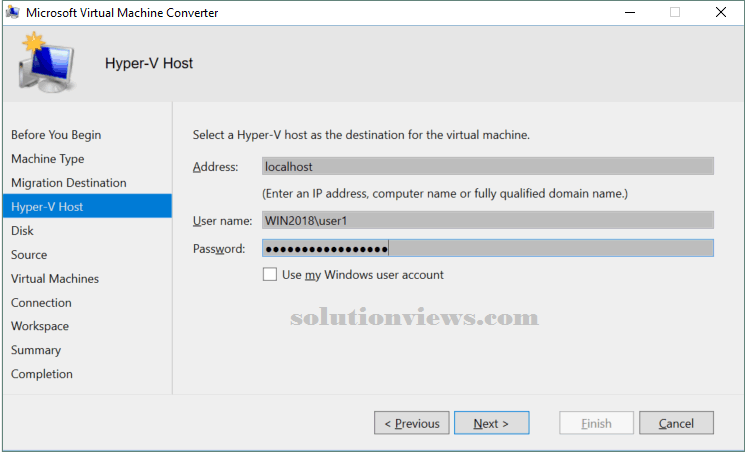
Select a destination Hyper-V host. During this example, the Hyper-V server is running on {a local |an are |a neighborhood} host (the device and also the Hyper-V server are put in on constant machine). MVMC may save a born-again VM to Associate in nursing off-site destination host over the network. Certify that your firewalls are designed consequently if your device and Hyper-V host are running on completely different machines. Remote access through Windows Management Instrumentation should be enabled. Choose the name or scientific discipline address of your destination host, choose the credentials of a user WHO has decent access privilege to attach to a Hyper-V host (the native administrator of the destination Hyper-V host and also the domain administrator have such access privilege). Then click Next to proceed.
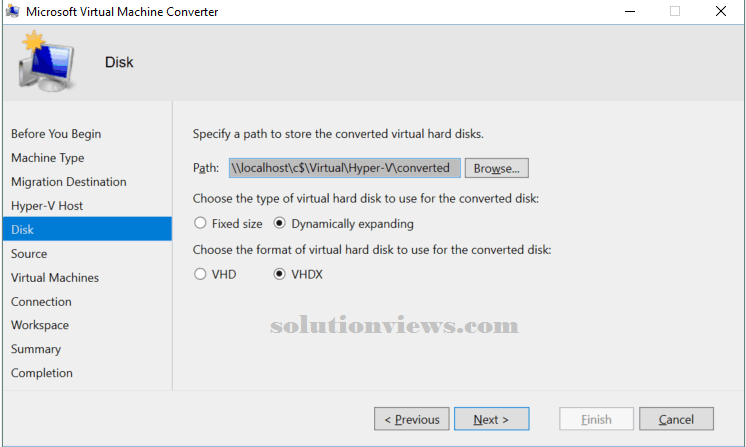
Set the disk choices. Specify a network path to store the born-again virtual exhausting disks. For the aim of this walkthrough, the VM is being born-again and transferred to a Hyper-V server put in on constant machine that’s running the device. Thus, the subsequent network path is applied:
\\localhost\c$\Virtual\Hyper-V\converted
It is suggested to avoid exploitation the system disk (usually C:) for storing VMs in production environments. as an case in point, if your Hyper-V host could be a remote device, your selected path would perhaps look like: \\10.10.10.12\d$\Virtual\Hyper-V
Choose the sort of virtual disk to be used when conversion. The virtual disk may be of 2 types: a set size disk (the analog of a thick-provisioned disk) or a dynamically increasing disk (the analog of a thin-provisioned disk). During this walkthrough, a dynamically increasing disk is chosen for the aim of saving cupboard space.
Choose the format of the virtual exhausting disk: .vhdx could be a newer and a lot of progressive file format that’s utilized by each Gen1 and Gen2 VMs. vhdx is chosen for the needs of this walkthrough. Click Next to continue.
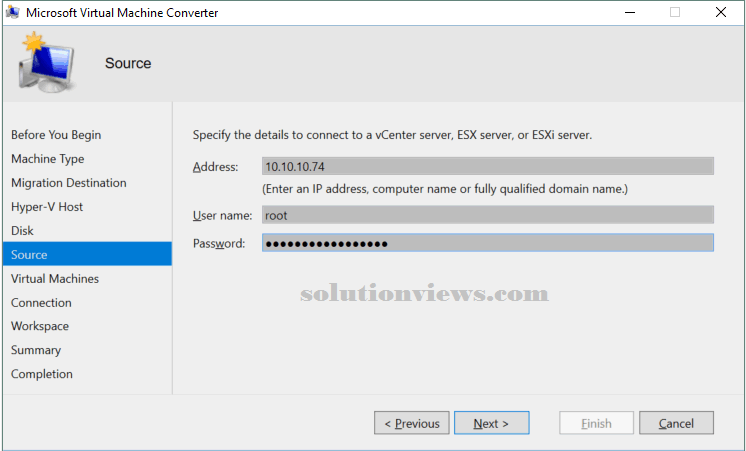
Specify the supply details for affiliation to a vCenter server or ESXi server. During this example, a VM running on Associate in Nursing ESXi server should be born-again. Hence, the scientific discipline address, login, and positive identification for the ESXi server ought to be entered at this step. Click Next to proceed.
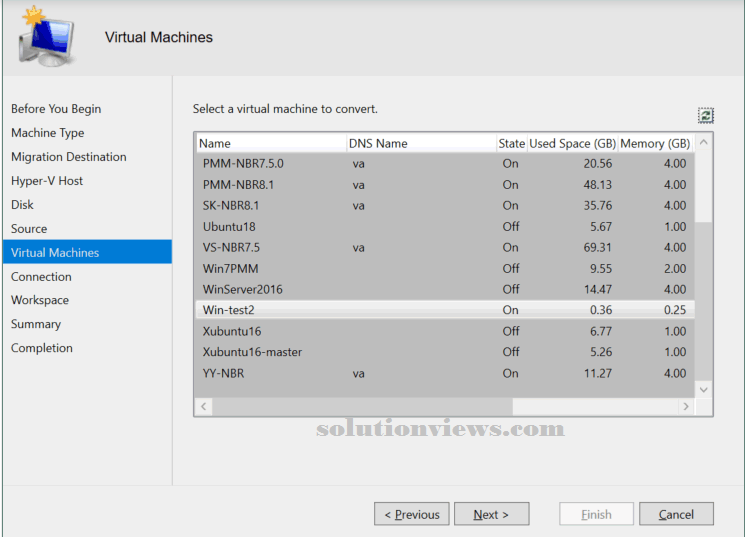
Now, choose the virtual machine for conversion from the ESXi server you’ve got chosen. Within the current example, a light-weight Windows VM running on Associate in Nursing ESXi host is being born-again. When choosing the VM, click next.
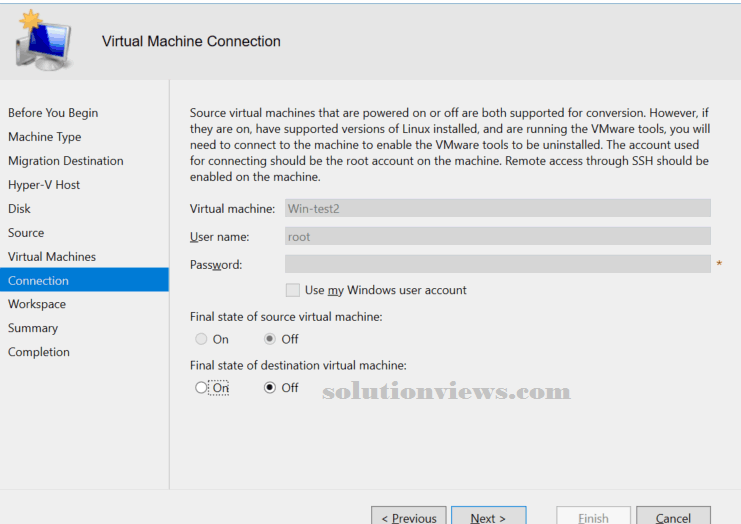
Virtual machine affiliation. If VMware Tools are put in on a UNIX operating system virtual machine, you need to give the username and positive identification of the basis account on the supply VM to change the device to uninstall VMware Tools. During this example, a Windows machine while not VMware Tools is employed – thence, these fields are inactive. Outline the ultimate state of the supply machine and also the final state of the destination machine (On or off). Click Next.
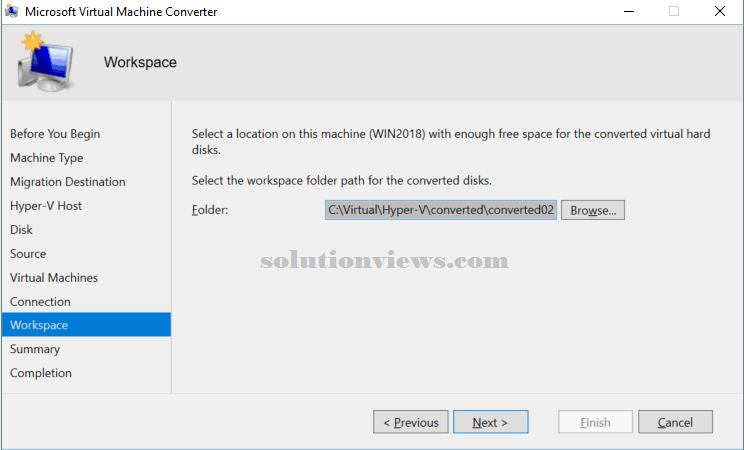
Define the space. The space could be a temporary folder that’s wont to store temporary files throughout the conversion method. For higher performance, this folder ought to be placed on the machine wherever the device is put in. Enter the trail or click the Browse button and choose the suitable folder. Then click next.
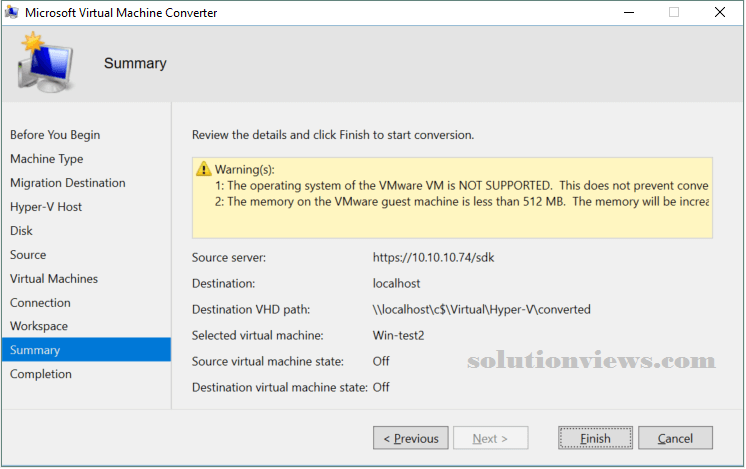
Check the outline. Review the configuration details you’ve got nominal. If the warnings don’t seem to be crucial, you’ll be able to proceed; these don’t stop conversion. Click end to begin the virtual machine conversion method.
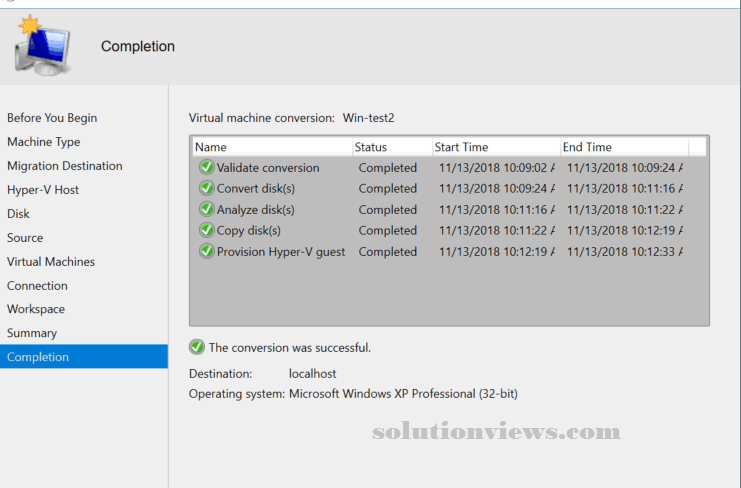
Wait for the VM conversion to finish. The method may be long, looking on the scale of the virtual disks of the supply VM further as network speed. If conversion is roaring, click on the point of exit the virtual machine device.
You can currently edit the VM settings. Right-click the VM and choose Settings from the context menu. The VM is keeping within the directory you nominal earlier. Take away the network adapter and add a heritage network adapter for older guest in operation systems to change networking. Then choose the suitable virtual switch or produce a brand new one for VM affiliation to the network.
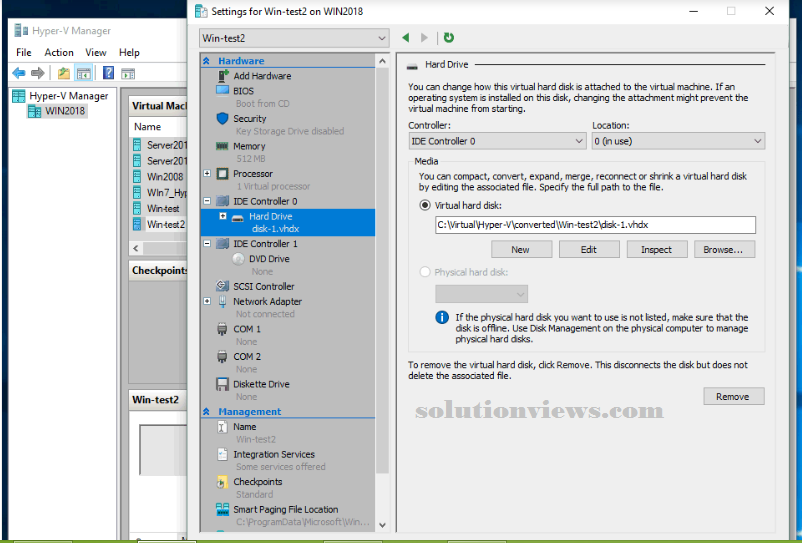
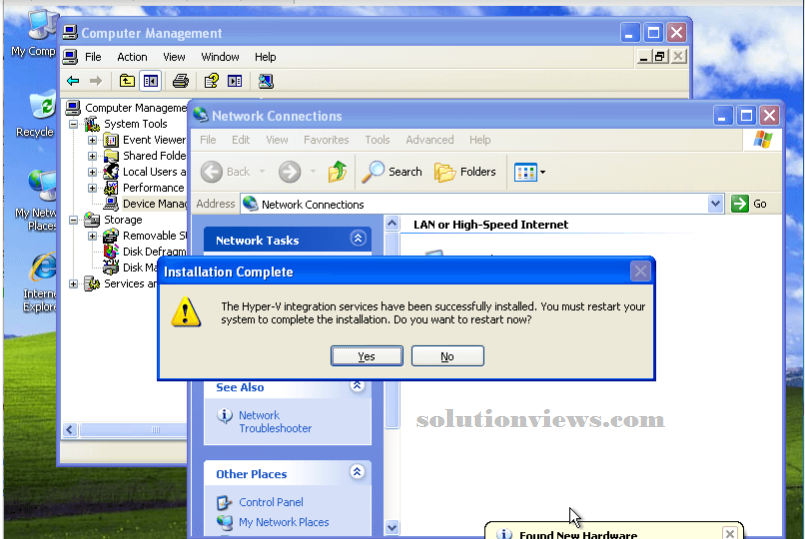
After configuring the VM settings, begin the VM and tack the guest OS. Wait till the OS acknowledges new virtual devices. Don’t forget to put in Hyper-V Integration Services for higher performance and user expertise. For manual installation of Integration Services, insert the vmguest.iso image within the virtual DVD drive of the VM and run the installer. Once installation is complete, boot the VM and eject the virtual ISO disc.
Converting VMDK to VHD exploitation PowerShell:
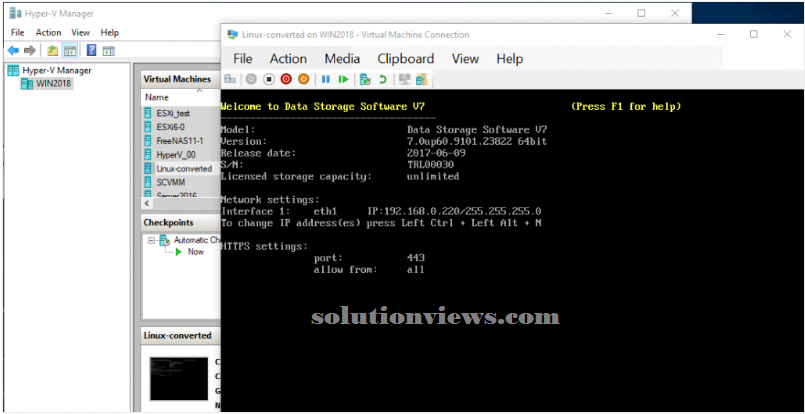
In the previous example, changing a VM running on Associate in Nursing ESXi host was explained and also the Microsoft Virtual Machine device graphical user interface was used. Let’s currently contemplate a distinct use case for VM conversion. If you’ve got solely VMware VM virtual disks, or if you’ve got a VM for VMware digital computer (not for ESXi), the MVMC and its graphical user interface cannot be used. Recall that after you install the MVMC, some helpful PowerShell cmdlets are provided. Within the next examples, you’ll be capable to find out how to transform a VMDK virtual disk to Hyper-V format disk exploitation the statement interface (CLI) and the way to run VM exploitation that virtual disk on Hyper-V.
Converting VMware digital computer based mostly Virtual Disks:
Add the device module to the present PowerShell session. The module is found within the directory wherever Microsoft Virtual Machine device is put in. within the current example, the default location is employed for the device. kind the subsequent command in PowerShell:
Import-Module “C:\Program Files\Microsoft Virtual Machine Converter\MvmcCmdlet.psd1”
If your device is put in in another directory, kind the trail of your directory rather than C:\Program Files\Microsoft Virtual Machine Converter\

Go to the index of your VM and list the records of that directory. Within the current example the VM is found in C:\virtual\StorageLinux
cd C:\virtual\StorageLinux
dir.
You can see the VM files here. Create a note of the name of the VMDK file, because it is required for more operations. Within the current example, a UNIX operating system virtual machine with one virtual disk is employed. Significantly, the VM has no snapshots and VMware Tools isn’t put in (see the screenshot below).

ConvertTo-MvmcVirtualHardDisk -SourceLiteralPath “C:\Virtual\StorageLinux\StorageLinux three’s kernel 64-bit.vmdk” -DestinationLiteralPath “C:\Virtual\Hyper-V\converted\01” -VhdType DynamicHardDisk -VhdFormat Vhd
Where:
-SourceLiteralPath is that the path to a VMware virtual disk that ought to be born-again.
-DestinationLiteralPath is that the path to a directory wherever the virtual disk of the Hyper-V format ought to be saved.
-VhdType defines the sort of the virtual disk – either dynamically increasing or mounted.
-VhdFormat defines the format of the Hyper-V virtual disk (VHD or VHDX).
Wait till the conversion method is finished. A progress bar indicates the present state.
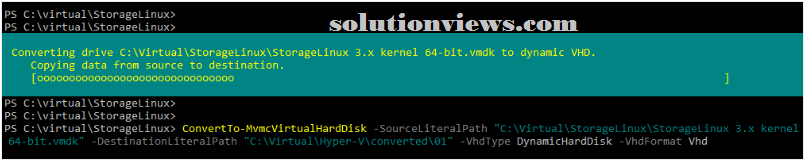
When the virtual disk is with success born-again from VMDK to VHD, the subsequent ought to be displayed on the screen:

Create a brand new VM and use the VHD disk created from the conversion. For this half, check with the diary post that explains the way to produce a brand new virtual machine in Hyper-V. The key purpose is to attach the virtual disk. At the suitable stage of the New Virtual Machine Wizard, choose Use Associate in Nursing existing virtual disk and specify the situation of your fresh created VHD file.
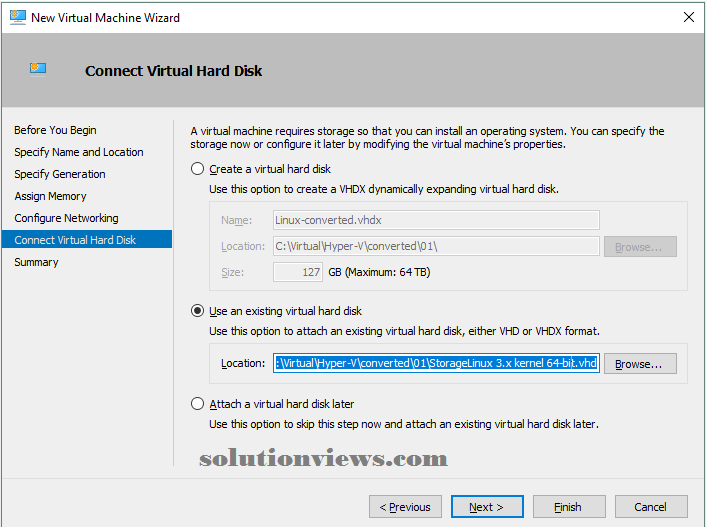
After finishing configuring a VM, run the virtual machine on your Hyper-V host.
You can conjointly use this methodology for changing VMs with multiple virtual disks. Every virtual disk should be connected to the VM when conversion during this case.
Converting Virtual Disks of VMware ESXi Format
First, you wish to repeat virtual disk files from the ESXi host’s data store to the machine with Microsoft Virtual Machine device put in. during this case, one VMware virtual disk consists of 2 files – diskname.vmdk and disk name-flat.vmdk. A vmdk file could be a descriptor that contains data regarding the virtual disk configuration and points to a -flat.vmdk file. The virtual disk information itself is kept within the -flat.vmdk file. The scale of a vmdk file could be a few kilobytes, whereas the scale of -flat.vmdk file is far larger. You’ll be able to copy VMware virtual disk files from Associate in Nursing ESXi host exploitation the VMware vSphere shopper or any SCP (secure copy protocol) shopper.
Copying files exploitation VMware vSphere shopper:
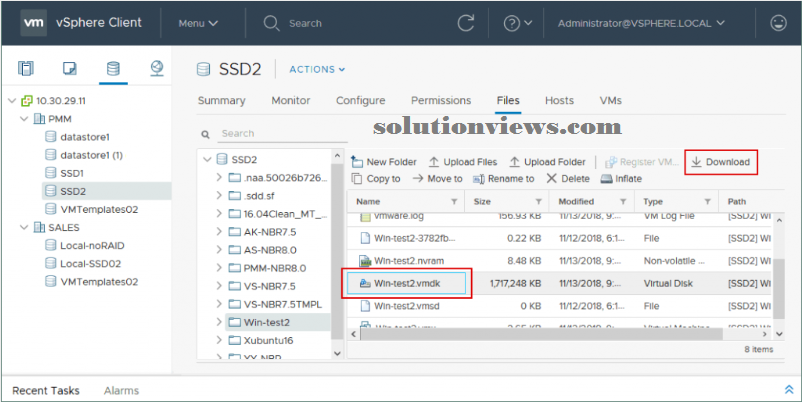
This methodology may be used if you manage your ESXi hosts with vCenter Server. Log into your vCenter with the vSphere shopper (enter the scientific discipline address of your vCenter Server within the address bar of your internet browser). Head to the Storage tab, choose the data store with the files of your VM, choose the VM directory, and choose the virtual disk that ought to be born-again. Once you’ve got hand-picked the disk, click transfer and save a zipper archive with the vmdk and -flat.vmdk files to the machine with MVMC put in. listen to the scale of the virtual computer file. The VM utilized in this instance (Win-test2 that was born-again earlier with MVMC through the GUI) has Associate in Nursing 8GB thin-provisioned virtual disk that consumes regarding one.64 GB on the VMFS data store. (You will browse a lot of regarding thick and skinny provisioning in an exceedingly separate diary post.)
Note: you’ll be able to see only 1 VMDK get into the online interface of the VMware vSphere shopper and also the VMware Host shopper. Don’t be alarmed; there are 2 files (vmdk and -flat.vmdk) on the data store. you’ll be able to ensure that each of those files are gift on the data store if you log into your ESXi host exploitation the SSH shopper and list the files within the directory of your VM on the data store.
Once the nothing archive is downloaded, extract the virtual disk files.

After extracting the files, you’ll be able to see that the -flat.vmdk virtual computer file consumes eight GB of space (the most provisioned size of the present virtual disk), and not 1.64 GB. Later, you’ll be able to convert this virtual disk to the dynamically increasing virtual disk for Hyper-V.

Copying files exploitation WinSCP shopper:
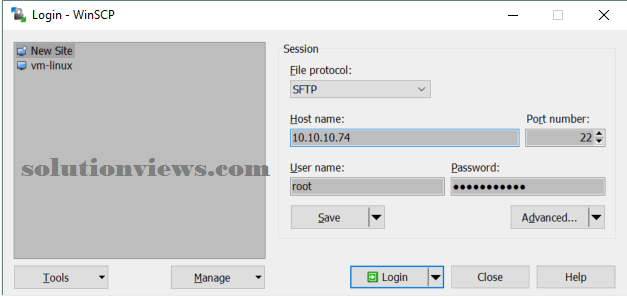
WinSCP could be a free application that uses SCP, SFTP (SSH Secure Shell File Transfer Protocol), FTP, and WebDAV protocols for information transfer. SFTP is most well-liked, if potential. You’ll be able to transfer WinSCP from the official electronic computer.
Run WinSCP and log into your ESXi server by coming into the scientific discipline address, port variety, and root credentials.
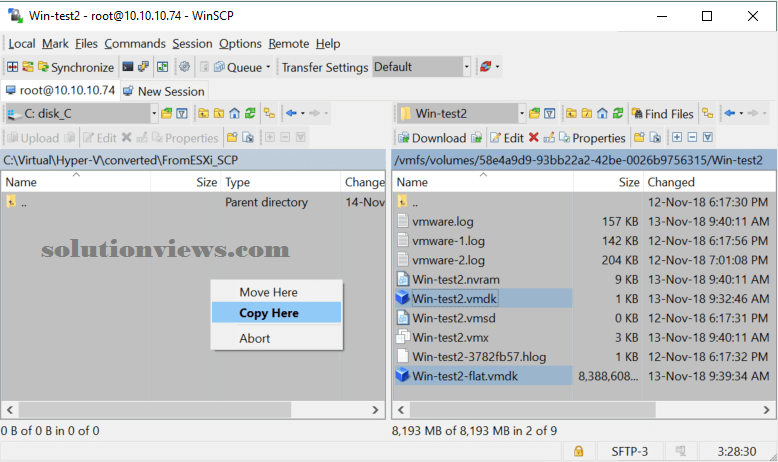
WinSCP has Associate in Nursing intuitive graphical user interface with 2 main panels wherever you’ll be able to access files and directories. Within the left panel, navigate to the directory wherever your VMDK files are keep before conversion. within the right panel, head to the VM directory on your ESXi data store. Within the current example, the trail to it directory is /vmfs/volumes/SSD2/Win-test2. Choose the 2 virtual disk files required (vmdk and -flat.vmdk) and replica them to your native directory. Merely drag and drop the files.
Converting a VMDK virtual disk traced from ESXi:
The VMware virtual disk files traced from ESXi are currently placed on the Windows machine with Microsoft Virtual Machine device. Changing the virtual disks of Associate in Nursing ESXi VM is comparable to changing the virtual disks of a VMware digital computer VM. The most distinction is that you simply currently have 2 files (vmdk and -flat.vmdk) instead of one file.
Open PowerShell and certify that the suitable device module is foreign. If it isn’t, kind the subsequent command:
Import-Module “C:\Program Files\Microsoft Virtual Machine Converter\MvmcCmdlet.psd1”
Now enter the subsequent command to convert a virtual disk.
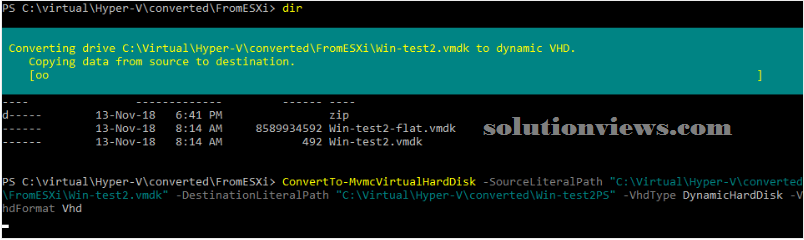
ConvertTo-MvmcVirtualHardDisk -SourceLiteralPath “C:\Virtual\Hyper-V\converted\FromESXi\Win-test2.vmdk” -DestinationLiteralPath “C:\Virtual\Hyper-V\converted\Win-test2PS” -VhdType DynamicHardDisk -VhdFormat Vhd
Define the trail to the vmdk file (not to a -flat.vmdk file) for the -SourceLiteralPath argument.
When the conversion method is with success completed, produce a brand new Hyper-V VM and use the present virtual disk choice to attach the VHD virtual disk that’s prepared when conversion (as explained on top of during this article). you’ll be able to then edit VM configuration and run the virtual machine.
Issues which will Occur:
There are numerous errors that might stop the conversion method from operating. Let’s contemplate what problems will occur and the way to resolve them.
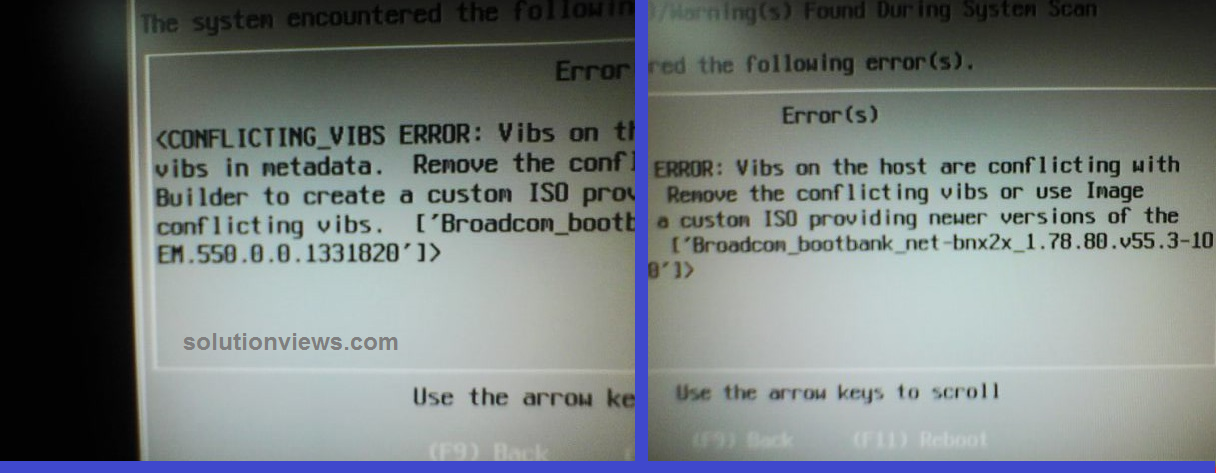
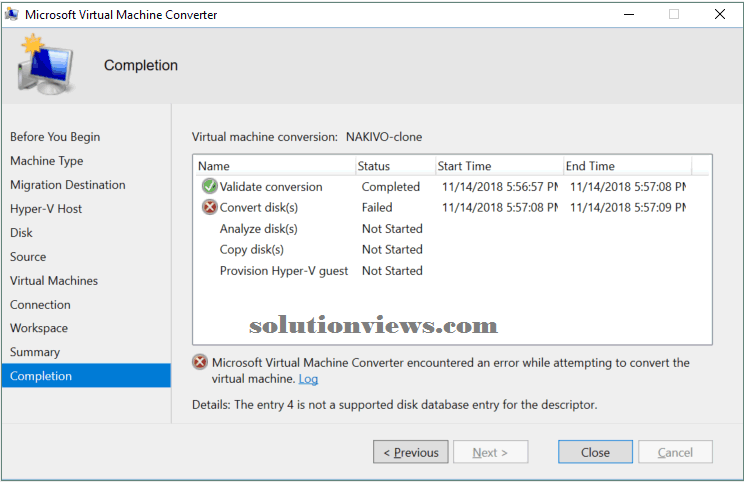
The entry one isn’t a supported disk info entry for the descriptor.
If you realize this error once changing an effective disk from VMDK format to VHD format, it means Microsoft Virtual Machine expedient cannot admit a number of the disk info accesses. The amount of the entry will vary – e.g. you may see a pair of, 3, 4, etc., rather than one. So as to repair this issue, edit the virtual disk descriptor.

Fixing the difficulty for a virtual disk of VMware digital computer format:
A VMDK virtual disk of VMware digital computer format has Associate in nursing embedded descriptor (the descriptor is integrated into the VMDK file with the disk data). You wish to transfer a free utility kit that may extract the virtual disk descriptor to a TXT file. You’ll be able to then edit the descriptor and import the altered descriptor from the TXT file back to the VMDK file. The name of the utility kit is destock tools (DS File Roman deity Kit). you’ll be able to transfer the dock kit here.
Extract the files from the archive, as an example to C:\Virtual\_tools\dsfok
Run CMD (Press Win+R, kind cmd and press Enter). head to the directory with dsfok tools:
cd C:\Virtual\_tools\dsfok
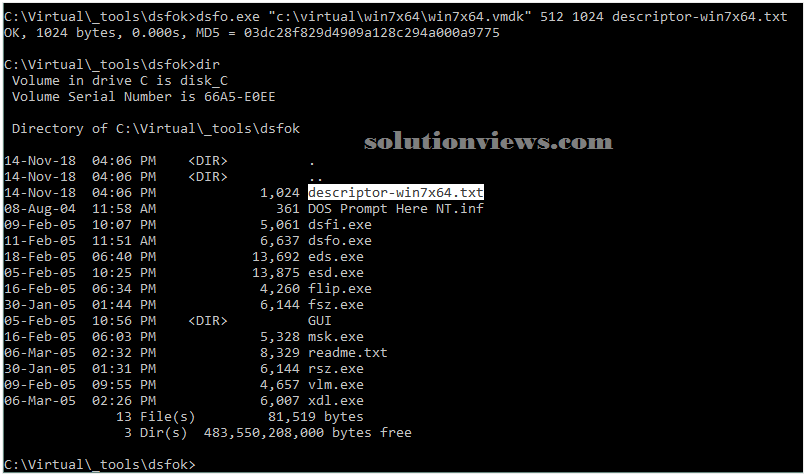
Run dsfo.exe with the subsequent parameters:
dsfo.exe “C:\virtual\win7x64\win7x64.vmdk” 512 1024 descriptor-win7x64.txt
where:
512 bytes is that the offset;
1024 bytes is that the size of the exported data;
Descriptor-win7x64.txt is that the name of file to that the descriptor is exported.

The descriptor is currently extracted to the descriptor-win7x64.TXT get into the directory with dsfok tools.
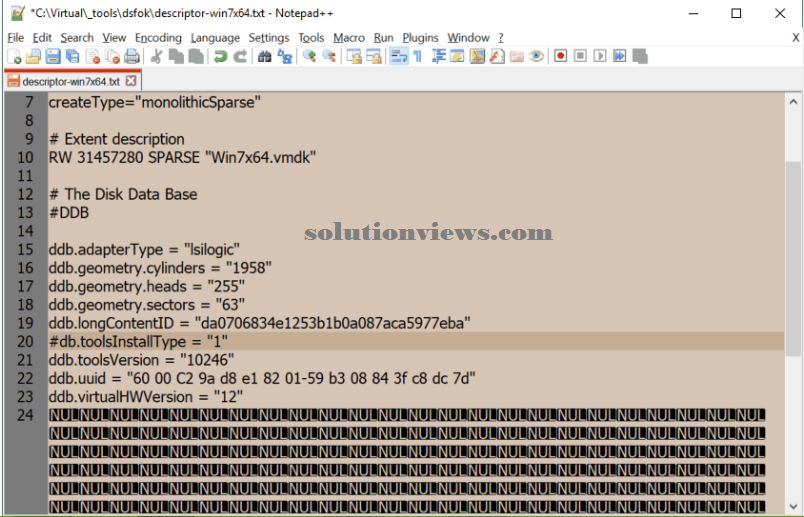
Edit the .txt file of the descriptor with a text editor (choose one that properly acknowledges the layout, like Notepad++). Notice the part of the descriptor with ddb.toolsInstallType = “1” and comment that bit out by substitution the primary “d” character with a “#” character. The format of the descriptor isn’t desecrated during this case and you’ve got #db.toolsInstallType = “1” string as a result. The commented-out string isn’t processed once reading the descriptor’s configuration. Save the file once written material is finished.
You currently got to import the altered descriptor back to the VMDK file of VMware digital computer format. so as to try to to this, run dsfi.exe with the subsequent parameters:
dsfi.exe “C:\virtual\win7x64\win7x64.vmdk” 512 1024 descriptor-win7x64.txt

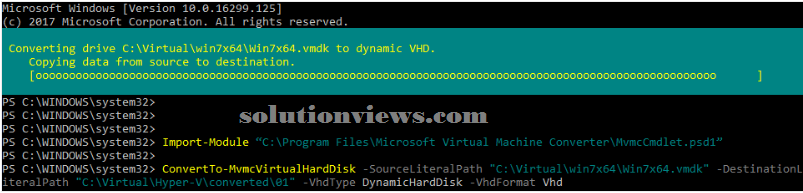
Now you’ll be able to convert the VMDK virtual disk to VHD format by running the subsequent command in PowerShell:
ConvertTo-MvmcVirtualHardDisk -SourceLiteralPath “C:\Virtual\win7x64\Win7x64.vmdk” -DestinationLiteralPath “C:\Virtual\Hyper-V\converted\01” -VhdType DynamicHardDisk -VhdFormat Vhd
The error is not any longer thrown and also the conversion method is started.
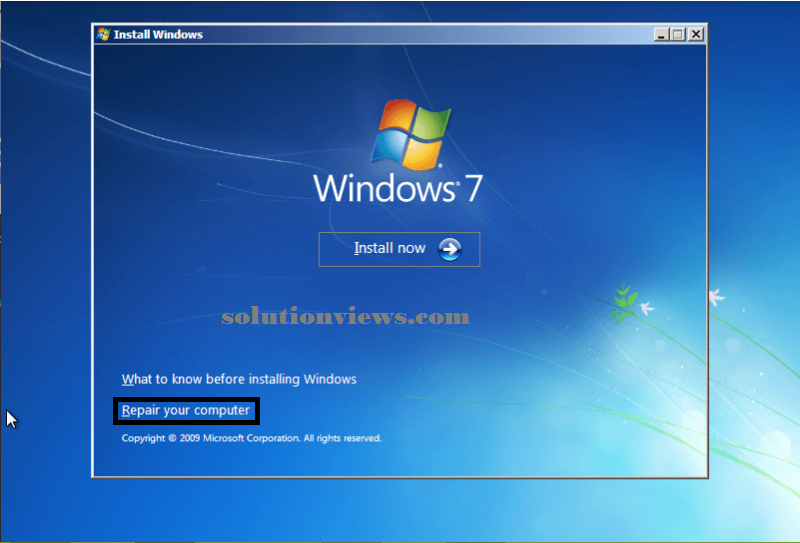
Once the virtual disk is born-again to VHD format, you’ll be able to produce a brand new Hyper-V VM and connect the virtual disk (this method was explained earlier during this diary post). you’ll be able to then run the VM on Hyper-V. However, another issue might occur. If your virtual machine doesn’t load and you see a blinking indicator on black background, you wish to repair a boot sector of the virtual disk.
Note: Windows seven is put in on the virtual disk shown during this walkthrough example.
Insert the ISO installation image of your Windows distribution and boot from the virtual CD/DVD drive. The intrinsically repair tools of the installation disc may be wont to fix the boot sector, as well as the master boot record (MBR).

Once the Windows installer is loaded, click Repair your laptop.
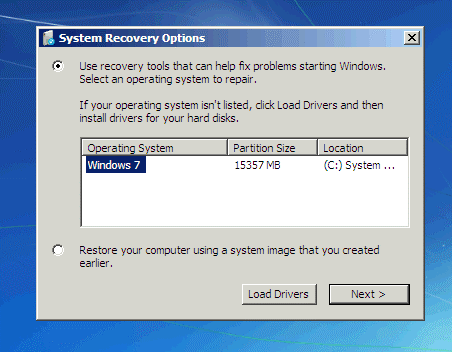
Select your software system on the suitable virtual disk and click on Next.
Run the prompt and execute the subsequent commands:
bootrec /fixmbr
bootrec /fixboot
Restart the virtual machine and boot from the virtual disk.
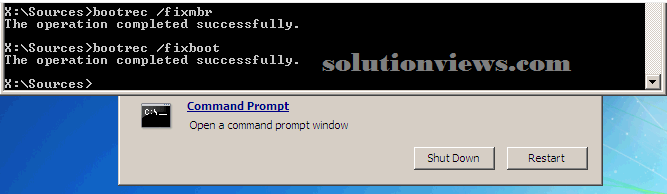
Your VM ought to currently boot with success.
Fixing the difficulty for a virtual disk of VMware ESXi format:
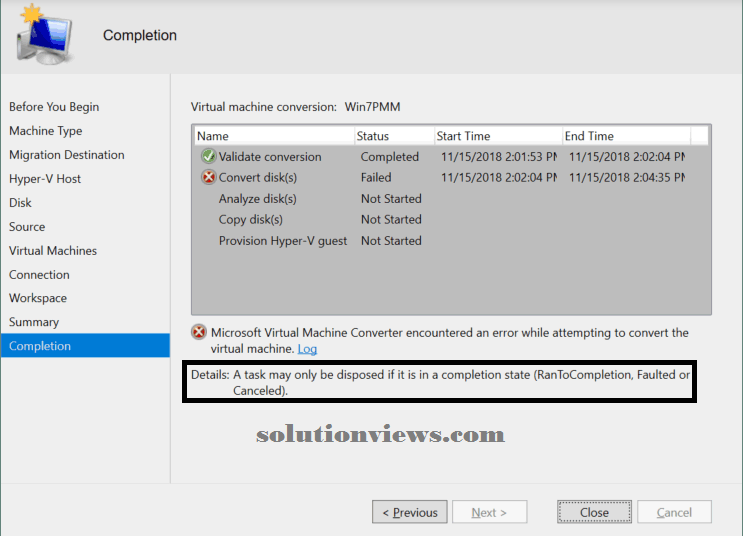
Let’s explore the way to fix the same issue after you export a virtual machine from VMware ESXi to Hyper-V. A UNIX operating system VM is employed during this example (the VM name is NAKIVO-clone) and Microsoft Virtual Machine device returns the subsequent error: The entry four isn’t a supported disk info entry for the descriptor. The tactic for fixing this issue is comparable to the one explained within the previous example; you wish to edit the descriptor of every virtual disk of the VM.
Recall that a virtual disk of a VM running on VMware digital computer has Associate in nursing embedded descriptor (the descriptor is integrated into the VMDK file). Against this, if a VM runs on Associate in Nursing ESXi host, then the virtual disk information and descriptor are keep in 2 completely different files. Change SSH access on the ESXi host wherever the VM you would like to convert is registered. Log into the ESXi console with Associate in Nursing SSH shopper like Putty.
Go to the directory wherever the VM files ar keep. during this example, the VM files are placed in /vmfs/volumes/SSD1/NAKIVO-clone. The name of the data store is SSD1 during this case.
cd /vmfs/volumes/SSD1/NAKIVO-clone
Type ls -al to list the files within the VM directory. As you’ll be able to see from the screenshot below, the VM has 2 virtual disks.
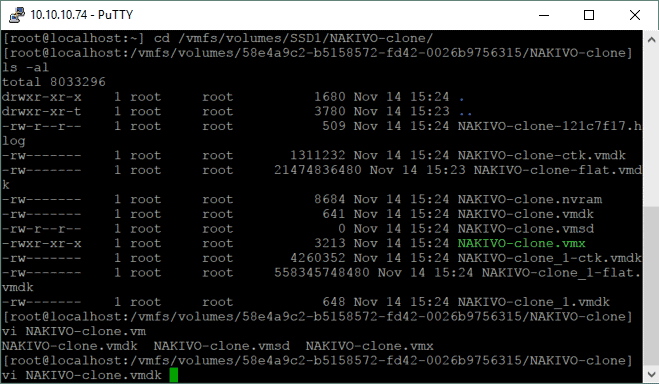
Edit the descriptor of the virtual disk exploitation vi (the console text editor):
vi NAKIVO-clone.vmdk
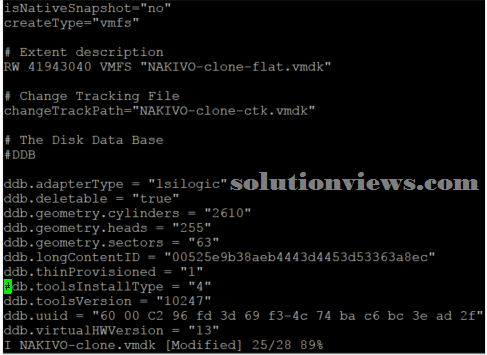
Find the subsequent string:
ddb.toolsInstallType = “4”
Edit the string by substitution the primary “d” character with a “#” character. When written material the section, it ought to say: #db.toolsInstallType = “4”
Use the arrows to maneuver your indicator. Press “a” to modify from navigation mode to written material mode for appending symbols. Once you’ve got created the alteration, press Esc to exit the written material mode. Then Kind: wq to put in writing the changes to the file and exit.
Check the virtual disk consistency when saving changes to the descriptor file:
vmkfstools -e Win7PMM.vmdk

Edit the descriptor of the second virtual disk within the same manner. once the descriptors of all the VM’s virtual disks ar altered, initiate VM conversion with MVMC once more. The virtual disks of your VM will currently be born-again while not errors.
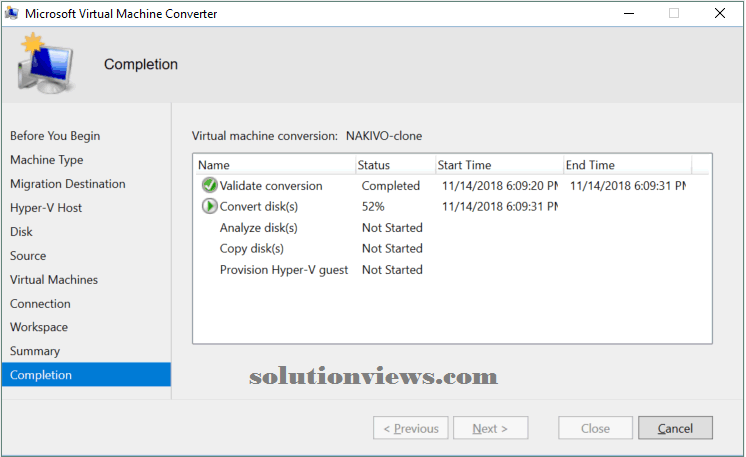
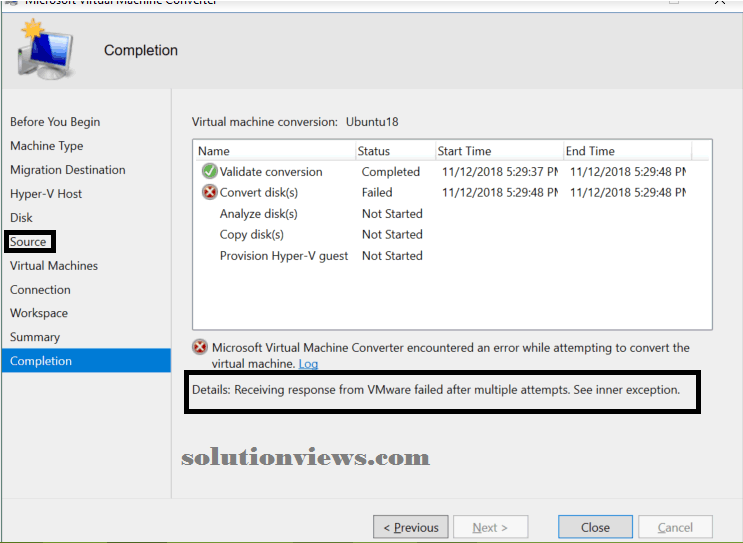
Receiving response from VMware unsuccessful when multiple makes an attempt. See inner exception:
This error will occur if Associate in Nursing ESXi host is outlined as a supply within the graphical user interface of MVMC. If you utilize vCenter Server to manage ESXi hosts as well as the present host, outline the name or scientific discipline address and also the credentials for the vCenter Server instead of the ESXi host within the supply section.
A task might solely be disposed if it’s in an exceedingly completion state (RanToCompletion, Faulted or Canceled)
If you get this error once exploitation Microsoft Virtual Machine device to convert a VM from ESXi to Hyper-V format, copy the virtual disk files (vmdk and -flat.vmdk) to the machine with the device put in, convert the virtual disks in PowerShell, then produce a brand new Hyper-V VM and connect the disks to it VM.
Conclusion:
Today’s diary post has lined the conversion of VMware VMs to Hyper-V format. Microsoft Virtual Machine device (MVMC) is one among the foremost cheap tools for this purpose. It includes graphical user interface tools and statement tools for PowerShell. With the MVMC graphical user interface, you’ll be able to convert entire VMs running on ESXi hosts. PowerShell cmdlets enable you to convert individual VMware virtual disks of ESXi format and digital computer format. You’ll be able to use the recommendations and walkthroughs provided during this diary post to resolve a number of the problems which will occur throughout VM conversion.