Although Windows ten is that the most stable and reliable version of Windows that Microsoft has created in quite your time, things can, and sometimes does get it wrong. Thankfully, there square measure variety of various diagnostic and troubleshooting tools engineered into the package. In fact, you’ll diagnose a good sort of Windows issues through PowerShell by investing the intrinsic troubleshooting packs.
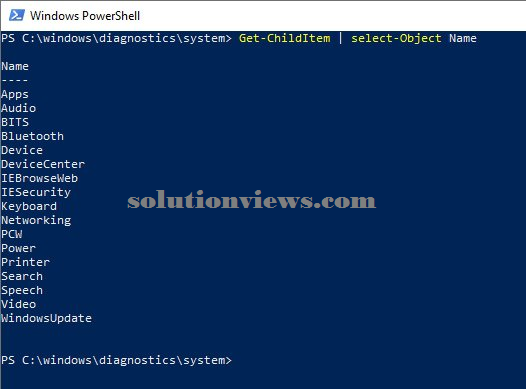
Troubleshooting packs square measure basically collections of diagnostic tests that square measure all associated with a particular space of the system. You’ll see a listing of all of the offered troubleshooting packs by gap PowerShell, navigating to C:\Windows\Diagnostics\System, then getting into the Get-Childtime | Select-Object Name command. As you’ll see within the figure below, there square measure presently seventeen totally different troubleshooting packs offered, covering everything from audio to printers.
To use the troubleshooting packs, you may need to specify the Get-Troubleshooting Pack cmdlet, followed by the name of the troubleshooting pack that you just need to use. If you wish to perform network medical specialty for example, you’d enter the Get-Troubleshooting Pack cmdlet, followed by the word Networking.
Before I continue, I would like to indicate that the explanation why i’m ready to escape with employing a simplified command like Get-TroubleshootingPack Networking is as a result of i’m performing from among the C:\Windows\Diagnostics\System folder. If you are trying to run a troubleshooting pack from another location, you may sometimes need to offer a full path. The command seems like this:
Get-TroubleshootingPack -Path “C:\Windows\Diagnostics\System\Networking”
Running troubleshooting packs:
So currently that I actually have explained the way to access a troubleshooting pack, let’s take a glance at what happens once you run a troubleshooting pack. For the subsequent examples, I’m attending to be exploitation the Windows Update troubleshooting pack; however the method works in essentially constant means notwithstanding that troubleshooting pack you employ.
So thereupon aforesaid, once you run the Get-TroubleshootingPack cmdlet and specify the name of a private troubleshooting pack, the initial results don’t seem to be specifically useful. As you’ll see within the figure below, Windows at first provides some version info, and not far more.

Running the troubleshooting pack during this means isn’t specifically useful, however there’s quite an little bit of helpful info contained among the troubleshooting pack. Before I show you the way to extract that info although, i would like to point out you the way to search out out what the troubleshooting pack will, and the way to inform if it’ll work on your system. the explanation why this is often necessary is as a result of some troubleshooting packs square measure designed for Windows ten, whereas others may solely work on Windows Server.
The system that I’m exploitation to come up with the screen captures during this article is running a 64-bit edition of Windows ten. Therefore, if I wished to understand what the Windows Update troubleshooting pack will and whether or not or not it’ll work on my system, I’d use a command like this one:
Get-TroubleshootingPack Windows Update | Select-Object Name, Description, Supports Client, SupportsAmd64
As you’ll see within the figure below, the SupportsClient field shows a price of “True,” which means that the pack can run on Windows ten. Similarly, the SupportsAmd64 column is additionally showing a price of true, which means that the pack can work on a 64-bit package. The values that you just will use to check whether or not or not a troubleshooting pack is supported include:
• SupportsClient
• SupportsServer
• SupportsX86
• SupportsAmd64
• SupportsIA64

So currently let’s take a glance at the way to use a troubleshooting pack to see what’s wrong with a system. Instead of running the Get-TroubleshootingPack cmdlet directly, it’s sometimes attending to be easier to map the cmdlet to a variable. Therefore, I’m attending to use a variable named $Diag. Here is that the command:
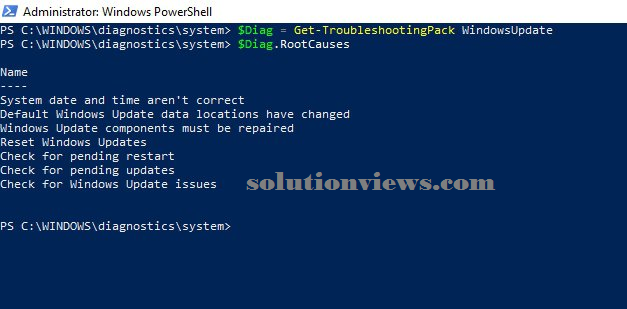
$Diag = Get-TroubleshootingPack WindowsUpdate
Hunting down the foundation causes:
Once the variable has been created, {we can we will we square measure able to} begin to appear for the foundation causes of the issues that we tend to are experiencing. Every troubleshooting pack will check for a range of conditions. To visualize a listing of the tests, simply enter the variable name, followed by a amount, and therefore the word RootCauses. The figure below shows the potential root causes of a Windows Update failure.
So currently let’s run the troubleshooting pack. To do so, pipe the antecedently created variable to the Invoke-TroubleshootingPack cmdlet. You’ll see what this seems like within the next figure.