An issue with the DNS server will interrupt your net service. you’re in all probability here thanks to DNS problems. It may be the message “DNS_PROBE_FINISHED_NO_INTERNET” whereas exploitation the web or “The DNS server isn’t responding” shown by Windows Network medical specialty whereas troubleshooting.
Both the error messages associated with Windows ten DNS problems and therefore the answer is close by. The DNS error messages don’t seem to be restricted to those 2 messages; there area unit several alternative error messages like “DNS_PROBE_FINISHED_NXDOMAIN,” ”DNS_PROBE_FINISHED_BAD_CONFIG,” “Your DNS server may be unavailable” and lots of a lot of.
What Is DNS Server and Why net Services area unit stricken by It?
DNS is associate degree word form of name System. it’s wont to translate the domain names of internet sites to information science address as a result of the web solely understands information science addresses and not the alphabetic name of internet sites. The information science address of a selected web site is troublesome to recollect for somebody’s being. As an example, the web site has the name technorms.com has information science address thirteen.126.192.45.
Such protracted information science addresses area unit troublesome to recollect for USA however essential for internal communication between browser and internet server. DNS could be a middle man World Health Organization wills the interpretation for the graceful functioning of the web. Therefore, a difficulty with the DNS server halts the web service.
Solutions to repair DNS problems In Windows ten:
Whatever the DNS problems, there area unit varied ways in which you’ll handle and learn the way to repair the DNS server. Let’s check the varied problems that you just could face and therefore the solutions associated with it.
1. Check Your DNS Server Settings
Change in DNS server settings are often the most reason behind your DNS problems. You’ll have a fast scrutinize that before continuing with alternative solutions.
Primis Player Placeholder
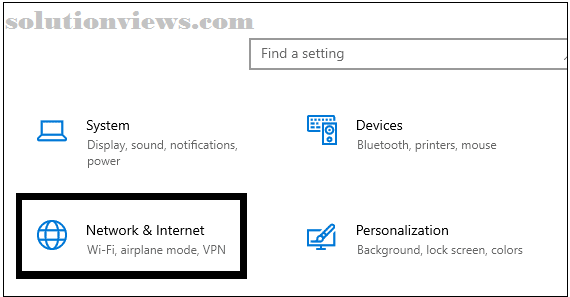
To check whether or not your DNS server settings area unit correct, press Windows key + I to open Settings.
Next, click on Network and net.
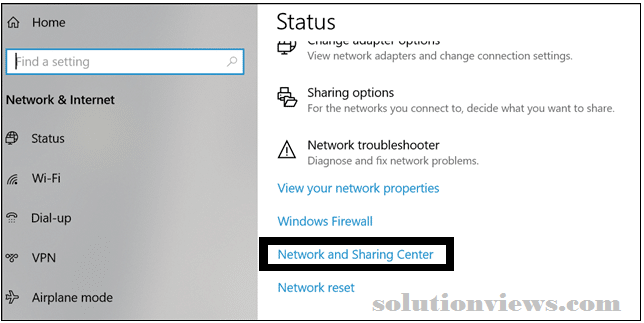
Scroll down and click on on Network and Sharing Center.
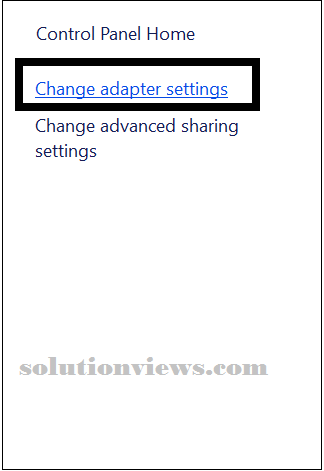
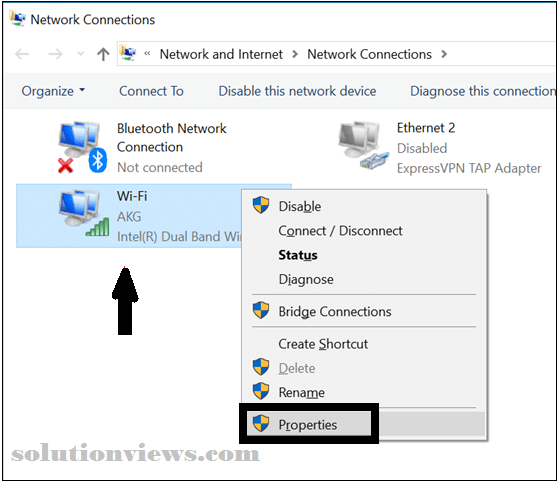
In the left pane of Network and Sharing Center, click on modification adapter settings.
Now, right-click on the connected network. Then choose Properties from the context menu.
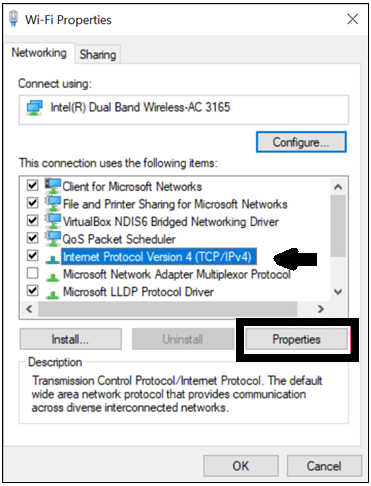
When a replacement window seems on the screen, choose net Protocol Version four (IPv4) and so click on Properties.
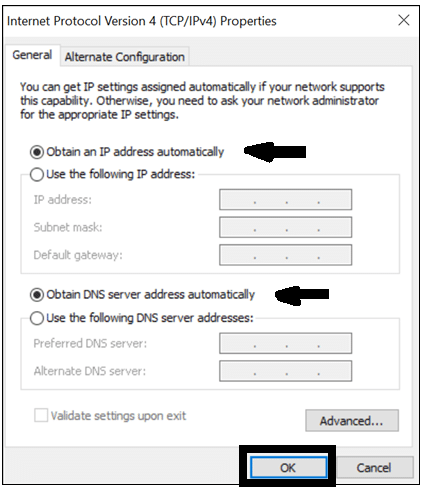
Check whether or not the radio buttons for get associate degree information science address mechanically and acquire DNS server address mechanically area unit selected.
If it’s not selected, then build the specified changes and click on on OK.
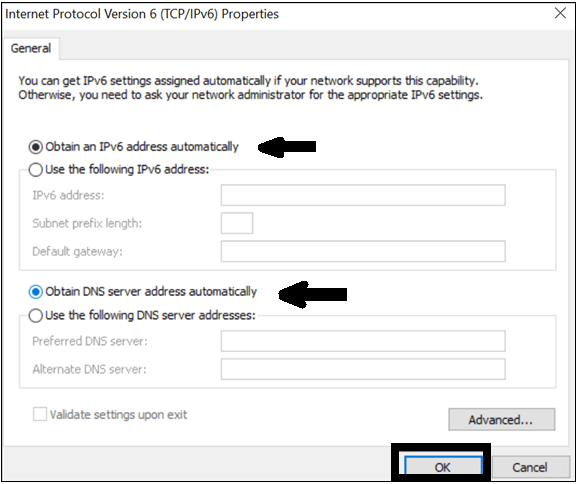
Now check an equivalent issue for net Protocol Version half-dozen (IPv6).
Click on Properties once choosing net Protocol Version half-dozen.
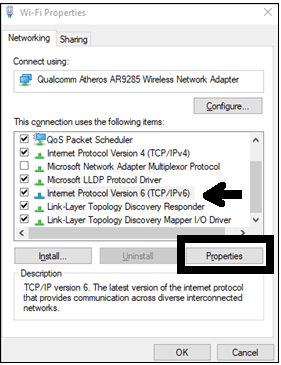
Select an equivalent radio buttons selected as in IPv4, that is, get associate degree information science address mechanically and acquire DNS server address mechanically severally.
Click on OK.
If you’re still facing the DNS error, or if you have got equivalent DNS settings, then you’ll strive from the various solutions listed below.
2. Use alternative DNS Servers.
If your DNS server’s setting matches the above-shown settings, then there may be a difficulty along with your ISP’s DNS server. Strive shifting to a different one briefly.
You can use Google’s public DNS server or Cloud fare’s DNS server.
To manually tack the DNS server, navigate to Settings ➞ Network and net ➞ Network and Sharing Center ➞ modification adapter settings.
Right-click on the network association and so click on Properties.
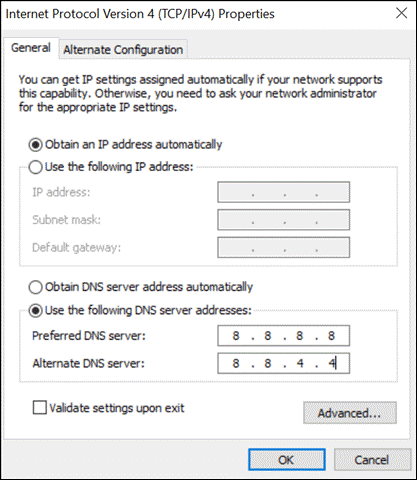
When network properties open, choose net Protocol Version four and so click on Properties.
When the web Protocol Version four Properties window seems on the screen, prefer to Use the subsequent DNS server addresses and manually enter eight.8.8.8 for the well-liked DNS server {and eight|and eight}.8.4.4 for Alternate DNS server.
Click on okay to save the changes.
Reconnect your net and check if the DNS server error resolves once manually dynamical the DNS server.
The address used on top of is Google’s public DNS server. If you want to use Cloud flare’s DNS, then add 1.1.1.1 for most popular DNS address and one.0.0.1 for alternate DNS addresses.
3. Tack the Macintosh (Media Access Control) Address
If you continue to have DNS failure, you’ll strive dynamical the macintosh address of your laptop manually. This answer has helped several users to resolve DNS problems. Macintosh address or physical address is unambiguously allotted to each network adapter.
To manually tack the Macintosh address, you wish to understand the physical address of the network adapter.
Follow the steps to urge the physical address.
Open the electronic communication, sort command ipconfig /all and hit Enter.
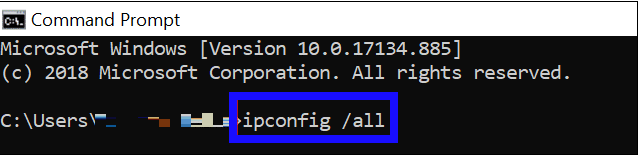
After capital punishment the command, you get the long list of details, ascertain the connected network, and note the physical address.
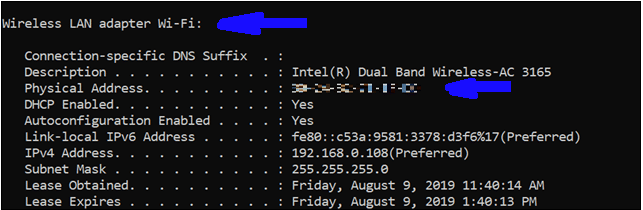
Once you recognize the physical address, you’ll tack it.
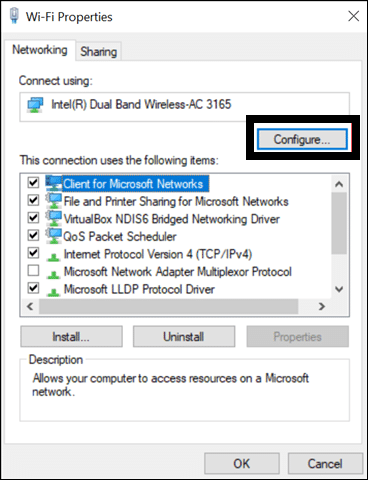
Open Settings ➞ Network and net ➞ Network and Sharing Center ➞ modification adapter settings, right-click on the connected network and choose Properties.
The following procedure is for Windows skilled users.
However, if you’re a Windows home version users follow the procedure written on an individual basis for Home users.
When the properties window opens, click on tack.
Next, visit the advanced tab, choose Network Address and write down the noted physical address within the textbox below price.
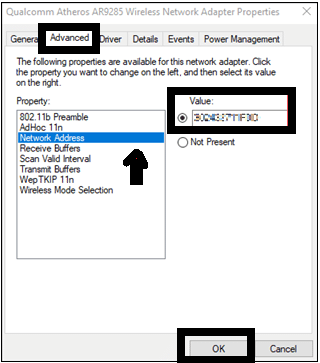
Click on okay to save the changes.
Windows Home Users
Type device manager within the begin menu, and open Device Manager, explore for Network adapters and right-click on the suitable choice below it and opt for Properties from the context menu.
Next, visit the advanced tab and add noted physical address to the worth of Network Address. If you bog down somewhere or want any help, you’ll check the small print on the way to notice and alter Macintosh address in Windows ten
4. Clear DNS Cache:
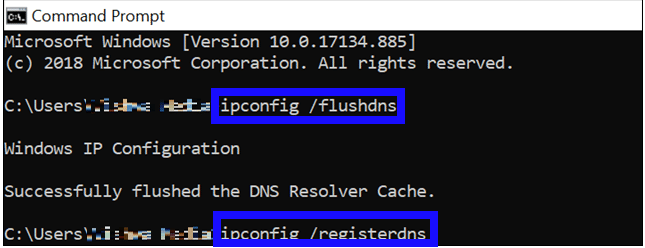
Sometimes simply clearing the cache could assist you get eliminate DNS error. To flush the DNS cache in Windows ten, there area unit some commands to execute.
Open the electronic communication, and execute the subsequent commands listed below.
ipconfig /flushdns
ipconfig /registerdns
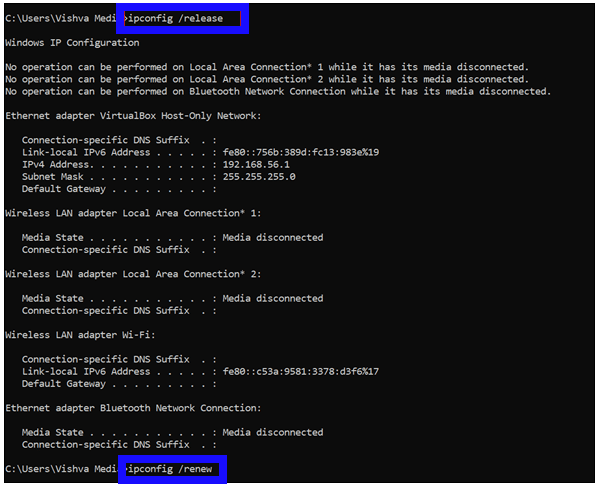
ipconfig /release
ipconfig /renew
You can visit some websites to see if ipconfig command in Windows ten resolves your DNS server inaccessible drawback
5. Update Your Network Drivers:
The noncurrent network drivers are often a reason for your no DNS server error. You’ll update them manually or use a third-party tool to try to to it for you.
To manually update your network drivers, press Windows key + X and open Device Manager.
Now, explore for Network adapters, right-click on the connected driver and click on Update driver.
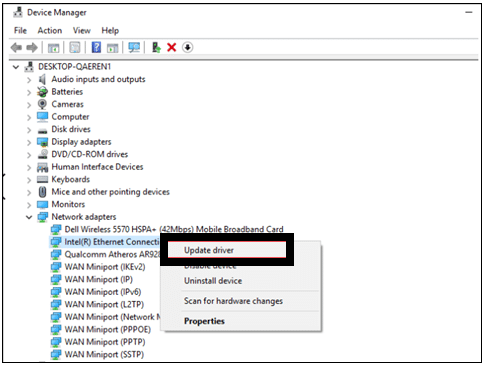
Restart the pc and check if you’ll browse the net pages.
6. Work On Winsock Keys From written record:
You can follow the below steps to figure on Winsock keys. It’s going to assist you to resolve DNS problems, because it did work for several users. However, before you start, you’ll backup the written record in Windows ten.
Open written record Editor by typewriting written record within the begin menu and navigate
HKEY_LOCAL_MACHINESYSTEM Current Control Set Services from the left pane of the written record editor.
Search for Winsock and WinsSock2.
Right-click on that and click on on Export from the context menu.

Save them as Winsock and WinSock2 severally in any location you want.
Then, delete each the Winsock written record keys from the written record editor.
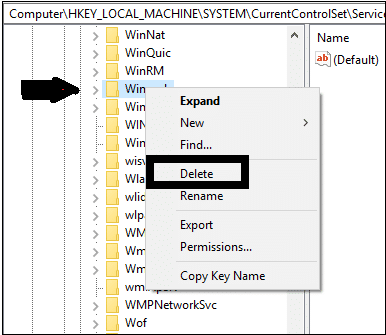
Restart your laptop and head back to the written record Editor.
Click on File from the menu bar of the written record editor and so click on Import.
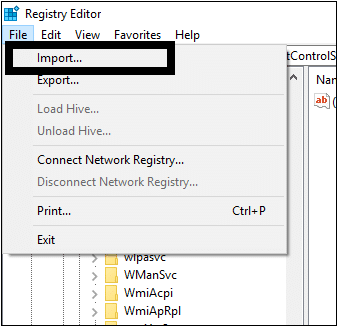
Import the Winsock keys exported within the steps before.
Again restart your laptop, open the browser to see if DNS error resolved.
7. Restart electronic equipment And Router:
If none of the solutions mentioned on top of work for you, then you’ll strive restarting your electronic equipment or Router, as which will be useful in some cases.
Simply power off your router or disconnect the ability twine from the router. Leave it for one to 2 minutes and so power on your router. If you have got unplugged the router plug it once more.
Restarting your router could assist you solve DNS failure.
8. Restart laptop In Safe Mode:
Safe mode has restricted software package and drivers, therefore if some third-party software package like antivirus is troublemakers, your issue are often solved in safe mode.
To alter safe mode, keep pressing the Shift key whereas clicking on the Restart choice.
When the blue screen seems with 3 choices, click on Troubleshoot ➞ Advanced choices ➞ Startup Settings and so click on Restart.
Now use the operate key (F1-F12) to alter safe mode.
Check your net property once the laptop starts.
However, if the DNS error resolves, it had been some third-party application or another driver/software that is enabled in traditional mode.
9. Disable Microsoft Virtual WiFi Miniport Adapter:
You can attempt to disable the Microsoft Virtual WiFi Miniport Adapter if it’s gift in your Network Adapters list.
To disable it, visit the Device Manager and click on on read within the menu bar.
Choose Show hidden devices from the list.
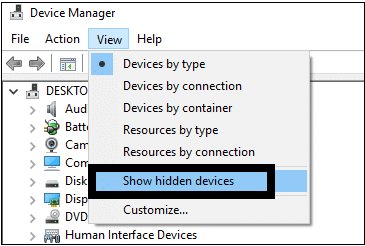
Once all the devices area unit visible, explore for Virtual Wi-Fi Miniport Adapter in Network adapters.
If found right-click on that and disable it. Inspect if the DNS issues resolve.
10. Install Network Adapter Drivers:
If you continue to have a DNS probe finished no net or no DNS server sort error, then uninstall your Network adapter drivers and install them.
To uninstall the network drivers, press Windows key + X and click on on Device Manager.
Search for Network adapters and Uninstall the relevant network driver.
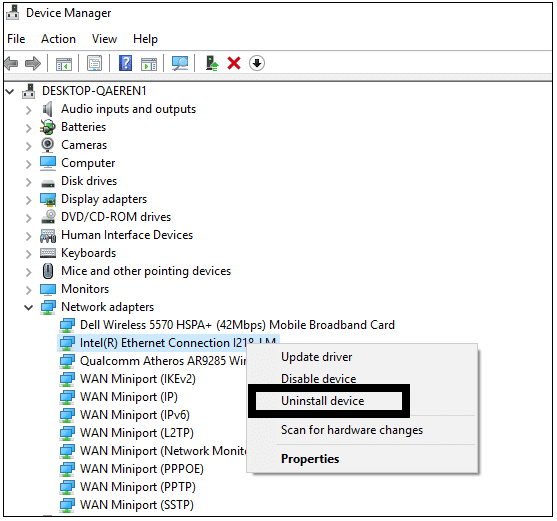
Restart the laptop and install the network driver once more.
11. Alter Microsoft LLDP Protocol Driver:
If your LLDP Protocol driver isn’t enabled, then you’ll run into DNS failure problems. Check if it’s enabled, if not, alter it exploitation the subsequent procedure.
Go to Settings ➞ Network and net ➞ Network and Sharing Center ➞ modification adapter settings, right-click on the connected network and click on on Properties.
When Properties open and check if there’s a tick besides Microsoft LLDP Protocol Driver.
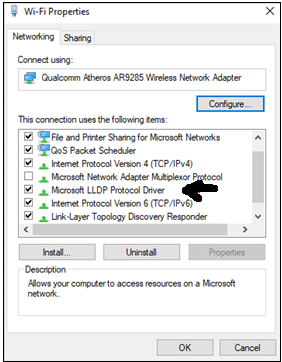
If it’s disabled, alter it by clicking on the checkbox.
12. Update The microcode within the Router:
Note: Update your router’s microcode provided that you’re cognizant of it, as a failure within the upgrade will cause permanent injury to the router.
Updates area unit continually an important a part of any device, therefore associate degree noncurrent microcode of router also can offer you errors like “DNS server inaccessible.” Update your router’s microcode exploitation the handbook as each router has completely different procedure to try to it.
After upgrading microcode, reconnect to the web and check if there’s no DNS failure any longer.
13. Disable Antivirus And Firewall:
An antivirus could be a much-needed software package with a rise within the range of viruses and malware. However, sometimes, this antivirus will have an effect on DNS servers, providing you with completely different DNS connected issues.
Uninstall your antivirus, restart your laptop and check if you’ll hook up with the web.
If you’re once more connected to the web once uninstallation finds a replacement for your antivirus or contacts the client support news the problem.
14. Disable Downloads From alternative PC’s:
Windows has this wonderful feature within which you’re allowed to transfer the updates from alternative users within the same network. this can be an honest choice if you have got associate degree unreliable net association.
However, this may additionally cause DNS problems.
To disable it, press Windows key + I to open Settings, navigate to Update & Security ➞ Advanced choices ➞ Delivery optimization.
In Delivery optimization window, slide the trigger below enable downloads from alternative PC’s

Check if this resolves no DNS server error.
15. Disable net Protocol Version half-dozen (IPv6)
Disabling IPv6 wouldn’t cause the other hassle and should additionally assist you solve DNS error.
To disable IPv6 service, navigate to Settings ➞ Network and net ➞ Network and Sharing Center ➞ modification adapter settings.
Right-click on the connected network and choose Properties.
Once the Properties window.
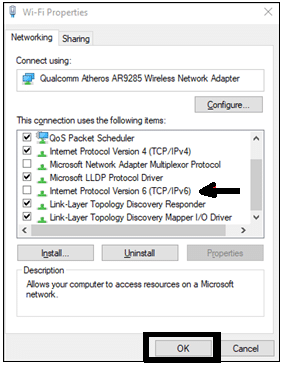
Open explore for net Protocol Version half-dozen and untick the checkbox next thereto.
16. Disable All alternative Network Connections:
There may be multiple network connections on your laptop which could be the rationale for your inaccessible DNS server.
You can disable all alternative active connections by progressing to
Settings ➞ Network and net ➞ Network and Sharing Center ➞ modification adapter settings.
Right-click on alternative connections besides the web and click on on Disable from the context menu.

Check out if you continue to see any DNS server not accessible error on your laptop
17. Check freshly put in Extension And Third-Party Applications:
If you have got recently put in some networking connected applications or extensions and later featured DNS issue, then these applications/extensions is also the offender.
Try uninstalling those applications and check your DNS settings in Windows ten to make sure if the applying failed to modification them. Restart your laptop and check if net property is traditional.
If removing the third-party applications doesn’t solve the error, then you’ll later disable extensions from the Chrome browser and check if that works for you.
18. Perform Clean Boot:
Sometimes the DNS problems area unit simply solved by performing arts a clean boot. To perform a clean boot sort msconfig within the begin menu and open System Configuration.
When System Configuration’s window opens, click on Hide all Microsoft services.
Once the Microsoft services area unit hidden, click on Disable all to disable the third party services.
Now, click on Apply and OK
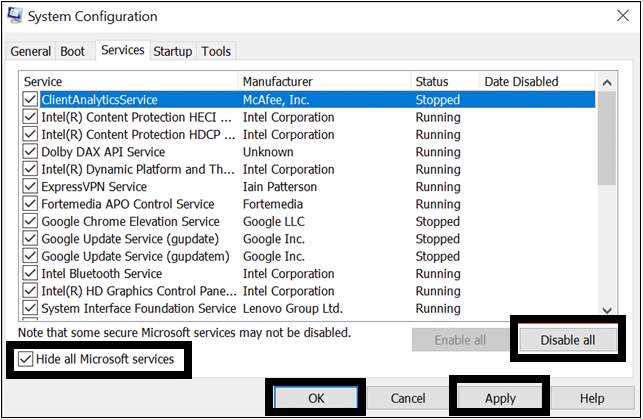
Restart your laptop and check if the problem is resolved. alter third-party services one by one to search out the offender.
19. Use NETSH Commands:
You can additionally strive exploitation the list of netsh commands mentioned below. It works for several users World Health Organization face DNS problems. These commands can reset your information science and so even flush the DNS cache for you in Windows ten.
Open the electronic communication and execute the subsequent commands one once the opposite.
netsh int information science reset
netsh winsock reset
ipconfig /flushdns
ipconfig /renew
Restart your laptop and check if this answer fixes DNS failure.
20. Modification Power Settings for Network Adapters
Your DNS server inaccessible issue are often solved by keeping the most performance parameter for the wireless adapter. To vary this setting, you wish to travel to power settings and alter the arrange.
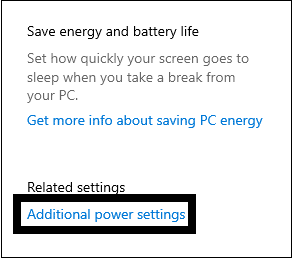
Type power within the begin menu and open Power & sleep settings.
Once the setting window opens, click on extra power settings.
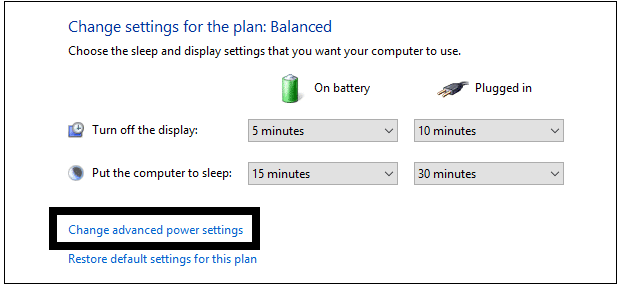
Now, click on modification arrange settings.

To edit the settings for the wireless adapter, click on modification advanced power settings.
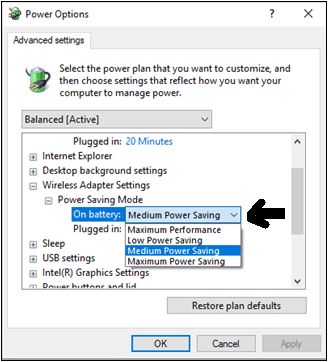
When the ability choices window seems, explore for Wireless Adapter Settings and click on the and sign (+) next thereto.
Next, click on + sign next to Power Saving Mode.
The menu has completely different choices choose most Power Saving; notwithstanding the default one says Medium Power Savings.
Apply the changes by clicking on Apply
Restart the laptop, and check your net property. You’ll be able to see if this variation in power settings worked for you and solved your DNS problems.
21. Inspect along with your ISP For the problem:
If the on top of solutions don’t seem to be determination the DNS drawback, then for once strive contacting your ISP and raise if the problem is from their facet. Sometimes, the DNS problems area unit from the ISP itself, that successively provides issues at our finish.
22. Use Another Router:
The last answer to your DNS failure is to vary your router. A faulty router also can cause DNS problems. Connect completely different router and check if you’ll hook up with the web.
DNS_PROBE_FINISHED_NO_INTERNET Solutions
Note: The below-mentioned answer might also work for your alternative DNS problems.
23. Clear DNS Cache in Google Chrome:
If you see DNS_PROBE_FINISHED_NO_INTERNET error on the Google Chrome browser, then you’ll specifically jump to easy solutions like simply clearing cache.
First, you wish to clear browsing history and so move to DNS cache
To clear browsing history press Ctrl + H in your Chrome browser.
Once the history page opens, click on Clear browsing history.
To clear DNS cache, sort “chrome://net-internals/#dns” in your Chrome browser and click on the Clear host cache button.
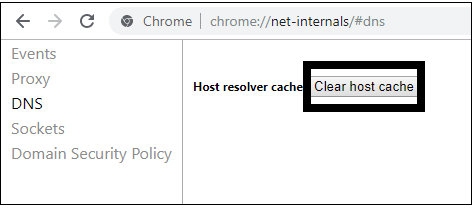
Check if the error resolves.
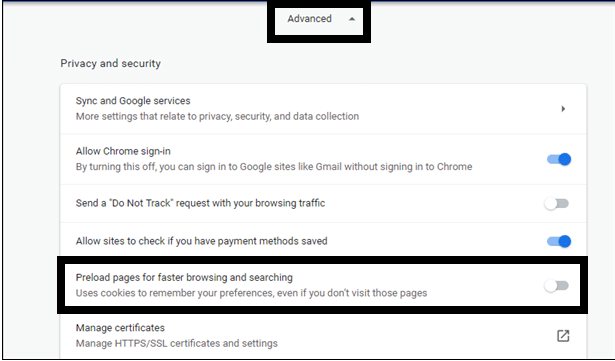
24. Disable Preload Pages In Chrome:
Disabling preload pages also can solve your DNS_PROBE_FINISHED_NO_INTERNET error.
To disable preload pages in Chrome, click on the three dots within the right corner of the Chrome browser and click on on Settings.
Scroll all the way down to the tip of the page and click on on Advanced and toggle the switch next to Preload pages for quicker browsing and looking out to disable it.
Close your Chrome browser and open it to see if this answer resolved your error.
Conclusion:
The on top of solutions can beyond question assist you to urge your DNS problems solved . If there’s a minor error in settings of DNS server then merely dynamical the settings as mentioned within the initial answer would have you ever get eliminate DNS failures. However, if the problem is with the router, then you wish to vary it fully or maybe install your browser. The answer depends on the complexness of the problem. Do allow us to recognize the answer that worked for you.