The file indexer service in Windows 10 and Windows 11 is built-in (which also applies to older versions like Windows 8 and 8.1). It serves as an internal librarian, tracking all of your files and folders across multiple drives. Indexing files in Windows speeds up searches and makes the operating system more responsive.
Windows is a complex product with tens of thousands of lines of code. It’s common that things go wrong and unforeseen complications arise, placing the Windows Search Filter Host and Indexer under a lot of stress. When anything consumes too much CPU resources, your computer slows down, warms up, and fans spin more faster.
Begin by examining the signs and symptoms. Make sure it’s Windows Search Filter Host that’s causing the excessive CPU usage. To do so, take these steps:
- On Windows 10, right-click the taskbar and select Task Manager. You may right-click the Start menu button in Windows 11. Ctrl + Shift + Esc is another option. This shortcut works in every version of Windows since Windows XP.
- Switch to the Processes tab in the Task Manager window.
- Next, sort processes by CPU load by clicking the CPU column.
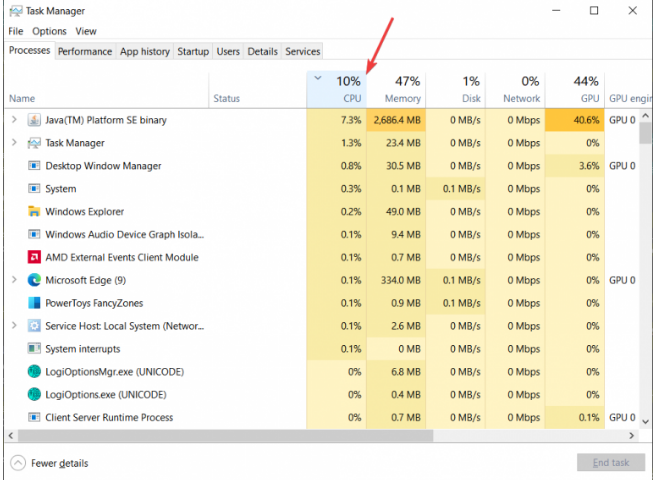
If Windows Search Filter Host is causing excessive CPU use, one of the following processes will appear at the top of the list: Microsoft Search Protocol Host (SearchProtocolHost.exe), Microsoft Search Filter Host (SearchFilterHost.exe), or Microsoft Windows Search Indexer (SearchIndexer.exe or SearchUI.exe).
As you can see, the “Microsoft Windows Search Indexer” process consumes almost 30% of the CPU and 3.2GB of RAM in our situation. That isn’t typical. That procedure seldom takes more than 3% of the CPU and 100 MB of RAM in a perfectly functioning machine.
How to Fix High CPU Utilization in the Search Filter Host and Indexer on Windows 10?
The programs “Microsoft Windows Search Filter Host” and “Microsoft Windows Search Indexer” make searching in Windows easier. These processes are part of the system-wide “Windows Search” service, which scans the file system for files, directories, programs, system utilities, and other Windows components that you might require. All of the data that Microsoft Windows Search Indexer collects while taxing your CPU is saved in a separate database file (index DB).
Windows indexes the following as part of the routine operation: file names and paths, creation time, keywords (document, text file, or html-page), properties, and other data. When you search in Windows 10 using the Start Menu, Taskbar, or Cortana, the operating system does not scan the full disc. Instead, it refers to a database with an organized index. As a consequence, Windows delivers search results significantly more quickly.
When Microsoft Windows Search Filter Host uses a lot of CPU and RAM, it signifies the operating system is now executing the indexing service and collecting data about your files and updating the search index. Wait 20-30 minutes before attempting to resolve Microsoft Windows Search Protocol Host excessive CPU load. This will allow Windows to complete the indexing process.
Of course, there are occasions when you simply cannot wait. If you need to regain lost speed quickly, try terminating the Windows Search Filter Host process. Don’t worry, it’s quite safe. After all, Windows will automatically restore the process without your action.
- To begin, open the Task Manager.
- Locate the problematic process that utilizes too much CPU and RAM on the Processes tab.
- After selecting the process, click Finish Task.
You may deactivate the Windows Search Indexing service and prevent it from starting automatically if you don’t utilise the search functions in Windows 10.
- Enter the services.msc command by pressing Win + R.
- Locate the Windows Search service in the list of services.
- Stop Windows Search by right-clicking it (if available). If the Stop action isn’t available, skip this step.
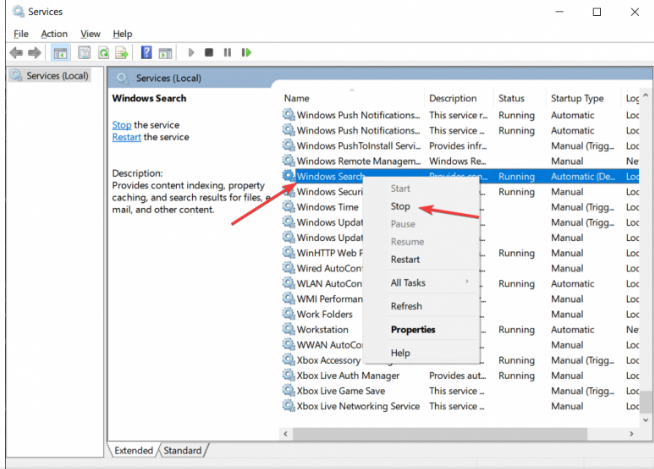
4. Change the Startup type parameter to Disabled by double-clicking the service.
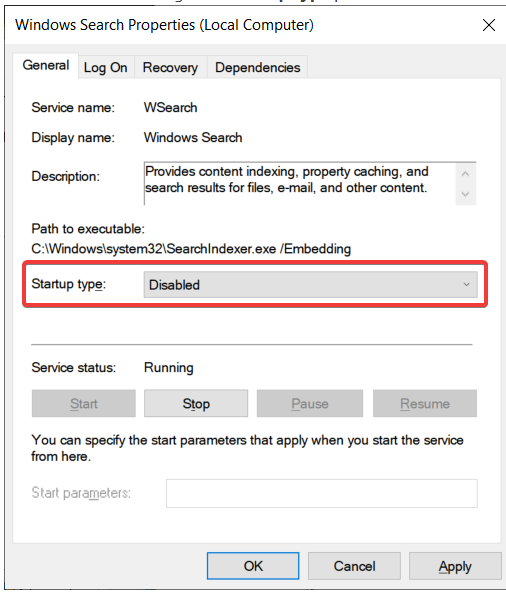
5.To save your changes, click Ok.
6. Restart your computer, even if it isn’t essential.
Fix the Host and Indexer of the Windows Search Filter CPU Overload Using the Troubleshooter for Search
The built-in utility “Indexing Troubleshooter” in Windows can help you fix problems with the Search service. To use the Windows Search Indexing Troubleshooter, perform these steps:
- To enter the Windows Settings app, press Win + I.
2. Select Search > Searching Windows from the drop-down menu.
3. To fix typical search issues, scroll down the list of options and click the Run the indexer troubleshooter link.
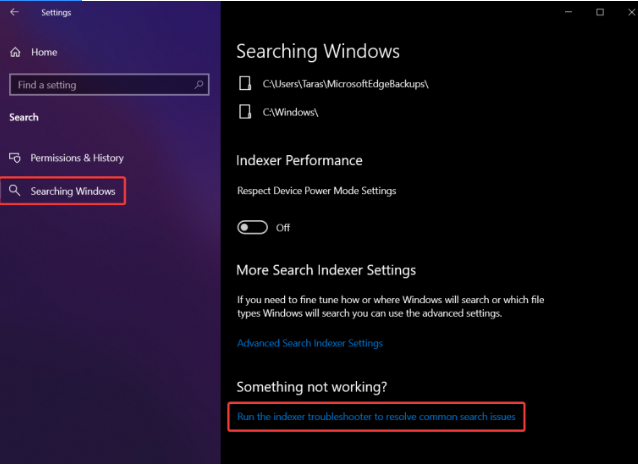
4. Alternatively, use the following command: msdt.exe -ep WindowsHelp id SearchDiagnostic.
5. To fix Windows Search Filter Host and Indexer, follow the on-screen instructions. Windows has a high CPU load.
In Windows, how do you rebuild the search index database?
Disabling Windows Search Indexer to alleviate high CPU demands is not an option for many. Rebuild the Windows Search Indexer database if this happens.
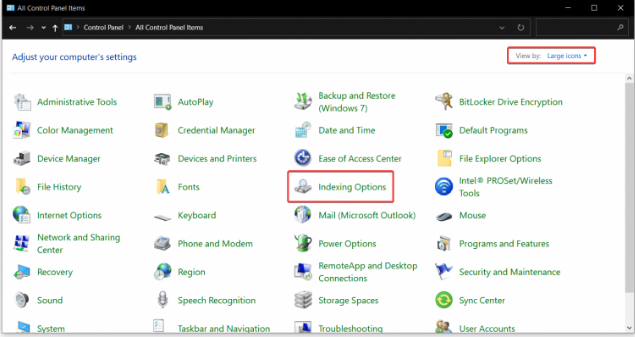
1.Enter the control command by pressing Win + R.
2. Change the size of the icons in the view to Large Icons or Small Icons.
3. Open the Indexing Options section.
4. Now you need to modify how the indexer works. Click the Modify button.
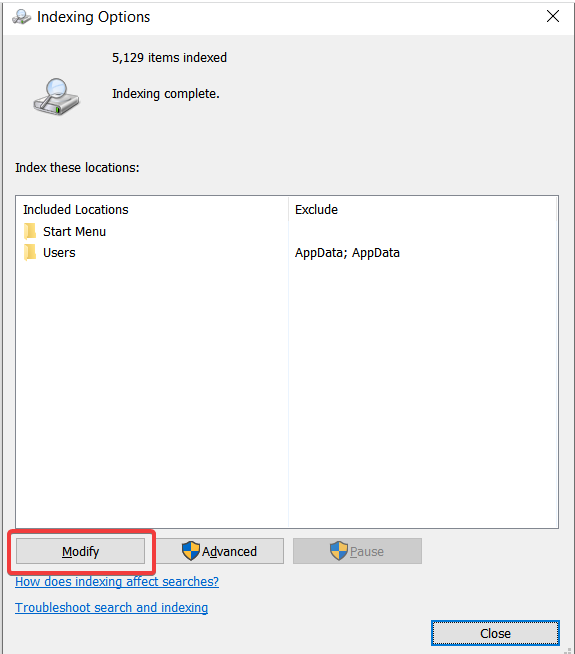
5.Uncheck all of the choices you don’t want to index.
6.Go to Advanced indexing after that.
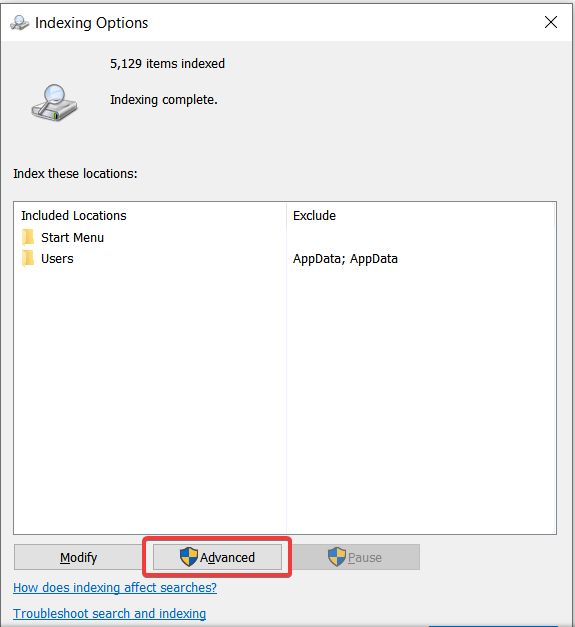
7. Click on Rebuild.

- You will see the following notice from Windows:
It’s possible that rebuilding the index will take a long time. Until the rebuilding is completed, certain views and search results may be incomplete. - Select OK.
Use your computer as usual once Windows has finished rebuilding the indexing database. To discover problematic processes, keep an eye on how the system consumes CPU resources. The Search Protocol Host and Search Filter Host processes should be putting a lot less strain on the CPU.
You can also stop the system indexing temporarily by suspending the Windows Search service for 15 minutes. To do so, go to the Control Panel’s Indexing Options and press the Pause button.

When the SearchFilterHost process inhibits you from working correctly but you don’t want to discontinue indexing services, this may be a better choice.
In some situations, it is more efficient to leave the index database alone. Remove the index database file instead. To do so, open Command Prompt with Administrator rights and run the following commands:
net stop WSearch

rd C:\ProgramData\Microsoft\Search /s /q

net start WSearch
If none of the above approaches worked to resolve the Windows Search Filter Host and Indexer High CPU Load issue, go to Control Panel > Troubleshooting > View all > Search and Indexing and launch the Windows 10 Troubleshooter. Follow the directions on the screen.
In some cases, users were able to resolve the search issue simply turning off the Bing Search feature (can used by Windows 10 for local search processes). Change the value of the registry parameter BingSearchEnabled from 0 to 1 to do this. To do so, open the Command Prompt as Administrator and run the command below:
reg.exe add HKEY_CURRENT_USER\Software\Microsoft\Windows\CurrentVersion\Search /v BingSearch
Thank you so much. I have tried all solutions found on different sites but none of them worked.
Your solution de remove the index database worked. It is the only solution that worked for me.
So thanks for putting in the effort to list all possible solutions.