Microsoft created a replacement “exception” to Exchange 2019. You’ll install it on Windows Server 2019 Core. Yes, you detected it right. This implies that you simply are going to be managing a server while not a desktop and everything is completed through the instruction. This can be not as tough as you would possibly suppose. In Server Core, you employ a utility referred to as sconfig.cmd. With it, you’ll do the following:
- Join domain/workgroup
- Computer name
- Add native administrator
- Configure remote management
- Windows updates
- Remote desktop
- Network settings
- Date and time
- Windows activation
- Reboot/shutdown choice.
Here may be a piece of what the window appearance like:
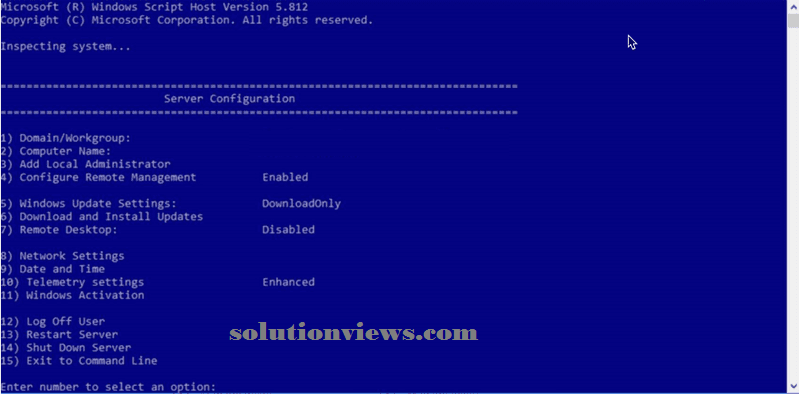
As you’ll see,
you enter variety to piece that possibility. We tend to don’t seem to be planning to cowl the fundamentals of sconfig here however you get the
thought of however the
configuration is completed on
Windows Server 2019 Core. this can
be an equivalent for
earlier versions of Core furthermore.
You can
access this server from a network share as you may have to be
compelled to copy the setup files and conditions required for
the Installation of Exchange 2019 on Server 2019 Core.
Here area unit steps to be performed
on the server:
- Enable file sharing
- Download the Exchange 2019 ISO from the MSDN/Visual Studio. (You want a
Subscription to transfer it.)
- Mount the Exchange Server 2019 ISO
- Install UCMA runtime four.0
- Install Visual C++ 2013 Redistributable Package
- Install the conditions
- Install Exchange Server 2019
Once you exit sconfig.cmd, you wish to run the subsequent command to modify file sharing.
netsh advfirewall firewall set rule group=”File and Printer Sharing” new enable=Yes
Once done, ensuing step is to mount the Exchange Server 2019 ISO. To do this, run the subsequent command:
Mount-DiskImage -ImagePath “C:\Installs\ExchangeServer2019-x64.iso”
The next factor we’d like to try and do is to put in UCMA runtime four.0 as this can be needed by for Exchange setup. you wish to navigate to the UCMARedist folder within the ISO and run the setup from there. Once UCMA has been put in, we are able to currently install Visual C++ 2013
Reboot your server finally installations area unit done. I unremarkably install all Windows updates and obtain that out the means. Once the server is prepared we are able to currently move ahead with the installation of Exchange 2019.
You need to navigate to the drive wherever the ISO is mounted and once complete, run the subsequent command:
Setup.EXE /Mode:Install /InstallWindowsComponents /IAcceptExchangeServerLicenseTerms /Roles:MB
You probably have detected that I actually have not done the conditions as I had it listed within the section higher than. Well, with the command higher than, you may see I used a switch referred to as /InstallWindowsComponents.
If you favor to try and do the installation of the conditions manually, you’ll do therefore by running the subsequent PowerShell command:
Install-WindowsFeature Web-WebServer,Web-Common-Http,Web-Default-Doc,Web-Dir-Browsing,Web-Http-Errors,Web-Static-Content,Web-Http-Redirect,Web-Health,Web-Http-Logging,Web-Log-Libraries,Web-Request-Monitor,Web-Http-Tracing,Web-Performance,Web-Stat-Compression,Web-Dyn-Compression,Web-Security,Web-Filtering,Web-Basic-Auth,Web-Client-Auth,Web-Digest-Auth,Web-Windows-Auth,Web-App-Dev,Web-Net-Ext45,Web-Asp-Net45,Web-ISAPI-Ext,Web-ISAPI-Filter,Web-Mgmt-Tools,Web-Mgmt-Compat,Web-Metabase,Web-WMI,Web-Mgmt-Service,NET-Framework-45-ASPNET,NET-WCF-HTTP-Activation45,NET-WCF-MSMQ-Activation45,NET-WCF-Pipe-Activation45,NET-WCF-TCP-Activation45,Server-Media-Foundation,MSMQ-Services,MSMQ-Server,RSAT-Feature-Tools,RSAT-Clustering,RSAT-Clustering-PowerShell,RSAT-Clustering-CmdInterface,RPC-over-HTTP-Proxy,WAS-Process-Model,WAS-Config-APIs
Once complete, boot your
server and so make sure to run the setup
command within the previous
step.
Note: If you’re having hassle obtaining the PowerShell
command to figure, you’ll go here for a lot of info regarding the
Install-Windows Feature cmdlet.
The setup
is unattended rather like Exchange
2016 or 2013 once run
from the instruction. Looking on what quantity RAM and CPUs
you allotted to your
server or if this can be a work with restricted resources, the
setup will take a moment. Don’t panic if it appears nothing is occurring occasionally — the setup is
busy within the background.
Once your
server installation finishes, boot your
server. The post-setup tasks area
unit an equivalent as you’d do with Exchange 2016 or
Exchange 2013. These embrace the
following:
- Import your SSL certificate or produce a replacement certificate request
- Configure your URLs (Auto discover, OAB, MAPI, OWA, ECP)
- License your Exchange 2019 Server therefore you don’t hit a limitation on the amount of databases you’ll mount
- Attach your storage (mount points or direct-attached)
- Create your Exchange databases
- Create your info handiness cluster (DAG)
- Add your DAG copies.
- Test that your DAG works before you set the work on
- Create a take a look at mailbox and ensure that Outlook works. take a look at Auto discover, OWA, etc.
- Configure your DNS (internally and externally)
- Test mail flow (internally and externally)
The items listed higher
than don’t seem to be in a very specific order.
Once you’ve got designed your server and done
testing, you’ll currently take a look at a migration of a user from Exchange 2016 or
Exchange 2013 if you’re running
a existence atmosphere. If this can be a spick-and-span atmosphere with no users,
then you’ll move and make your users, meeting rooms, shared mailboxes,
etc. bear in mind that
PowerShell is your friend and you’ll just about produce your organization units
and users with a script and CSV file.
As you’ll see higher than, it’s not tough to urge AN Exchange
2019 Server put in on
Windows Server 2019 Core Edition.