A RAM, or Random Access Memory, is an essential component of every contemporary computer, tablet, or smartphone. It stores data that an operating system needs to access fast in order to correctly run itself as well as all of your games, apps, and other programmes. It’s hundreds of times faster than even the fastest SSDs. If your RAM fails, your computer will give you a lot of grief. System deadlocks (computer simply “hangs” and stops responding to any user input), blue screens of death (also known as BSOD), software crashes, and other severe problems are frequently caused by damaged memory, making any work with a computer nearly impossible.
Do not hurry to the nearest store to buy a pair of new RAM sticks if you feel your computer is having RAM issues. Start by running a RAM test on Windows 10. To perform a memory test in Windows 10, you’ll need to either a third-party programme or the one included with the operating system. Since Windows Vista, the operating system from Microsoft has been able to run a built-in Windows memory diagnostic programme and detect RAM problems.
How do you know if you need to conduct a Windows memory check on your computer? The persistent blue screen of death, as explained above, is the most evident indicator of faulty RAM. It will display halt codes pertaining to memory and its operation, such as MEMORY MANAGEMENT or something like.
In this post, we’ll teach you how to do a RAM test in Windows 10 and give you some pointers for determining whether or not your computer need more memory.
What is the procedure for running a memory check in Windows 10?
It’s simple to use a built-in Windows memory check or diagnostic tool, and it doesn’t require any special skills. All you need to know is how to run the RAM check CMD function in Windows 10.
Consider the following before beginning a memory check on Windows 10:
- Reset your BIOS to factory defaults. Any RAM overclocking will be removed. This step is especially critical since people sometimes confuse faulty RAM with wrong overclocking settings.
Open your computer casing and swap RAM modules if possible. If your motherboard’s A1-A2 slots are full, move them to B1-B2 slots. Skip this step if you’re using all four slots or your motherboard only has two.
If at all feasible, only fill one slot and see how well your PC runs. Perhaps only one RAM stick is having issues;- Make sure you’re using the same memory sticks. Although memory mismatch is rarely an issue anymore, the optimum performance is obtained when identical memory sticks from the same kit with the same clock speed, timings, and size are used.
If the issues persist after you’ve tried everything else, it’s time to do a memory check on Windows 10.
RAM test for Windows 10
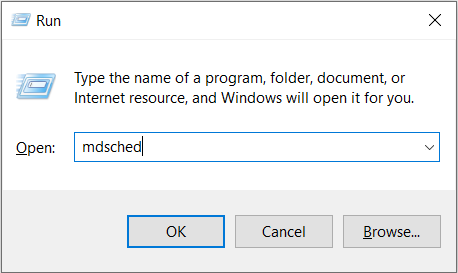
Press Win + R on your keyboard and type the following Windows 10 RAM check command: mdsched.
The next thing you will see will be a small windows prompt asking you to immediately reboot your system or wait until the next time you start a PC. Choose whatever suits you better.
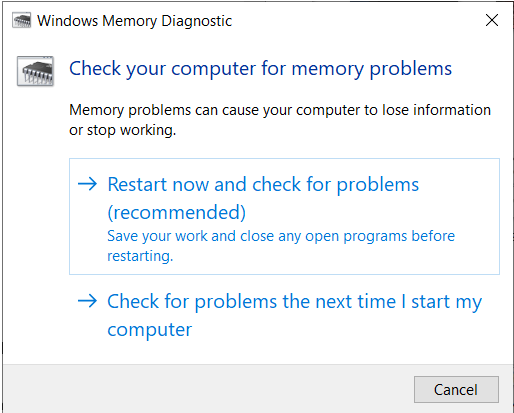
Please keep in mind that after you run the Windows 10 memory test cmd, the scan will begin as soon as your machine resumes. You can either use the default memory check settings or choose from a number of presets.
There are three types of RAM tests available in Windows:
- The quickest method is the Basic Windows Memory Test, which runs only three tests to examine the RAM: MATS+, INVC, and SCHCKR.
- The default selection is the standard memory test. LRAND, SCHCKR3, Stride6, WINVC, and WMATS+ are some of the other tests available.
- All of the basic Windows memory tests are included, as well as CHCKR4, CHCKR8, Stride6, Stride38, WSCHCKR, WCHCKR3WStride-6, and ERAND.

You can also select the pass count from 0 to 15 and activate or prevent the use of caching. Select a few passes if you have time to check RAM can take the continuous stress. By default, Windows performs two passes of the RAM test. The RAM test will run until a user voluntarily stops it if you choose 0.
The keys shown below the screen can be used to explore the Windows 10 memory test interface.
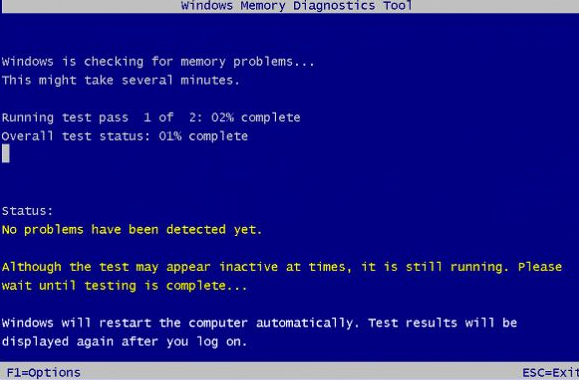
The check can take anywhere from a few minutes to many hours, depending on the exam and the number of passes. A notification will appear if an error occurs during the scanning process. All faults and errors found throughout the test will be kept in a Windows 10 RAM check log file that you may access once the test is completed.
If your PC has two or more RAM sticks, we recommend removing all of them and leaving only one inserted for the most efficient RAM check in Windows 10. Run the memory check in Windows 10 on each stick independently. This will allow you to know which memory stick is working properly and which is not.
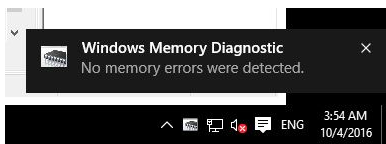
A computer will restart automatically if the memory test found no faults with your RAM. You’ll notice a notification in the lower right corner when signing back into your account. You may get to the test’s log file from there.
Windows Memory Diagnostic
No memory errors were detected.
The scan findings can also be found in the system events log. Press Win + R and type eventvwr.msc to launch the Events Viewer. Navigate to the Event Viewer (Local) – Windows Logs – System section. Locate and open events from the MemoryDiagnostics-Results source.
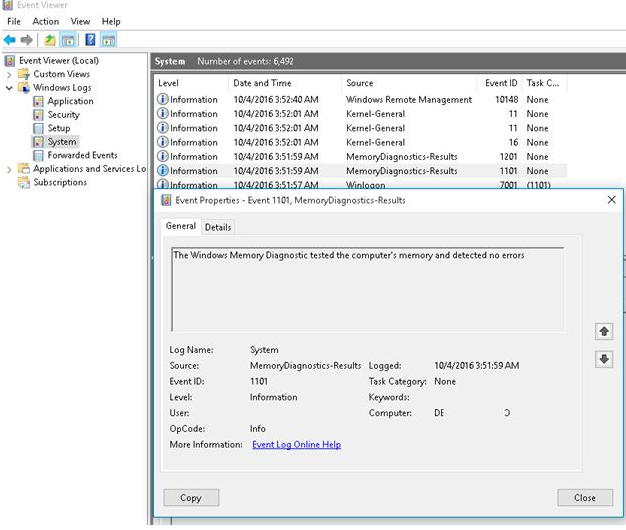
An event description in our case has the following text:
The Windows Memory Diagnostic tool checked the memory of the computer and found no issues.
Here’s a helpful hint. Disable automatic Windows RAM check if Windows does memory checks every time you turn on a computer. As Administrator, open Command Prompt and type the following command:
bcdedit /bootsequence {memdiag} /removeAnother approach to do a RAM check in Windows 10 is to use the Task Manager.
A third-party utility called memtest 86 can be used by more sophisticated users. It is available for download from the official website. Memtest does a memory check in the same way as the built-in tool, but it requires a flash drive to run. It’s also not very beneficial if your computer isn’t working properly.
After you’ve completed the Windows 10 RAM check, what should you do next?
Your following actions will be determined by the results of the memory test log file. Look for a solution to the errors you’ve found and, if necessary, replace your RAM. If no errors are found yet the problem persists, try the following:
- Make sure your BIOS / UEFI is up to date. You’ll be surprised at how much a simple BIOS update may increase RAM performance, particularly on AMD Ryzen-based systems.
- Windows should be reinstalled. Yes, we understand how stereotypical this suggestion is, and how people are weary of hearing about how to reinstall Windows from every website. However, the unfortunate reality is that a fresh copy of Windows 10 frequently solves all of the mystery bugs. That’s thanks to Microsoft.
- Check other components or try using your RAM on a different machine to see if it behaves improperly. If feasible, try out different RAM sticks to see how they affect your PC’s performance. This is especially crucial because a damaged motherboard could be another reason your PCs are acting erratically.