This is a PowerShell tutorial for viewing, adding, and removing mailbox calendar permissions for users in Office 365 (and on-premises Exchange). For example, you may need to give a few users read permissions to the room mailbox calendar. You may provide particular users or an AD security group access to room mailboxes and calendars. Calendar permissions should be assigned to a security group in most circumstances. To grant access to a specific mailbox calendar, all you have to do in this situation is add the user to the Active Directory group (without changing mailbox calendar permissions via PowerShell).
Users in Exchange and Office 365 organizations can’t see other users’ Outlook e-mails or calendar entries by default. The ability to access the Free/Busy information in other users’ calendars is the only privilege that all users have by default (this is the AvailabilityOnly role).
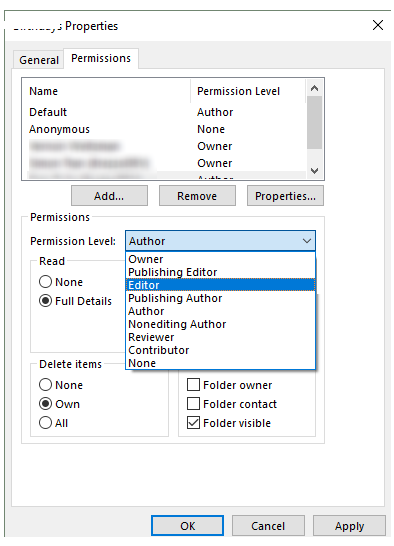
From the Outlook/OWA interface, users can grant other users the appropriate rights for Outlook mailbox folders and items. Unfortunately, calendar permissions cannot be managed centrally in Exchange 2016/2013 and Exchange Online (Office 365) using the GUI (Exchange MMC, EAC—Exchange Administration Center, or Office 365 admin portal). You can, however, utilize PowerShell’s built-in Add-MailboxFolderPermission cmdlet to manage user rights on any user’s mailbox folder (this cmdlet first appeared in Exchange Server 2010).
Connecting Office 365/Exchange from PowerShell
To begin, you must first establish a connection to your Office 365 or on-premises Exchange tenant.
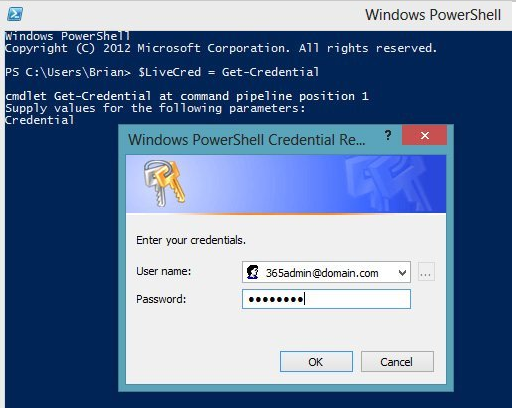
As Administrator, run the Windows PowerShell CLI;

Run the following command to save your administrator’s credentials into the PowerShell variable:
$LiveCred = Get-CredentialIf you are trying to connect to Office 365, specify your Office 365 tenant admin credentials:
Note. How to connect and manage Office 365 using PowerShell.
Now you need to create a new session:
For Office 365:$Session = New-PSSession -ConfigurationName Microsoft.Exchange -ConnectionUri https://outlook.office365.com/powershell-liveid/ -Credential $LiveCred -Authentication Basic –AllowRedirectionFor Exchange Server 2010, 2013, 2016, and 2019:$Session = New-PSSession -ConfigurationName Microsoft.Exchange -ConnectionUri https://<your-target-exchange-server-address>/powershell/ -Credential $LiveCredNote. In our case when we tried to run the previous command to connect Exchange 2010 we’ve received an error:
[ny-msg-02] Connecting to the remote server failed with the following error message: The WinRM client cannot process the request. The WinRM client tried to use Negotiate authentication mechanism, but the destination computer (my-msg-02:443) returned an ‘access denied’ error. Change the configuration to allow Negotiate authentication mechanism to be used or specify one of the authentication mechanisms supported by the server. To use Kerberos, specify the local computer name as the remote destination. Also, verify that the client computer and the destination computer are joined to a domain. To use Basic, specify the local computer name as the remote destination, specify Basic authentication and provide the user name and password. The server reported possible authentication mechanisms.
To connect to the target Exchange CAS server in our environment, we should utilize HTTP (rather than HTTPS) and Kerberos authentication. This is how the connection command should look:
$Session = New-PSSession -ConfigurationName Microsoft.Exchange -ConnectionUri http://ny-msg-02/powershell/ -Credential $LiveCred -Authentication KerberosThe next step is to import Office 365/Exchange management commands from another session to your PowerShell console:
Import-PSSession $SessionImport-PSSession: Files cannot be loaded because running scripts on this system have been disabled. To sign the files, you must provide a valid certificate.
In this instance, you must allow the script to run. Set the PowerShell Execution Policy variable to RemoteSigned: to do this.
RemoteSigned-Set-ExecutionPolicy


How to Get-Mailbox Calendar Permissions Using PowerShell?
You can view the current calendar (folder-level) permissions of the specified mailbox by using the ALL cmdlet (this cmdlet is available in the cloud-based service and on-premises Exchange):
Get-MailboxFolderPermission username:\calendar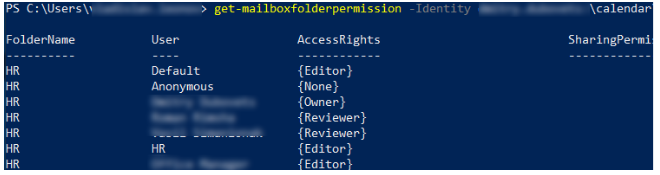
If you get an error when running the following commands, here’s a hint:
Get-MailboxFolderPermission: Get-MailboxFolderPermission: Get-MailboxFolder Get-MailboxFolderPermission is not a recognised name for a cmdlet, function, script file, or executable programme. Check the spelling of the name, or if a path was included, make sure it’s correct before trying again.
This indicates that you did not finish connecting to your Exchange/Office 365 tenant and did not import PowerShell Exchange cmdlets into your session. Read the previous paragraph carefully and follow the steps.
If this command returns that ‘username: calendar’ cannot be found, the user’s Outlook language settings are most likely set to anything other than English. The Calendar folder name can be changed appropriately (calendarkalendercalendariocalendrierкалендаp). To view calendar permissions in the Dutch Language (nl-NL), for example, use the command:
Get-MailboxFolderPermission username:AgendaYou can get the name of the calendar in the current user’s language configuration with the command:
(Get-MailboxFolderStatistics username -FolderScope Calendar).Identity
Check the current calendar permissions with the command:
Get-MailboxFolderPermission brett.jackson:\calendarAs you can see, the default AvailabilityOnly role is assigned to a calendar folder only.

You can get the list of all mailbox calendars permissions in your organization using the following command:
Get-Mailbox | ForEach-Object {Get-MailboxFolderPermission $_”:\calendar”} | Where {$_.User -like “Default”} | Select Identity, User, AccessRightsOutlook: Calendar Permission Levels and Access Roles
When managing calendar and Outlook folder permissions, you can use the following built-in Exchange roles:
- Owner — gives complete control of the mailbox folder: read, create, modify, and delete all items and folders. Also, this role allows for to manage of item’s permissions;
- PublishingEditor — read, create, modify, and delete items/subfolders (all permissions, except the right to change permissions);
- Editor — read, create, modify, and delete items (can’t create subfolders);
- PublishingAuthor — create, and read all items/subfolders. You can modify and delete only items you create;
- Author — create and read items. Edit and delete own items;
- NonEditingAuthor — full read access, and create items. You can delete only your own items;
- Reviewer — read folder items only;
- Contributor — create items and folders (can’t read items);
- AvailabilityOnly — read Free/Busy info from the calendar;
- LimitedDetails — view availability data with calendar item subject and location;
- None — no permissions to access folders and files.
You can also use granular permissions to fine-tune the access rights to the mailbox calendar. The following values are available:
- CreateItems;
- CreateSubfolders;
- DeleteAllItems;
- DeleteOwnedItems;
- EditAllItems;
- EditOwnedItems;
- FolderContact;
- FolderOwner;
- FolderVisible;
- ReadItems.
The Permission Level roles described above are just a set of granular permissions. For example, the Editor role is a set of the following individual permissions: CreateItems, DeleteAllItems, DeleteOwnedItems, EditAllItems, EditOwnedItems, FolderVisible, ReadItems
How to Set Office 365/Exchange Calendar Permissions Using PowerShell?
In order to grant user2 the permissions to view and edit user1 calendar items, run the following command:
Add-MailboxFolderPermission -Identity user1@domain.com:\calendar -user user2@domain.com -AccessRights EditorIf some of the items in the calendar are marked as Private, you can allow delegating the permissions to view Private calendar items using the command:
Add-MailboxFolderPermission –Identity user1@domain.com:\calendar –User user2@domain.com -AccessRights Editor -SharingPermissionFlags Delegate,CanViewPrivateItemsIf you need to change the default permissions for the calendar folder (to allow all organization users to view a calendar of the specified user), run the command:
Set-MailboxFolderPermission -Identity user1@domain.com:\calendar -User Default -AccessRights ReviewerCheck the current calendar permissions again using the Get-MailboxFolderPermissions cmdlet, they should change:
Get-MailboxFolderPermission -Identity user1@domain.com:\calendar
You can also grant permissions for the mailbox not to an individual user, but to the Exchange distribution group:
New-DistributionGroup -Type Security -Name “Resource Calendar Owners” -Alias “grResourceCalendarAccess” add-MailboxFolderPermission -Identity user1@domain.com:\calendar -User grResourceCalendarAccess -AccessRights OwnerIn some cases, you need to grant Reviewer permissions on a calendar folder in all user’s mailboxes in your Exchange organization. You can make this bulk calendar permissions change using a simple PowerShell script. To change the Default calendar permission for all mailboxes to Reviewer:
foreach($usermbx in Get-Mailbox -RecipientTypeDetails UserMailbox) { $usercalendar = $usermbx.alias+":\Calendar" Set-MailboxFolderPermission -Identity $usercalendar -User Default -AccessRights Reviewer }Also, you can prepare a CSV file with a list of users, and assign them permissions to access a specific user’s calendar:
Import-Csv users.csv | foreach { add-MailboxFolderPermission -Identity "user1@domain.com:\calendar" -User $_.alias -AccessRights Owner }The Set-MailboxFolderPermission cmdlet’s argument SendNotificationToUser can be used to send a “share invitation” email that outlines your modifications. Only when one of the following permissions is set via the AccessRights parameter may the option -SendNotificationToUser $true be used: LimitedDetails, Reviewer, or Editor are all options. Send a sharing invitation to user2 with the following command:
Add-MailboxFolderPermission -Identity user1@domain.com:\calendar -user user2@domain.com -AccessRights Editor -SendNotificationToUser $true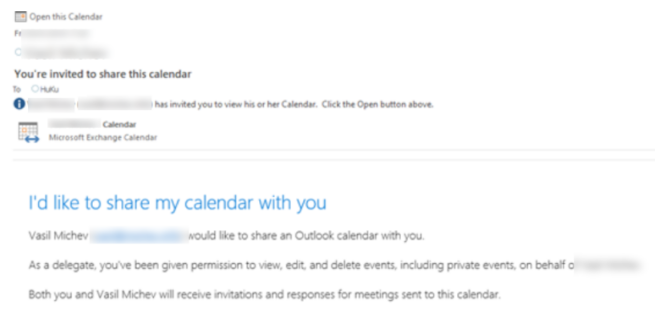
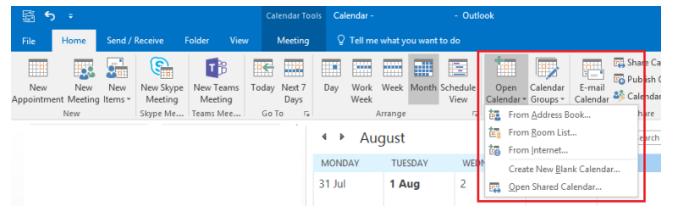
How to Add Shared Calendar in Outlook 2016?
Switch to the calendar view and pick the calendar type you want to add to view other calendars in Outlook 2016 (including room resources and shared calendars). You can choose a user from the Address Book (Global Address List – GAL), the Open Shared Calendar (user name must be specified), the Room List, and the Internet (web calendar).
You could want to add a calendar from the Global Address List, for example. Click OK when you’ve found the name of the calendar you wish to add to Outlook. The shared calendar should appear in the Shared Calendars section of My Calendars.
For example, you want to add a calendar from the Global Address List. Find the calendar name you want to add to Outlook and click OK. The shared calendar should appear under the My Calendars in the Shared Calendars section.
How to Remove and Reset Calendar Permissions via PowerShell?
To remove permissions use the Remove-MailboxFolderPermission cmdlet:
Remove-MailboxFolderPermission -Identity user1@domain.com:\calendar –user user2@domain.comIf you want to reset the user’s calendar permissions to default, then run:
Get-MailboxFolderPermission brett.jackson:\Calendar | % { Remove-MailboxFolderPermission -Identity $_.Identity -User $_.User }To exclude some “default” permissions entries from the removing script, use the following PowerShell one-liner:
Get-MailboxFolderPermission brett.jackson:\Calendar | ? {$_.User -notmatch "^(Default|Secretary|Anonymous)$"} | % { Remove-MailboxFolderPermission -Identity $_.Identity -User $_.User.ADRecipient.ExchangeObjectId.Guid -Confirm:$false }Now you can disconnect your PowerShell session from Office 365/Exchange:
Remove-PSSession $Session