A large number of network printers can be connected to print servers running Windows Server. With a large number of devices, the Windows print queue may freeze, making it impossible to remove a print job from the queue or “soft” clean the entire print queue using the “Print Management > Printers > Open Print Queue > Cancel all documents” console. The print and document queues obstruct the sending of fresh files for printing. The server may experience high CPU utilization of up to 100% in this circumstance.
On a Windows Server 2016/2012R2/2008R2 network print server, this guide will show you how to manually clear a job stuck in the print queue. The obvious first step is to restart the printer/computer. You can also delete or cancel a work in the queue by right-clicking on it. If those steps don’t work, proceed to the instructions below.
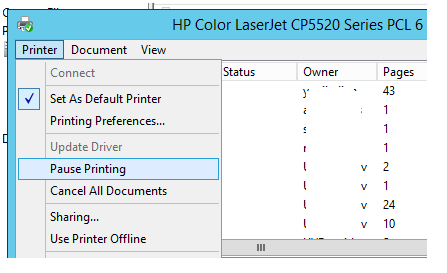
Make sure the Pause Printing and Use Printer Offline options in the Windows print queue management menu are off before continuing. These options should be disabled.
Windows Server: Clear out Stuck Print Job
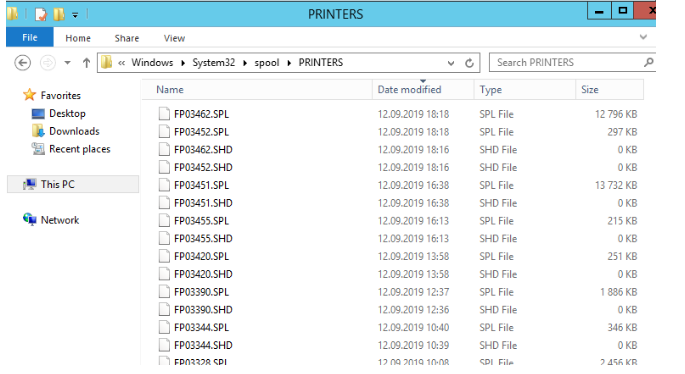
- Go to C:WindowsSystem32spoolPRINTERS and double-click it.
Each print job has two matching files: a.SPL file and a.SHD file, which you should look for.
What exactly are these files? When you print a document, the Windows Print Service (Print Spooler) creates two files in the percent systemroot percent System32spoolPRINTERS directory: one with the.SHD extension (which contains the print job’s settings), and the other with the.SPL extension (which contains the print job’s settings) (contains the data that needs to be printed). These files are automatically erased from both this directory and the print queue after successful printing.
2. I normally use notepad to open the.SPL files and look for the relevant print job. They usually include the printer model and the username of the person who printed. The files aren’t attractive, but with a little CTRL+F, you should be able to find the document that’s stuck in the queue.
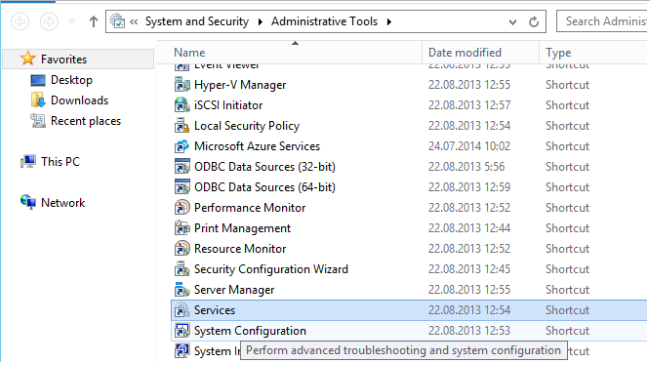
3. Now go to the Start Menu > Administrative tools and launch the Services console (services.msc).
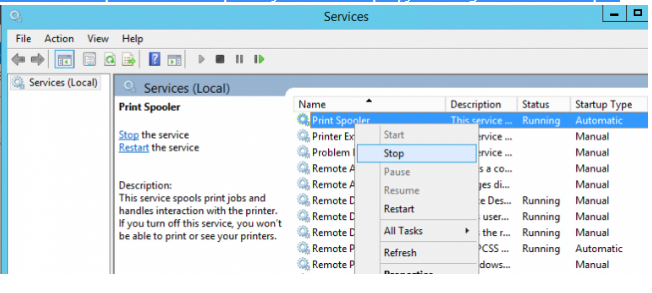
4. Right click on “Print Spooler” and stop it. If you don’t stop it, you will get errors in Step 5.
5. Step 1: Delete the.SPL and.SHD files that correspond to the stuck document.
6. By right-clicking on the print spooler service and selecting “Start,” you can restart it.
7. It should now be gone if you refresh the print queue window!
Reset and Clear Print Spooler in Windows Server without Reboot
If this method did not help you, you can completely clear the print queue on the server, but all (!!!) print jobs in the queues of all printers will be deleted.
To do this, open an elevated command prompt and, run the following commands in turn:
net stop spooler

del %systemroot%\system32\spool\printers\*.shd /F /S /Q

del %systemroot%\system32\spool\printers\*.spl /F /S /Q

net start spooler
If you prefer PowerShell, you can clear the print queue with this script:
Get-Service *spool* | Stop-Service -Force -Verbose

Start-Sleep -Seconds 10

$path = $env:SystemRoot + ”\system32\spool\printers\”

Get-ChildItem $path -File | Remove-Item -Force -Verbose

Get-Service Spooler | Start-Service -Verbose
If old documents are accumulating in your print queues, you can periodically delete them from the queue. For example, the following script deletes all documents older than 2 days from print queues:
Get-Printer | get-printjob | where{$_.SubmittedTime -lt ((Get-Date).adddays(-2))} | Remove-PrintJobIf the printer doesn’t print after clearing the print queue, try the following options:
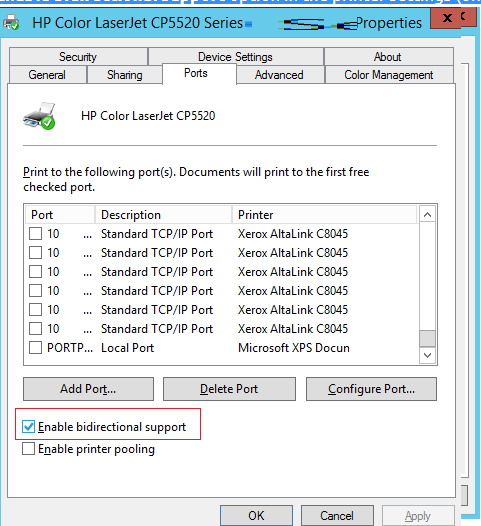
- Try to disable the Enable bidirectional support option in the printer settings (on the Ports tab);
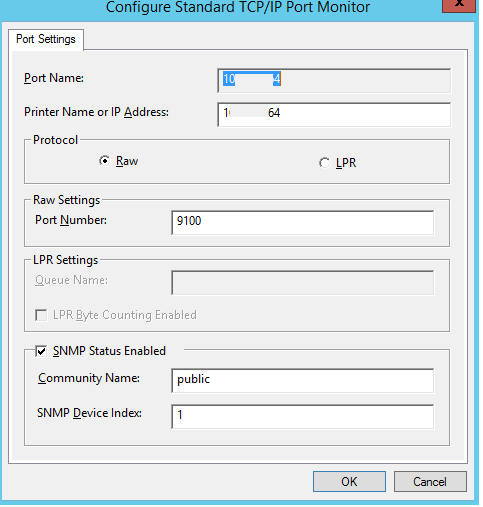
2. Recreate the print port of your network printer in the console section Print Management > Ports.

3. Make sure you’re not printing from WSD ports. When you install a new network printer in Windows Server 2012R2, a WSD port is automatically generated. The “ghosts” of finished tasks stay in the Spooler folder when utilising this port type. They can be manually removed from the Spooler folder (the Print Spooler service does not lock them), but they remain in the printer queue window. Change the port type to Standard TCP/IP Port from WSD.
4. In the printer port settings, enable the SNMP Status Enabled option.
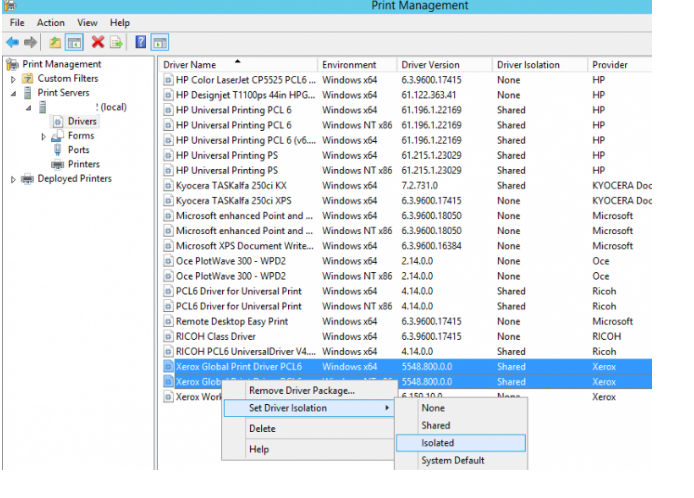
5.Try to enable driver isolation mode for problematic printer drivers. Select print driver > right click > Set Driver Isolation > Isolated.
You can locate/delete the files as well as stop/restart the print spooler without any downtime if you work in a small business environment. Setting the driver in isolation mode is another technique to repair a work stuck in the queue. That is the subject of a separate article. This is just a quick technique to get to the front of the line.