The Sysprep programme is used to create a reference Windows image and depersonalise it, as well as remove all unique identifiers (SID, GUID) from the system, which is required for proper deployment on a corporate network (see our Sysprep Windows 10 Guide). When using the sysprep /generalize /oobe /shutdown command to create a reference Windows 10 image, Sysprep.exe may return the following error: Sysprep Was Not Able to Validate Your Windows Installation.
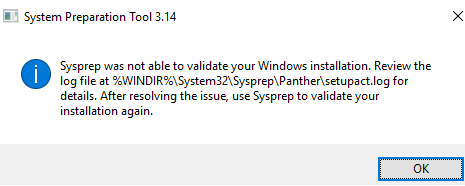
System Preparation Tool 3.14
Sysprep was not able to validate your Windows installation. Review the log file at %windir%\system32\Sysprep\panther\setupact.log for details. After resolving the issue use Sysprep to validate your installation again.
How to Fix Sysprep Was Not Able to Validate Your Windows Installation Error?
To fix the error go to the C:\Windows\System32\Sysprep\Panther directory and open the sysprep log file (setupact.log) using any text editor (for example, Notepad).
Begin by looking over the contents of the setupact.log file from the bottom to the top for any issues. You’ll need to take different steps to fix the mistake depending on what it is. The probable Sysprep errors are discussed below.
Turn BitLocker Off to Run Sysprep
Error SYSPRP BitLocker-Sysprep: BitLocker is on for the OS volume. Turn BitLocker off to run Sysprep. (0x80310039)
Error [0x0f0082] SYSPRP ActionPlatform::LaunchModule: Failure occurred while executing ‘ValidateBitLockerState’ from C:\Windows\System32\BdeSysprep.dll
Open the command prompt as administrator and run the command:
manage-bde -statusIt should return the following info:
Disk volumes that can be protected with
BitLocker Drive Encryption:
Volume C: [OSDisk]Conversion Status: Encryption in Progress
This problem is particularly common on Windows 10 tablets and laptops that use InstantGo encryption (based on BitLocker.) To resolve this issue, run the following PowerShell command to disable encryption for the Windows system volume:
Disable-Bitlocker –MountPoint ‘C:’
SYSPREP Failed to Remove Apps for the Current User
Check if there are such errors in the setupact.log:
Error SYSPRP Package SomeAppName_1.2.3.500_x64__8we4y23f8b4ws was installed for a user, but not provisioned for all users. This package will not function properly in the sysprep image.
Error SYSPRP Failed to remove apps for the current user: 0x80073cf2.Exit code of RemoveAllApps thread was 0x3cf2
This suggests you either manually installed current UWP (APPS) Apps from the Windows Store or uninstalled a specific programme erroneously.
Attempt to uninstall this software package using PowerShell commands (run the command in the PowerShell console as Administrator)
Get-AppxPackage –Name *SomeAppName* | Remove-AppxPackage

Remove-AppxProvisionedPackage -Online -PackageName SomeAppName_1.2.3.500_x64__8we4y23f8b4ws
You must remove the UWP app from the other users’ accounts if it was installed for a different user account. Execute the following PowerShell command:
Get-AppxPackage -AllUsers | ? {$_.PackageFullName -eq 'SomeAppName_1.2.3.500_x64__8we4y23f8b4ws'}Check the value of PackageUserInformation. Remove any local users who have this package installed if they are no longer needed. Alternatively, disable the APPX for all users:
Remove-AppxPackage -Package 'SomeAppName_1.2.3.500_x64__8we4y23f8b4ws' -AllUsersRestart the computer and run Sysprep once more.
If Sysprep still won’t work, you’ll need to remove the following provision package from your Windows image:
Remove-AppxProvisionedPackage -Online -PackageName 'SomeAppName_1.2.3.500_x64__8we4y23f8b4ws'The next time Sysprep is used in a UWP package, it may fail. As previously stated, delete it. All non-standard UWP Microsoft Store apps should be removed.
Before you generate the image, remove the Internet connection or disable Automatic Updates in Audit mode. This disables automatic app updates in the Microsoft Store. Remove all local user profiles, leaving only the local administrator profile.
Sysprep Will not Run on an Upgraded OS
When trying to execute Sysprep on a Windows 10 image that has been upgraded from a prior version (Windows 8.1 or Windows 7 SP1), you should get the following error in the setupact.log file:
Error [0x0f0036] SYSPRP spopk.dll:: Sysprep will not run on an upgraded OS. You can only run Sysprep on a custom (clean) install version of Windows.
[0x0f0082] SYSPRP ActionPlatform::LaunchModule: Failure occurred while executing ‘Sysprep_Clean_Validate_Opk’ from C:\Windows\System32\spopk.dll; dwRet = 0x139f
Running a Sysprep on a Windows image that has been upgraded from a previous version of Windows is not recommended by Microsoft. It is advised that you use an image with a fresh Windows 10 installation. There is, however, a means to get around this requirement:
- Open the Registry Editor (regedit.exe) and go to the following registry key HKEY_LOCAL_MACHINE\SYSTEM\Setup;
- Find the registry parameter named Upgrade and delete it;
- Then go to the key HKEY_LOCAL_MACHINE\SYSTEM\Setup\Status\SysprepStatus and change the parameter of the CleanupState key to 7.
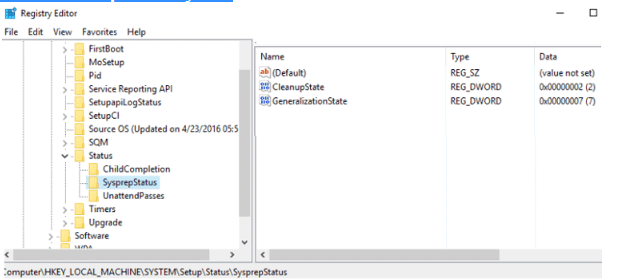
As a result, Sysprep will presume that this copy of Windows is being installed in clean mode. Reboot your PC and run Sysprep once more.
Sysprep Audit Mode Can’t be Turned on if There is an Active Scenario
Another Sysprep error occurs in new Windows 10 builds (1909, 20H2, 21H1). Sysprep fails with the following error in the setupact.log:
Error SYSPRP Sysprep_Clean_Validate_Opk: Audit mode can’t be turned on if there is an active scenario.; hr = 0x800F0975
Error SYSPRP ActionPlatform::LaunchModule: Failure occurred while executing ‘Sysprep_Clean_Validate_Opk’ from C:\Windows\System32\spopk.dll; dwRet = 0x975
Error SYSPRP SysprepSession::Validate: Error in validating actions from C:\Windows\System32\Sysprep\ActionFiles\Cleanup.xml; dwRet = 0x975
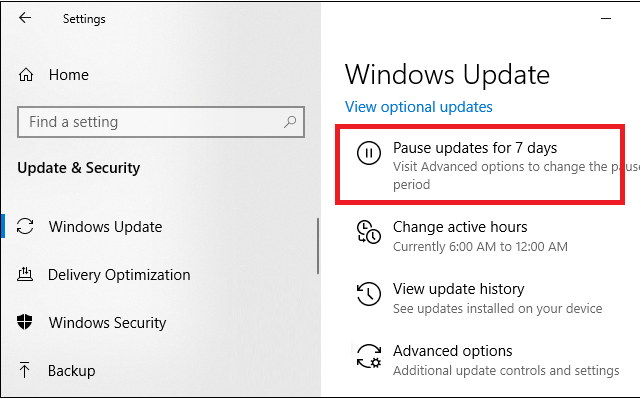
Error SYSPRP RunPlatformActions:Failed while validating Sysprep session actions; Error [0x0f0070] SYSPRP RunDlls:An error occurred while running registry sysprep DLLs, halting sysprep execution. dwRet = 0x975To fix the Sysprep error, utilise the contemporary Settings control panel to pause Windows updates (Settings > Update & Security > Windows Update > Pause updates for 7 days).