The Basics of PowerShell DSC (Desired State Configuration)
Desired State Configuration (DSC) allows you to configure Windows and applications using a configuration file and PowerShell. As in other configuration management systems (for example, Puppet or Ansible), when using Desired State Configuration, the administrator can describe the required configuration (target state) in the configuration file, and then use PowerShell to apply it to one or several computers/servers. With PowerShell Desired State Configuration, you can greatly simplify the deployment and configuration of servers and workstations with configure your Oss as code.
DSC first appeared in PowerShell 4.0 (a version of the Windows Management Framework introduced in Windows Server 2012 R2).
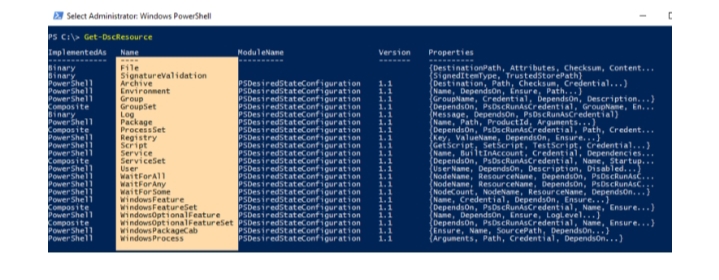
As we said above, the administrator must first create a configuration file that describes the Windows state. You can use the built-in resources (file, environment, registry, script, service, user), or third-party DSC resources. In Windows 10 (Windows Server 2016), there are 23 types of built-in DSC resources. You can display them using the Get-DSCResource command:
- File
- SignatureValidation
- Archive
- Environment
- Group
- GroupSet
- Log
- Package
- ProcessSet
- Registry
- Script
- Service
- ServiceSet
- User
- WaitForAll
- WaitForAny
- WaitForSome
- WindowsFeature
- WindowsFeatureSet
- WindowsOptionalFeature
- WindowsOptionalFeatureSet
- WindowsPackageCab
- WindowsProcess
- Powershell DSC
To demonstrate how DSC works, we will create a simple configuration file. Suppose our task is to configure the server as follows: disable the BranchCache service, start the notepad.exe process, allow RDP access in the registry (the parameter fDenyTSConnections is set to 0), and create the C: PS directory on the local drive.
The Configuration keyword is used to create the DSC configuration file. Create the dsc_test.ps1 file with the following code:
Configuration TestConfiguration
{
Node dc01
{
#Disable BranchCache Service
Service PeerDistSvc {
Name = “PeerDistSvc”
StartupType = “Disabled”
State = “Stopped”
}
#Enable RDP
Registry fDenyTSConnections {
Ensure = “Present”
Key = “HKEY_LOCAL_MACHINESYSTEMCurrentControlSetControlTerminal Server”
ValueName = “fDenyTSConnections”
ValueData = “0”
ValueType = “Dword”
}
#Create C:PS folder
File InstallDir {
Ensure = “Present”
Type = “Directory”
DestinationPath = “C:PS”
}
#Run Notepad.exe
WindowsProcess Notepad
{
Ensure = “Present”
Path = “C:WINDOWSsystem32notepad.exe”
Arguments = “”
}
}
}
TestConfiguration
Hint. In one configuration file, you can describe the state of one or more hosts.
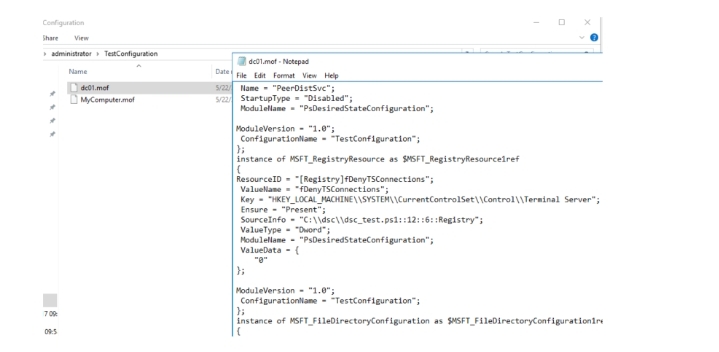
Run this PS1 script file. As a result, the dc01. mof file will appear in the current directory

Based on the configuration file for each node, a separate file is generated in the MOF file format (Management Object Format). You can manually view the contents of the MOF file:
To apply the settings from the DSC configuration file to the server, you need to apply the settings from the MOF file.
There are two ways to apply MOF files.
- Push – configuration files are transferred from the administrator’s workstation to remote computers via WinRM (Windows Remote Management). To do this, use the Start-DscConfiguration cmdlet;
- Pull – managed computers connect to a file server (configuration file repository), download, and apply settings on their own. Pull DSC configuration is based on a special IIS-based AppPool.
Consider applying the DSC configuration via push mode.
Tip. Before using the Push method, you need to configure the execution policy “Set-ExecutionPolicy RemoteSigned” and enable remote PowerShell using the “Enable-PSRemoting” command.
Start-configuration
To do this, use the command with the -Path argument, which specifies the path to the directory containing the MOF files. Apply the previously created configuration file to the current computer:
Start-DscConfiguration -Path C:UsersAdministratorTestConfiguration
Hint. For more detailed information on applying the configuration, use -Wait and –Verbose parameters.

After executing this command, if the computer configuration met the requirements, nothing will change, and if not, the settings will be changed. Settings applied on a computer by the Local Configuration Manager Service. In our example, the directory C: PS was created on the disk, the BranchCahe service stopped, and the notepad.exe process started on behalf of NT AUTHORITY SYSTEM.
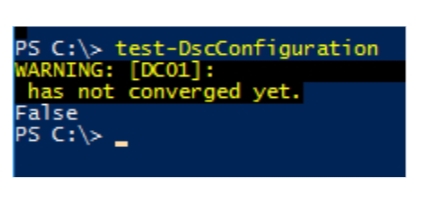
Settings made using the DSC may change over time. You can check for discrepancies between the current settings and the configuration file using the Test-DscConfiguration command. For example, we killed the notepad.exe processes and deleted the C: PS directory. Run the command:
Test-DscConfiguration
The cmdlet returned False, which means the server state does not match the configuration.
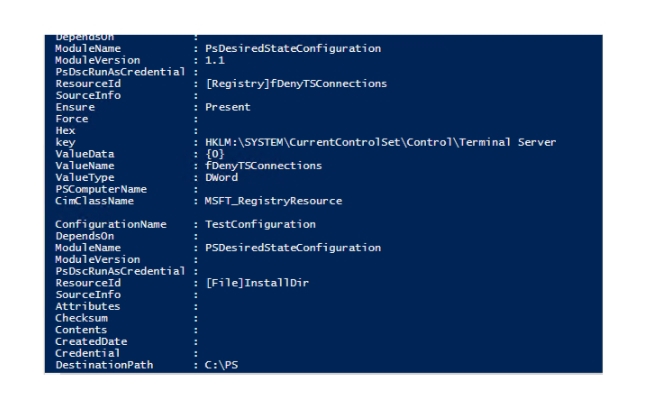
Using the Get-DscConfiguration command, you can get the value of the current DSC configuration settings.
To remove the current DSC configuration from the computer, run the command:
Remove-DscConfigurationDocument -Stage Current -Verbose