Introduction:
In this article, I’ll demonstrate the way to retrieve information from info in ASP.NET internet API victimization jQuery.
Step 1:
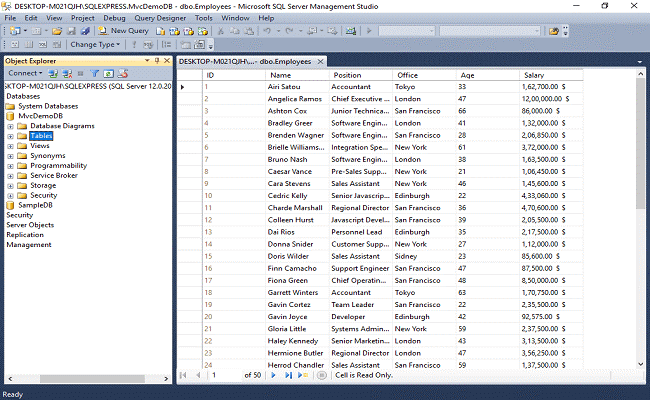
Open SQL Server 2014 and make info table to insert and retrieve the info.
CREATE TABLE [dbo].[Employees](
[ID] [int] IDENTITY(1,1) NOT NULL,
[Name] [nvarchar](50) NULL,
[Position] [nvarchar](50) NULL,
[Office] [nvarchar](50) NULL,
[Age] [int] NULL,
[Salary] [nvarchar](50) NULL,
CONSTRAINT [PK_Employees] PRIMARY KEY CLUSTERED
(
[ID] ASC
)WITH (PAD_INDEX = OFF, STATISTICS_NORECOMPUTE = OFF, IGNORE_DUP_KEY = OFF, ALLOW_ROW_LOCKS = ON, ALLOW_PAGE_LOCKS = ON) ON [PRIMARY]
) ON [PRIMARY]
GO
Step 2:
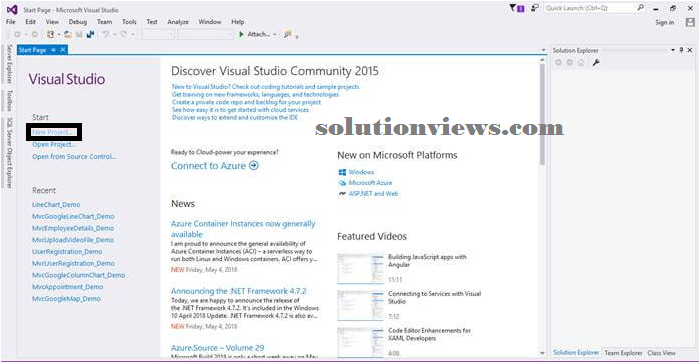
Open Visual Studio 2015, click on New Project, and make Associate in Nursing empty internet application project.
Screenshot for making new project one
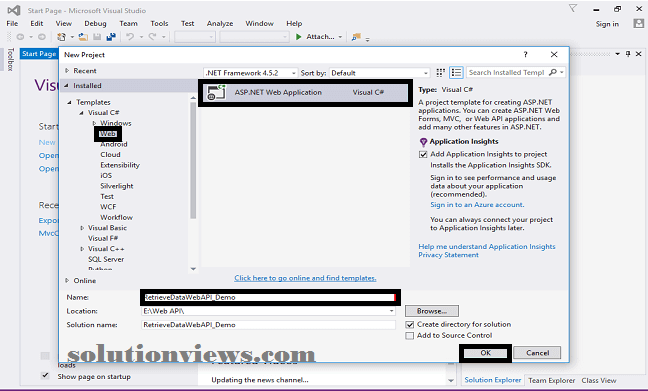
after clicking on New Project, one window can seem. Choose internet from the left panel, choose ASP.NET internet Application, provides a meaning name of your project, then click on OK.
Screenshot for making new project two:
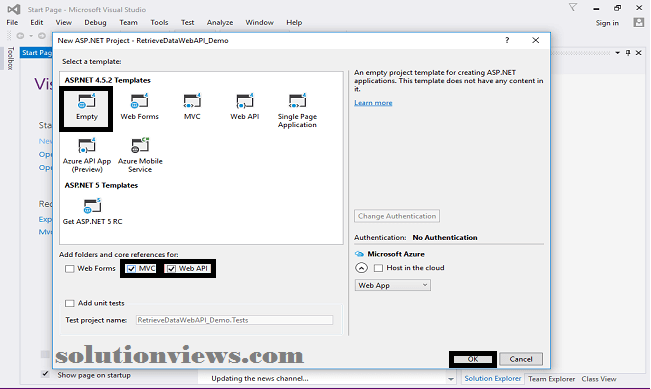
After clicking on OK, an additional window can seem. Select Empty check on MVC and internet API checkbox and click on OK, as shown within the below screenshot.
Screenshot for making new project three
Step 3:
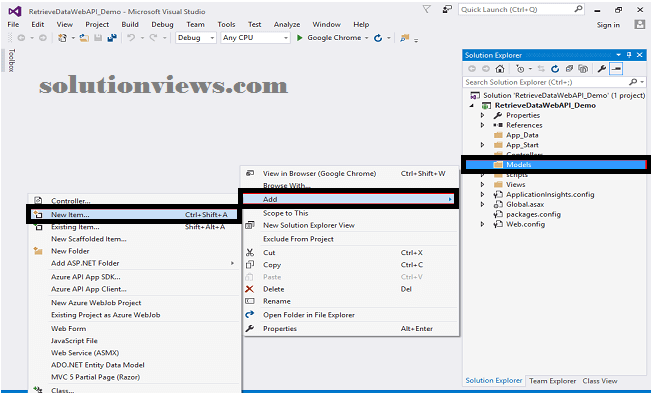
Add Entity Framework, right click on Models folder, select Add, then choose New Item and click on that.
Screenshot for adding Entity Framework one:
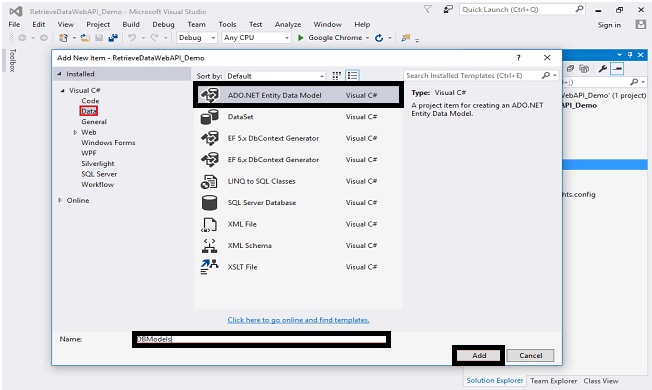
After clicking on New item, you’ll get a window from there. choose information from the left panel and select stir.NET Entity information Model, provides it name DBModels (this name isn’t necessary you’ll offer any name) then click on Add.
Screenshot for adding Entity Framework two:
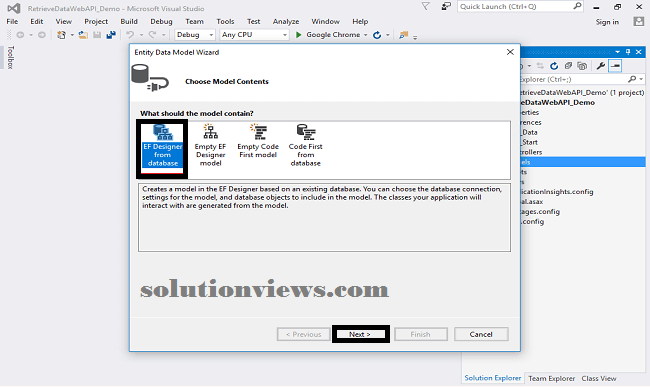
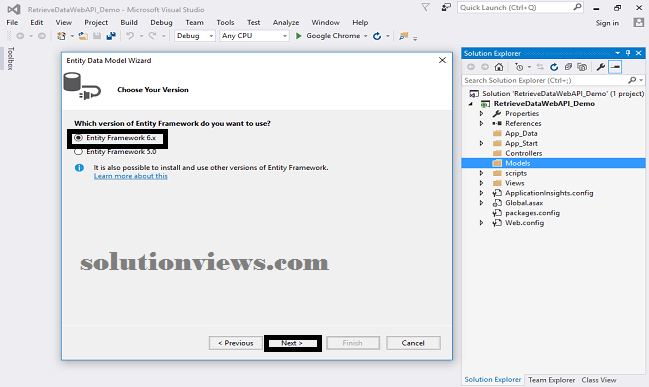
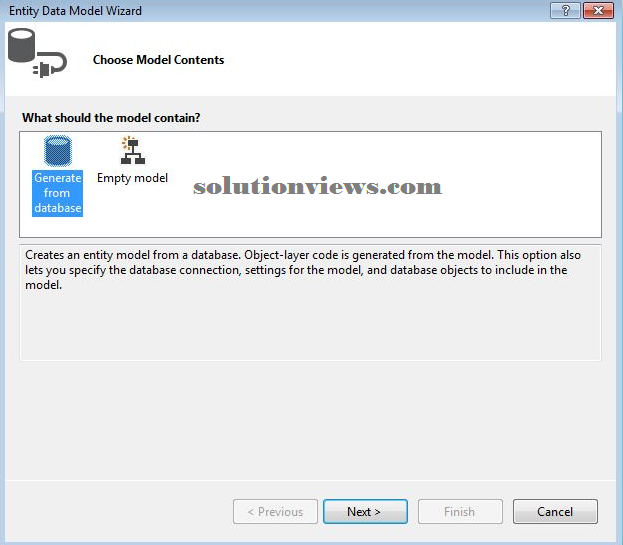
After you click on Add, a window wizard can open. Select EF Designer from the info and click on Next.
Screenshot for adding Entity Framework three:
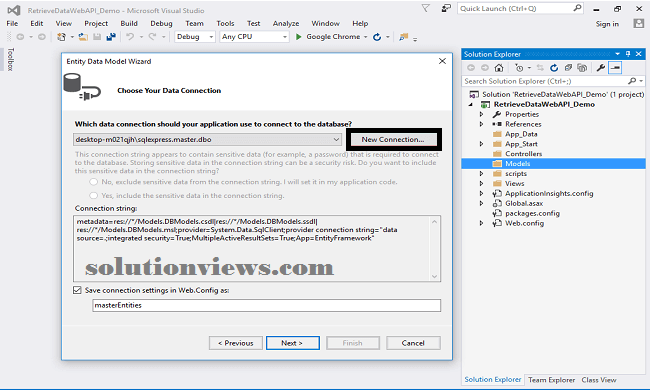
After clicking on Next, a window can get seem. Select New affiliation.
Screenshot for adding Entity Framework three
Screenshot for adding EF:

Another window can seem. Add your server name; if it’s native, then enter dot (.). Select your info and click on OK.
Screenshot for adding entity framework five:
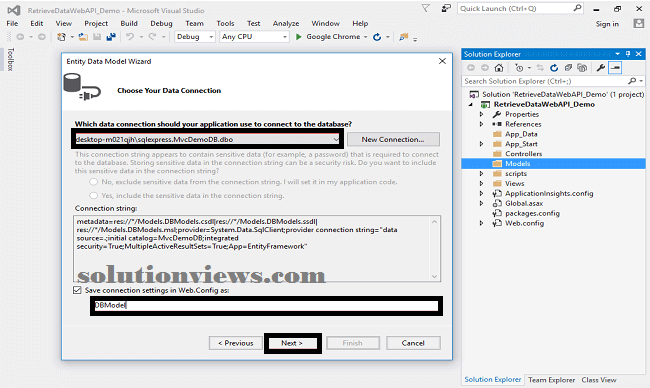
Connection can get supplemental. If you would like save affiliation as you wish. You’ll amendment the name of your affiliation below. It’ll save affiliation in internet config then click on Next.
Screenshot for adding entity framework half-dozen:
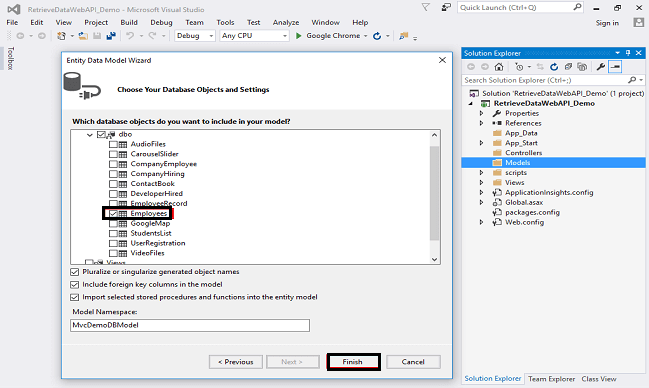
After clicking on NEXT another window can seem select info table name as show in below screenshot then click in end. Entity framework are supplemental with several category get generated beneath Models folder.
Screenshot for adding entity framework seven
Screenshot for adding entity framework eight:
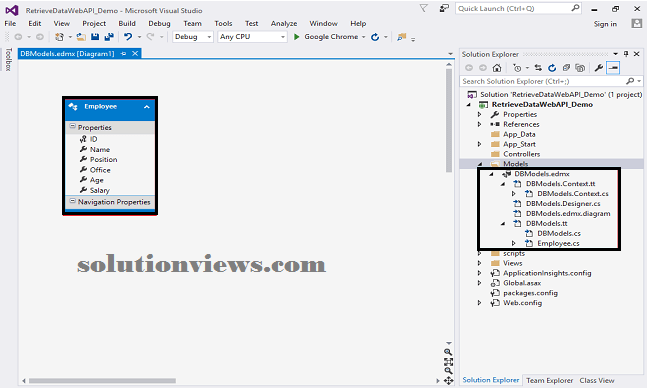
Following category are supplemental
{
     using System;
     using System.Collections.Generic;

     public partial class Employee
     {
         public int ID { get; set; }
         public string Name { get; set; }
         public string Position { get; set; }
         public string Office { get; set; }
         public Nullable<int> Age { get; set; }
         public string Salary { get; set; }
     }
 }
Step 4:
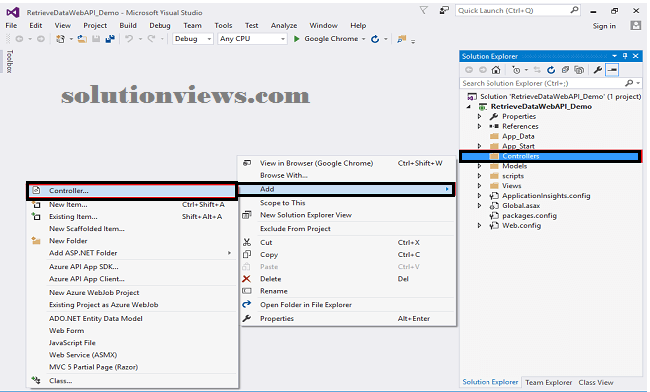
Right click on Controllers folder choose Add then select Controller as shown in below screenshot.
Screenshot internet API controller one:
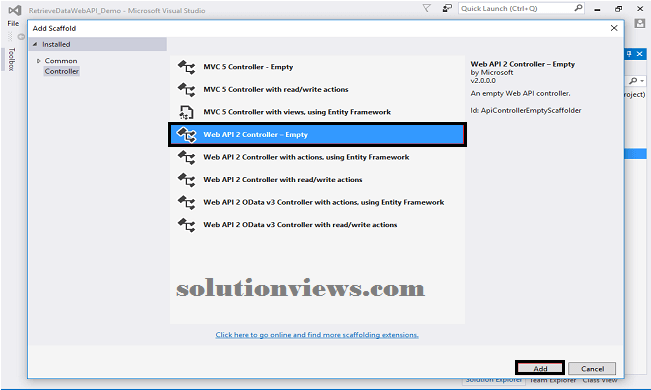
After clicking on controller a window can seem. Select internet API-Empty click on Add.
Screenshot internet API controller one:
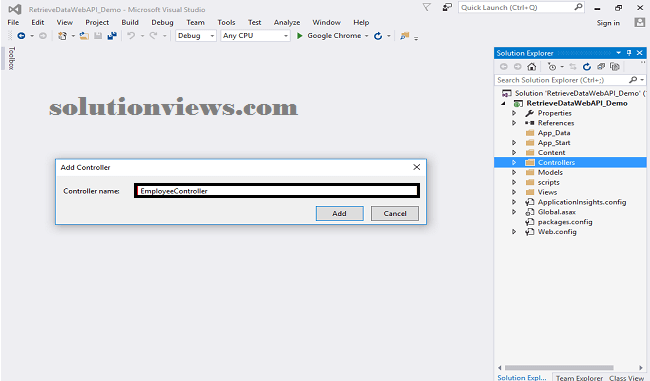
After clicking on Add another window can seem with Default Controller. Amendment the name Employee Controller then clicks on Add. Home Controller is supplemental beneath Controllers folder. Remember, don’t amendment Controller’s suffix. For all controllers amendment solely highlight, and rather than Default simply amendment Home as shown int the below screenshot.
Add namespace
using RetrieveDataWebAPI_Demo.Models;
Write following code in worker API controller,
 using RetrieveDataWebAPI_Demo.Models;
 using System;
 using System.Collections.Generic;
 using System.Linq;
 using System.Net;
 using System.Net.Http;
 using System.Web.Http;

 namespace RetrieveDataWebAPI_Demo.Controllers
 {
     public class EmployeeController : ApiController
     {
         public HttpResponseMessage Get()
         {
             List<Employee> employeeList = new List<Employee>();
             using (DBModel dc = new DBModel())
             {
                 employeeList = dc.Employees.OrderBy(a => a.Name).ToList();
                 HttpResponseMessage response;
                 response = Request.CreateResponse(HttpStatusCode.OK, employeeList);
                 return response;
             }
         }
     }
 }
Step 5:
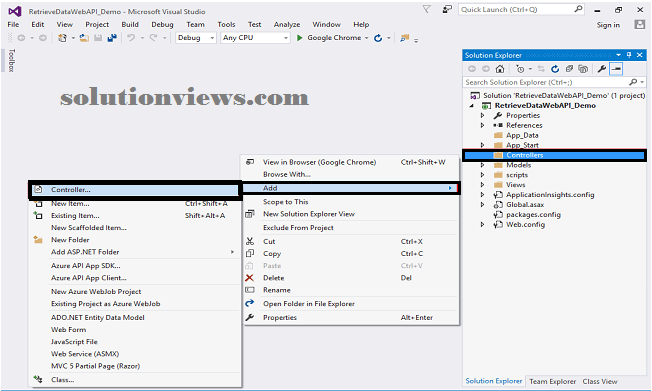
Right click on Controllers folder choose Add then select Controller as shown in th below screenshot.
Screenshot MVC controller one:
After clicking on controller a window can seem select MVC 5-Empty click on Add.
Screenshot MVC controller one:
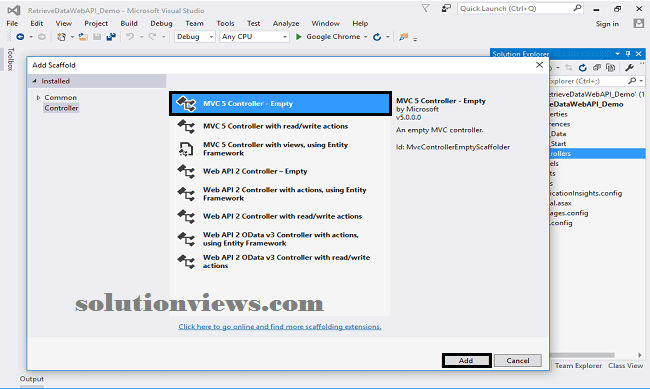
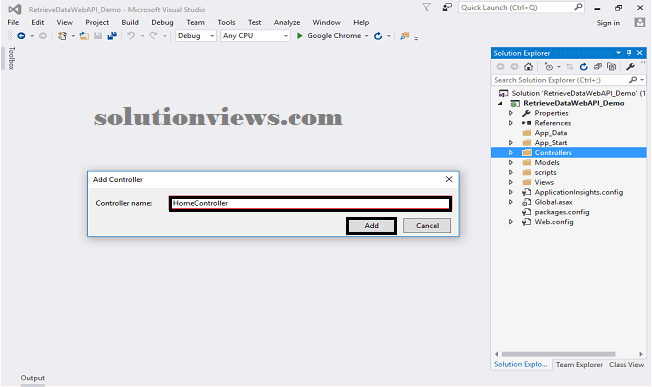
After clicking on Add another window can seem with Default Controller. Amendment the name to Employee Controller then clicks on Add. Home Controller is supplemental beneath Controllers folder. Keep in mind don’t amendment Controller’s suffix; for all controllers amendment solely highlight and rather than Default simply amendment Home as shown within the below screenshot.
MVC five Home controller:
  using System;
 using System.Collections.Generic;
 using System.Linq;
 using System.Web;
 using System.Web.Mvc;

 namespace RetrieveDataWebAPI_Demo.Controllers
 {
     public class HomeController : Controller
     {
         // GET: Home
         public ActionResult Index()
         {
             return View();
         }
     }
 }
Step 6:
Right click on Index action methodology in controller. Add read and a window can seem with default Index name uncurbed (use a Layout page) and click on on Add. Read are supplemental in views folder beneath Home folder with name Index.
Add following scripts and designs in head section of index read
Step 6:
Right click on Index action methodology in
controller. Add read and
a window can seem with default Index
name uncurbed (use a
Layout page) and click on on
Add. Read are supplemental in views folder beneath Home folder with name Index.
Add following scripts and designs in
head section of index read
- <link href=”~/Content/bootstrap.min.css” rel=”stylesheet” />
- <script src=”~/scripts/jquery-3.3.1.min.js”></script>
- <script src=”~/scripts/bootstrap.min.js”></script>
- <script src=”~/scripts/GetData.js”></script>
Design read with hypertext mark-up language
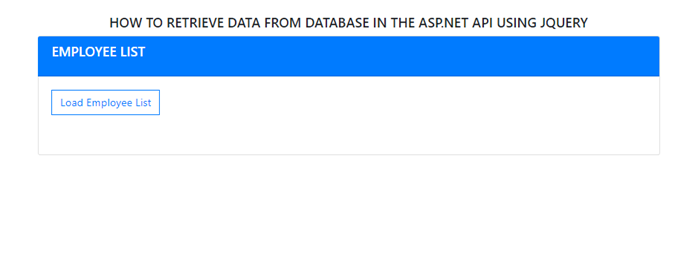
- <div class=”container py-4″>
- <h5 class=”text-center”>HOW TO RETRIEVE DATA FROM DATABASE IN THE ASP.NET Web API USING JQUERY</h5>
- <div class=”card”>
- <div class=”card-header bg-primary text-uppercase text-white”>
- <h5 class=”card-title”>Employee List</h5>
- </div>
- <div class=”card-body”>
- <button id=”btnGetData” type=”button” class=”btn btn-outline-primary rounded-0″>Load Employee List</button>
- </div>
- <div id=”updatePanel” style=”padding:20px;”>
- </div>
- </div>
- </div>
- </body>
- @{
- Layout = null;
- }
- <!DOCTYPE html>
- <html>
- <head>
- <meta name=”viewport” content=”width=device-width” />
- <title>Index</title>
- <link href=”~/Content/bootstrap.min.css” rel=”stylesheet” />
- <script src=”~/scripts/jquery-3.3.1.min.js”></script>
- <script src=”~/scripts/bootstrap.min.js”></script>
- <script src=”~/scripts/GetData.js”></script>
- </head>
- <body>
- <div class=”container py-4″>
- <h5 class=”text-center”>HOW TO RETRIEVE DATA FROM DATABASE IN THE ASP.NET MVC 5 USING JQUERY</h5>
- <div class=”card”>
- <div class=”card-header bg-primary text-uppercase text-white”>
- <h5 class=”card-title”>Employee List</h5>
- </div>
- <div class=”card-body”>
- <button id=”btnGetData” type=”button” class=”btn btn-outline-primary rounded-0″>Load Employee List</button>
- </div>
- <div id=”updatePanel” style=”padding:20px;”>
- </div>
- </div>
- </div>
- </body>
- </html>
Step 7:
Click on Tools choose NuGet Package Manager then select Manage NuGet Packages for resolution and click on that.
Screenshot for NuGet Package:
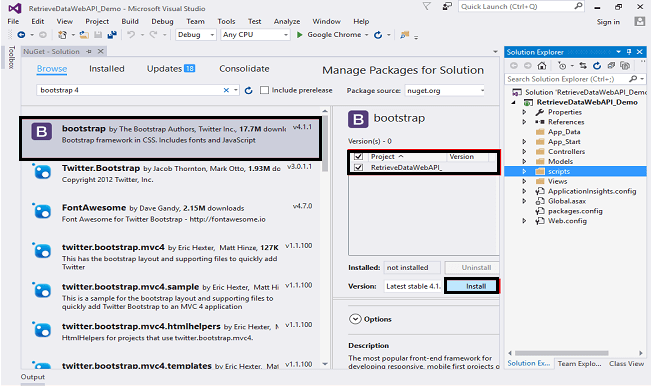
After that a window can appear; select Browse kind bootstrap and install package within the project.
Similarly kind JQuery and install the most recent version of JQuery package in project from NuGet then shut NuGet resolution.
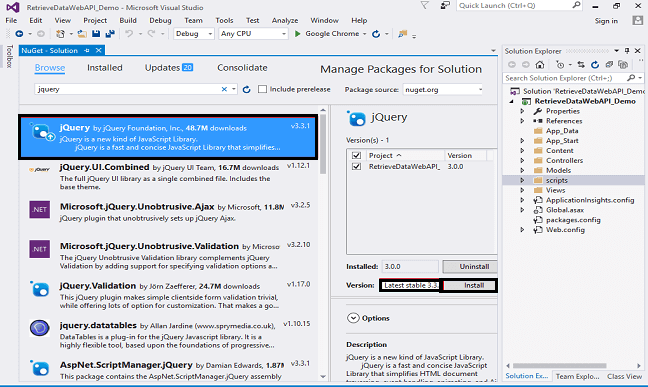
Keep helpful gets in Content and scripts folder, as shown below.
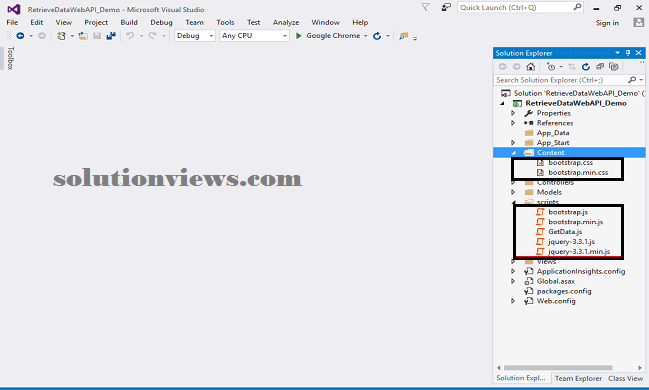
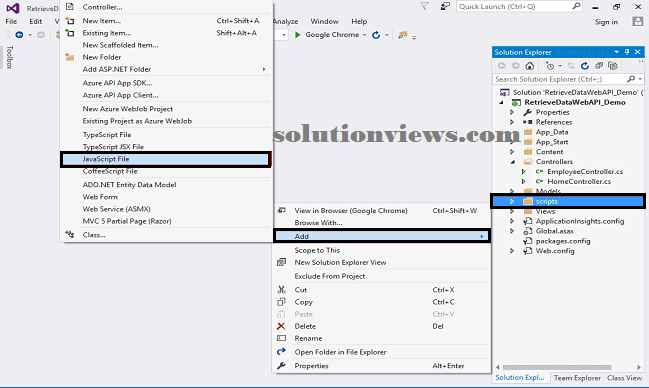
Step 8:
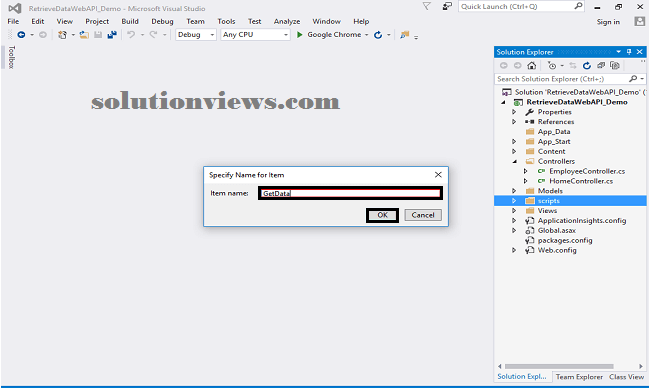
Right click on scripts folder, add script file name as GetData.
Screenshot one:
Screenshot two
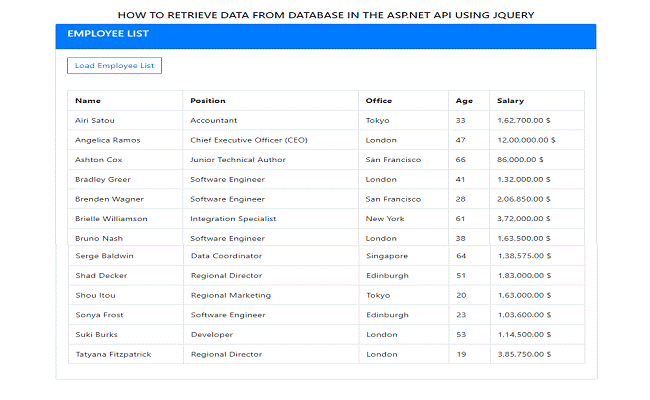
Write the subsequent jQuery code to retrieve information from the info API.
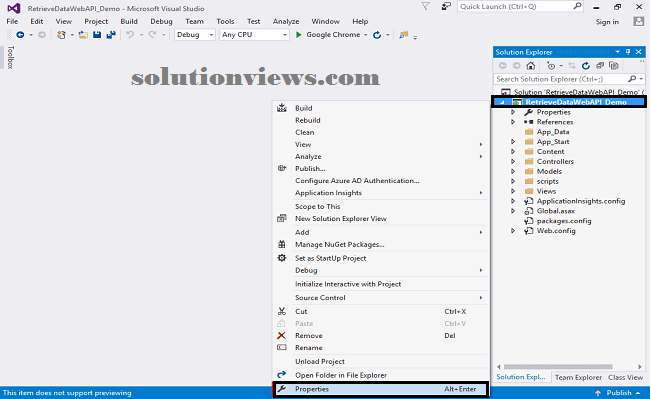
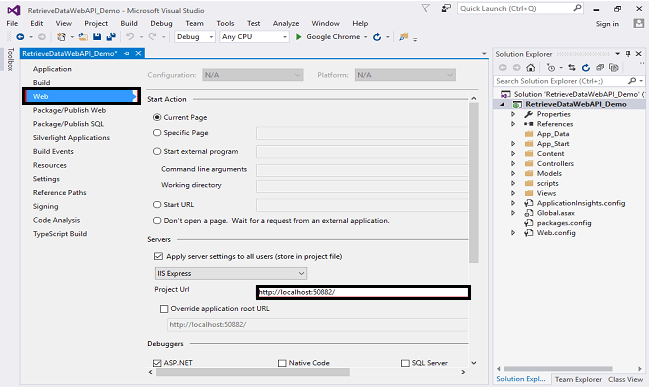
Change API computer address to the computer address that’s generated for your project. Right click on project and click on on properties.
Screenshot one
Screenshot two
- $(document).ready(function () {
- var apiBaseUrl = “http://localhost:50882/”;
- $(‘#btnGetData’).click(function () {
- $.ajax({
- url: apiBaseUrl + ‘api/Employee’,
- type: ‘GET’,
- dataType: ‘json’,
- success: function (data) {
- var $table = $(‘<table/>’).addClass(‘dataTable table table-bordered table-striped’);
- var $header = $(‘<thead/>’).html(‘<tr><th>Name</th><th>Position</th><th>Office</th><th>Age</th><th>Salary</th></tr>’);
- $table.append($header);
- $.each(data, function (i, val) {
- var $row = $(‘<tr/>’);
- $row.append($(‘<td/>’).html(val.Name));
- $row.append($(‘<td/>’).html(val.Position));
- $row.append($(‘<td/>’).html(val.Office));
- $row.append($(‘<td/>’).html(val.Age));
- $row.append($(‘<td/>’).html(val.Salary));
- $table.append($row);
- });
- $(‘#updatePanel’).html($table);
- },
- error: function () {
- alert(‘Error!’);
- }
- });
- });
- });
Step 9
Double-click on Globle.aspx file from your project and add the following code.
- protected void Application_BeginRequest()
- {
- string[] allowedOrigin = new string[] { “http://localhost:50882/” };
- var origin = HttpContext.Current.Request.Headers[“Origin”];
- if (origin != null && allowedOrigin.Contains(origin))
- {
- HttpContext.Current.Response.AddHeader(“Access-Control-Allow-Origin”, origin);
- HttpContext.Current.Response.AddHeader(“Access-Control-Allow-Methods”, “GET,POST”);
- }
- }
Step 10
Save and build project. Now, run the project by pressing ctrl+F5.
Screenshot 1
Screenshot 2
I wish to show thanks to this writer for rescuing me from this type of problem. As a result of browsing through the online world and coming across notions that were not helpful, I thought my entire life was done. Existing devoid of the approaches to the difficulties you’ve solved by means of the report is a critical case, and those which may have adversely affected my career if I hadn’t noticed your web blog. Your capability and kindness in dealing with the whole lot was very useful. I’m not sure what I would’ve done if I hadn’t discovered such a stuff like this. It’s possible to at this point look ahead to my future. Thanks very much for your reliable and result oriented help. I will not hesitate to suggest your web page to anybody who requires care about this situation.