The administrator may need to capture the Windows image installed on the reference PC without using Sysprep in some circumstances. This was necessary in our instance due to the presence of an older legacy programme on the machine, which was installed and linked to many local user profiles during deployment. If you try to use sysprep to capture the image of such a computer, the old software will not run after manually deploying the OS image to any computer through MDT/SCCM (when using sysprep, some programme settings and local profiles are deleted). That’s why, instead of utilising sysprep, we wanted to find another means to retrieve a reference WIM image of a computer.
To capture a WIM image of a system, use the ImageX software. The ImageX.exe programme is not a part of Windows or WinPE. As a result, you must first copy the ImageX.exe utility to the system32 subdirectory of the Windows PE image (the application is included in the Microsoft Windows AIK utility pack) (usually the image is in the boot.wim file).
DISM /Mount-WIM /WimFile:c:\WinPE_x86\WinPE.wim /Index:1 /MountDir:c:\WinPE_x86\Mount

Copy “C:\Program Files\Windows AIK\Tools\x86\ImageX.exe” C:\WinPE_amd64\Mount\Windows\System32

DISM /Unmount-WIM /MountDir:C:\WinPE_x86\Mount /Commit
Assume you have a reference machine from which you’d like to produce an image for use on other computers in your organisation. The reference machine has all of the essential drivers, programmes, and OS, environment, and app settings loaded. Connect a second disc to this computer or build a separate partition that is at least as large as the system disc C:. If there is no free space, you can save the captured wim Windows image in a shared network folder. To do so, your network card must be supported by the WinPe environment, and your computer must be set up to automatically get an IP address from a DHCP server.
Start Windows PE on your reference computer (this can be a special bootable DVD or USB flash drive or an installation disc with a Windows 10 Install image).
Press Shift + F10 on the installation start screen. A window with a command prompt should appear. Start the capture from the C: drive and use the command to save the OS image to the second local drive:
imagex.exe /capture C: D:\win10custom.wim "Windows 10 Custom Image" /compress maximum
Although maximum compression (attribute /compress maximum) reduces image size, it takes longer to capture than rapid compression. The speed with which such an image can be unpacked throughout the deployment process is virtually completely independent of the type of compression used.
You can copy the picture to a shared folder on the server across the LAN instead of an additional hard disc; to do so, connect it using the command:
net use u: wds1wimshare /user:contosoadmin "pa$$word"After you’ve finished capturing the image, restart your computer in normal mode to see if the file win10custom.wim has arrived on the mapped drive. You can now upload this file to your WDS server or use it as a reference computer backup copy.
By copying the generated wim image to the sources folder with the name install.wim and overwriting the regular image, it may be included in the Windows install media. If you make a Windows boot disc and start the installation right away, you’ll get a copy of your reference computer’s operating system.
You can also use the command to apply your image to a computer:
imagex E:\install.wim /apply "Windows 10 Custom Image" D: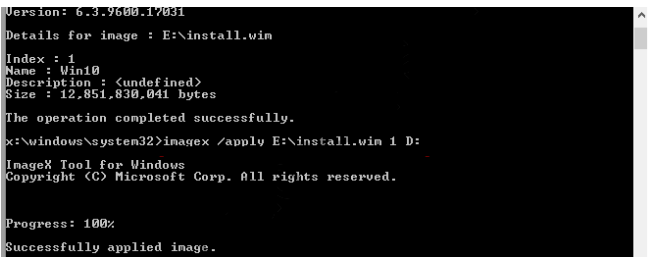
If you’re using WinPE 2.0 or 3.0 to capture and deploy PC images (.wim files), you’ve definitely run into an issue while trying to deploy a Windows 7 or Windows 10 image without first performing sysprep. The issue is that if you try to re-deploy an image of Vista or 7 that has not been sysprepped, the BootMGR will be broken. To resolve this issue, follow the instructions outlined below.
1st step
We’ll presume you’ve already captured your image and are ready to go. Start up your image deployment software now (WinPE 2.0 or WinPE 3.0).
2nd Step
We cover how to utilise DiskPart and how to avoid the hidden partition before deploying a fresh image in other articles. We recommend that you read them.
3rd step
You must run the following commands once you have deployed your non-sysprepped image: (I use a batch file to accomplish this.)i
bcdedit /set {default} device partition=c:

bcdedit /set {default} osdevice partition=c:

bcdedit /set {bootmgr} device partition=c:
4th step
When deploying a non-syprepped image on Windows 10, 8.1, or 7, this will resolve the BOOTMGR issue.