RADIUS (Remote Authentication in Dial-In User Service) is a network protocol that allows users to authenticate, authorize, and gather data about the resources they’re using. Its purpose is to transfer data from the central platform to network clients/devices. To authenticate remote dial-in clients and authorize them to access some network services or resources, your remote access (RADIUS) server can communicate with a central server/service (for example, an Active Directory domain controller). You can utilize a single centralized authentication system in your domain as a result of this.
In this article, we’ll show you how to set up a centralized RADIUS server on Windows Server 2016 and how to use the Network Policy Server (NPS) service to establish RADIUS authentication on Cisco devices. In this case, RADIUS will use the AD to authenticate remote users and grant them access to the command-line interface of Cisco switches and routers (as RADIUS clients).
Installing Radius Server (NPS) Role on Windows Server 2016
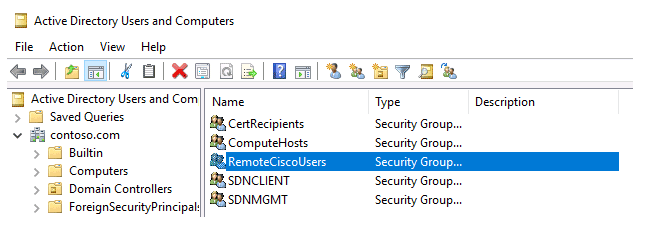
Create a new security group in the Active Directory domain (for example, RemoteCiscoUsers) and add all users who will be authorized to login on Cisco routers and switches (how to add a user to an Active Directory group?).
The Network Policy Services (NPS) role was added to Windows Server 2008 R2 to provide RADIUS server capabilities. With the NPS role, you can use the Radius protocol to authenticate remote clients against Active Directory.
As a result, the RADIUS server role must be installed on your Windows Server 2016. Run the Add Roles and Features wizard from the Server Manager console. The Network Policy Server role in Windows Server 2016 includes the Remote Authentication Dial In User Service (RADIUS) protocol. In the role selection phase of the wizard that opens, pick Network Policy and Access Services.
Install-WindowsFeature NPAS -IncludeManagementTools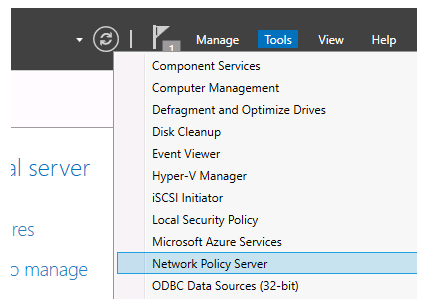
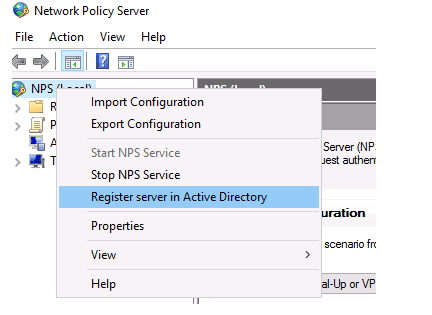
To use the NPS server in the domain, you must register it in the Active Directory. In the NPS snap-in, right-click on a root and select Register server in Active Directory.
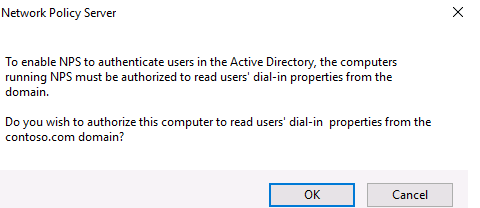
Confirm the registration of the server in Active Directory.
Also, you can register your NPS server in Active Directory with a command:
netsh ras add registeredserverTo authenticate users, the server will be given permission to read the properties of Active Directory user accounts. The server will be added to the RAS and IAS Servers domain group.

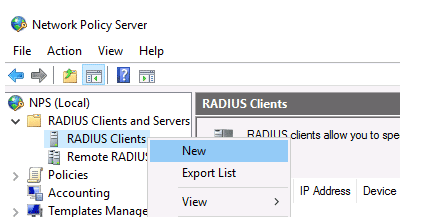
Now you can add the Radius client. Radius client is the device from which your server will receive authentication requests. In this example, it could be a Cisco router, switch, Wi-Fi access point, etc.
To add the new Radius client, expand the RADIUS Clients and Servers section in the NPS console tree and select New on the RADIUS Clients item.
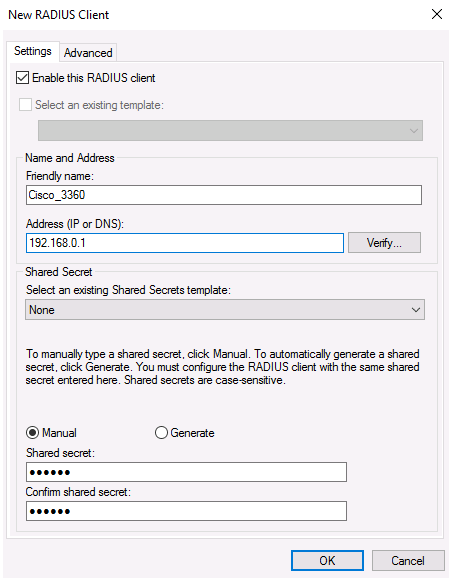
Fill in the boxes Friendly name, client Address (IP address or DNS name), and Shared Secret + Confirm shared password on the Settings page (you will use this password in the Cisco switch/router configuration).
Due to issues with shared key distribution, the shared secret password is rarely utilised in large corporate networks. It is recommended that certificates be used instead of shared passwords. You can request and import a *.p12 certificate for the Radius/NPS server if you have a corporate Certification Authority in place to establish PKI infrastructure. Simply save the certificate to your Local Machine’s personal certification repository.
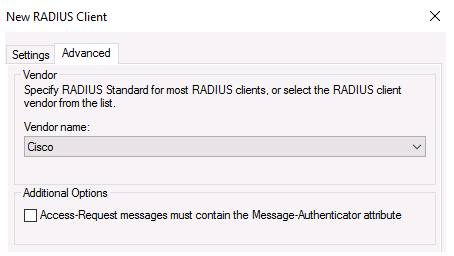
In the Advanced tab, select Vendor name – Cisco.
You can use the PowerShell command instead of the NPS GUI to add a new RADIUS client. In this case, you can use the New-NpsRadiusClient PowerShell cmdlet.
New-NpsRadiusClient –Address "192.168.31.1" –Name "cisco2960" –SharedSecret "Zb+kp^JUy]v\ePb-h.Q*d=weya2AY?hn+npRRp[/J7d"Configuring NPS Policies on the RADIUS Server
NPS policies enable you to authenticate remote users and grant them access to the NPS role’s access rights. You can link RADIUS client records and the domain security group that sets the level of access to CISCO equipment using NPS access policies.
On a RADIUS server, there are two types of policies:
Connection request policies – these policies specify which RADIUS servers should authenticate and authorise connection requests received from RADIUS clients based on a set of criteria.
Network policies are a set of conditions and settings that let you decide who is allowed to connect to your network and what access permissions they have. These policies are processed in order from top to bottom;
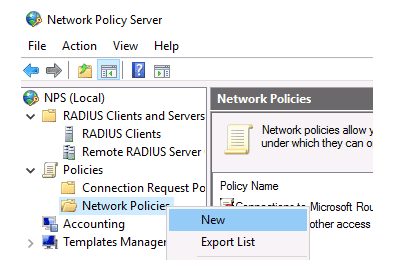
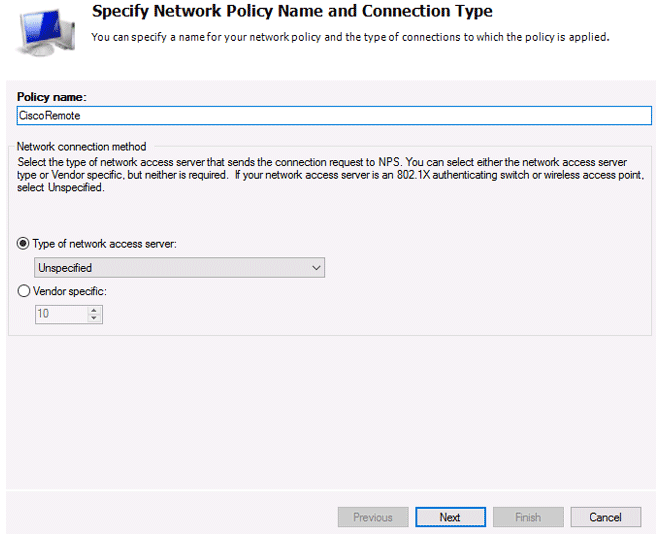
Only the NPS Network policies will be used in our example. Select New: from the Policies > Network Policies branch.
Specify the Policy name, the type of network access server should remain unchanged (Unspecified).
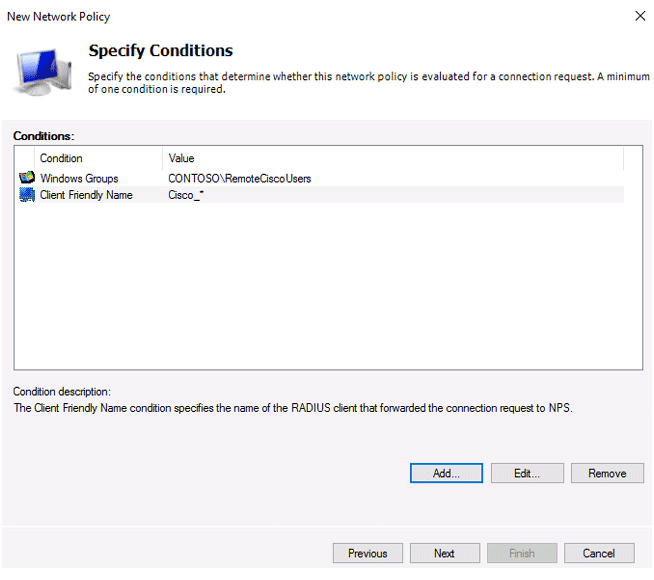
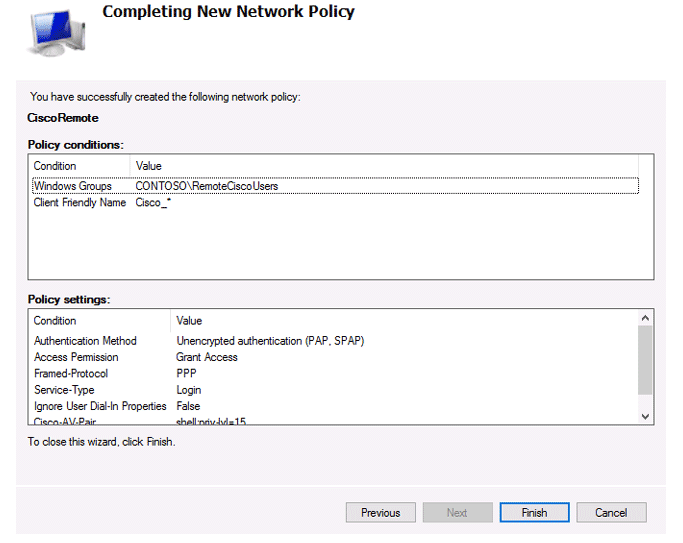
You must provide the criteria under which this RADIUS policy will be applied in the next step, Specify conditions. Add two further requirements: the authorised user must belong to a specified domain security group, and the device you want to access must have a specific name. Select the Windows Group type (add the RemoteCiscoUsers group) and the Client Friendly Name (Cisco_*) to create a new condition using the Add button.
Note that the Client Friendly Name field may differ from your device’s DNS name. In the future, we’ll need it to identify a specific network device while implementing Remote Access Policies. You can use this name to specify a mask that will allow a single access policy to process numerous different RADIUS clients.
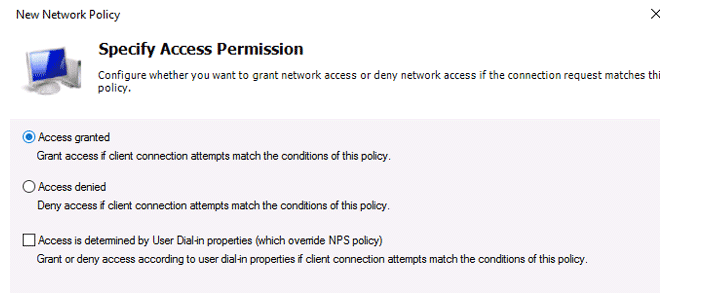
On the next screen, select Access Granted.
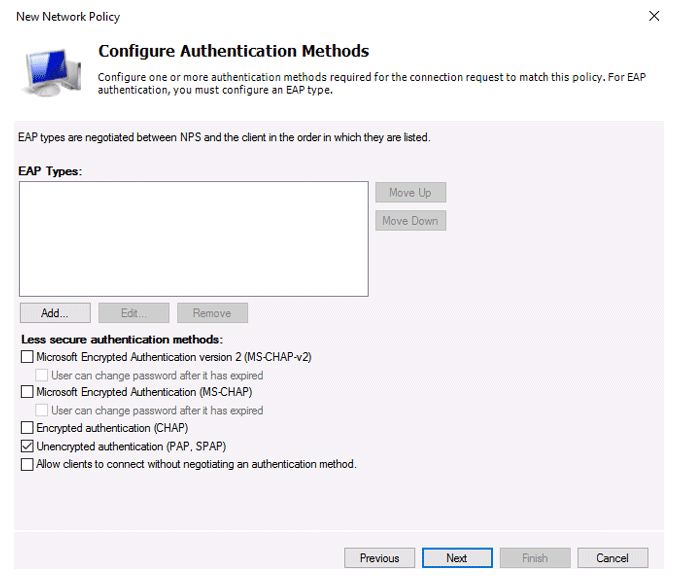
Because our Cisco switch supports only the Unencrypted authentication method (PAP, SPAP), we’ll uncheck all other options.
The next step in the configuration Constraints can be skipped.
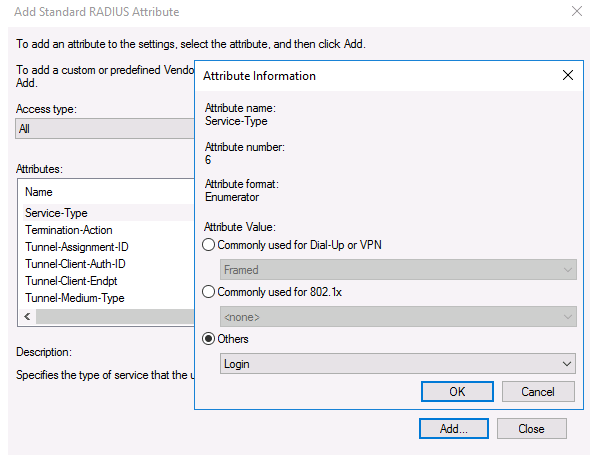
Go to the RADIUS Attributes > Standard section in the Configure Settings section. Click the Add button after deleting the current attributes.
Select All from the Access Type drop-down menu, then Service-Type > Add from the Service-Type drop-down menu. Login if others are specified.
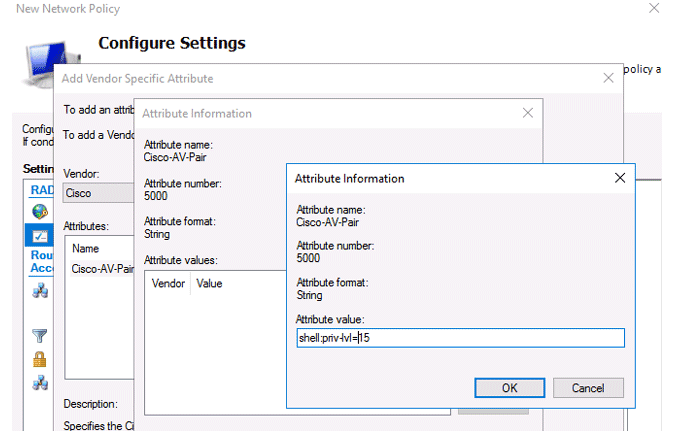
Now add a new attribute in the RADIUS Attributes > Vendor Specific section. Under Vendor, select Cisco, and click Add. Here you need to add information about the attribute. Click Add and specify the following value:
shell: priv-lvl = 15This value means that the user authorized by this policy will be granted a maximum (15) administrative access permission on the Cisco device.
The last screen displays all selected NPS policy settings. Click Finish.
You can use the command to backup the current NPS server configuration to an XML file:
Export-NpsConfiguration -Path c:\ps\backup_nps.xmlIf you need to restore NPS configuration from a previously created backup file, run:
Import-NpsConfiguration -Path c:\ps\backup_nps.xml
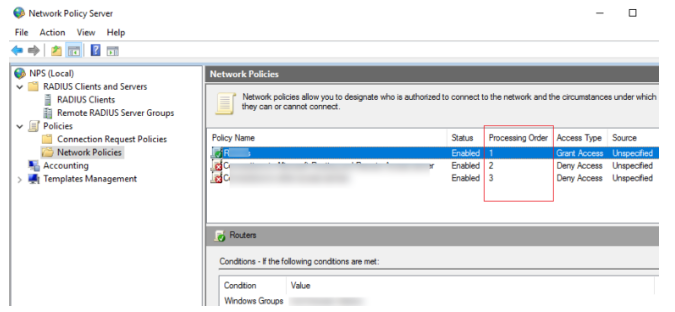
Pay attention to the order of RADIUS policies when establishing and planning them. Policies are processed in order from the top down, and when all of the conditions in the next policy are met, the next policy’s processing is stopped. The Processing Order setting in the NPS console can be used to adjust the priority of policies.
Open the Active Directory Users and Computers console (dsa.msc), find the user, open its properties, go to the Dial-In tab, and choose the Control access with NPS Network Policy option in the Network Access Permission section to activate the user account for Radius authentication.

Also, you can check the current option value using PowerShell:
Get-ADUser richard.doe -Properties msNPAllowDialin -Server dc1.solutionviews.comIf the above command did not return any result (empty), this means that the default value “Control access through NPS Network Policy” is used.
If you want to reset this user attribute to the default state, use the command:
Set-ADUser richard.doe -Clear msNPAllowDialin -Server dc1.solutionviews.comOr you can reset this attribute for all users in the specific Organizational Unit (OU) using the LDAP filter:
Get-ADUser -SearchBase "ou=Users,ou=Paris,dc=solutionviews,dc=com" -LDAPFilter "(msNPAllowDialin=*)" | % {Set-ADUser $_ -Clear msNPAllowDialin}Configuring RADIUS Setting on Cisco Devices
Following the creation of the policy, you can configure your Cisco routers or switches to use the newly installed Radius NPS server for authentication.
Because we use domain accounts for authentication, the user credentials must be transmitted in an encrypted format over the network. To do so, disable the telnet protocol on the switch and enable SSHv2 on Cisco using the configuration mode commands:
configure terminal

crypto key generate rsa modulus 1024

ip ssh version 2
AAA works in such a way: if the response from the server is not received, the client assumes unsuccessful authentication. Be sure to create a local user in case the RADIUS server is unavailable for any reason.
You can create a local user with the following command:
username cisco_local password $UPerrP@ssw0rd
In order to make the use of SSH mandatory and disable remote access using Telnet, execute the following commands:
line vty 5 15

transport input ssh
Below is an example of the configuration for authorizing a Radius server for the Cisco Catalyst Switch:
aaa new-model

aaa authentication login default group radius local

aaa authorization exec default group radius if-authenticated

radius-server host 192.168.1.16 key Sfs34e#sf

#Specify your RADIUS server IP address and key for encryption (the shared secret that we specified on the RADIUS server)

service password-encryption

# Enable password encryption

If you have several Radius servers, add them to the group:

aaa group server radius radius_srv_group

server 192.168.1.16

server 192.168.101.16
How to Check the NPS/RADIUS Logs on Windows?
This completes the minimal switch configuration, and you can now check your Cisco equipment for Radius authentication.
You must enable the Network Policy Server audit policy to enable NPS Server Radius Authentication logging. This policy can be enabled using the local Group Policy Editor or the commands below:
auditpol /get /subcategory:"Network Policy Server"

auditpol /set /subcategory:"Network Policy Server" /success:enable /failure:enable
Use the following PowerShell script to find all NPS authorizations events for a specific user (in this case, Richard.Doe):
$Query = @"
<QueryList>
<Query Id="0" Path="Security">
<Select Path="Security">
*[EventData[Data[@Name='SubjectUserName'] and (Data=solutionviews\richard.doe')]] and
*[System[(EventID='6272')]]
</Select>
</Query>
</QueryList>
"@

$events = Get-WinEvent -FilterXML $Query
$ipaddr = @{ label="IP"; Expression={$_.properties[9].value} }
$events | select $ipaddr | group "IP" | format-table Count, Name -autosize