If you utilise local (and global) networks, you’re probably aware that files are transferred between systems via the SMB, FTP, or HTTP protocols. The issue with all of these protocols is that huge files take a long time to download. This type of difficulty is also common as a result of a slow or unstable connection. When you use these protocols to copy files, it frequently consumes all of the available bandwidth between the server and the consumers. It could wreak havoc on a network’s or an application’s performance (sometimes we cannot set up the proper QoS policies).
In this post, we will show you how to use PowerShell to copy huge files using the BITS protocol.
Using BITS (Background Intelligent Transfer Service) BITS (Background Intelligent Transfer Service) is a Windows service that allows you to transfer files across computers. You can transfer files between computers using the BITS protocol (download and upload files).
The following are some of the advantages of employing BITS:
BITS is a smart protocol that can control how much bandwidth is used. BITS has the ability to modify the data transfer speed on the fly.
BITS can resume file transferring automatically even after network outages because it runs in the background and is not visible to the user.
On the client (or server) side, BITS does not require a full-fledged IIS server.
So, for sending large data over sluggish networks, BITS is the optimum protocol.
How to use PowerShell to download the BITS protocol
Let’s suppose that we need to download the file, which is stored on the HTTP server (http://10.2.2.148/erd65_32.iso).
First, we have to add BITS module support to the PowerShell:
Import-Module BitsTransfer
After that, we can see the list of all available commands:
get-command *-BITS*
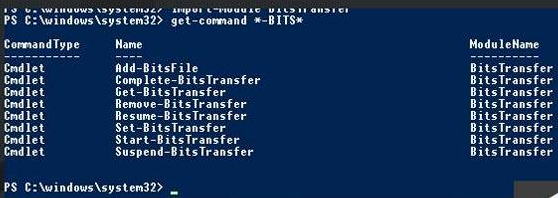
As you can see, there are eight scripts to choose from.
BITS allows for synchronous data transport.
Use the following command to download the file via the BITS protocol:
Start-BitsTransfer –source http://10.2.2.148/erd65_32.iso -destination c:temp

Message This is a background intelligent transfer service (BITS) file transfer, which indicates that the file is currently downloading via the BITS protocol.
The script starts downloading in synchronous mode in this situation. You can see the progress bar, which will show you the current state of the transfer.
Please keep in mind that if you restart your computer, the downloading process will not be restarted.
BITS allows for asynchronous data transport.
The procedure can be run in asynchronous mode. You’ll need to add the –asynchronous argument to the command below to accomplish this. In this setting, if something goes wrong (the server or the client reboots), the downloading process will resume automatically.
Start-BitsTransfer -source http://10.2.2.148/erd65_32.iso -destination c:temp –asynchronous

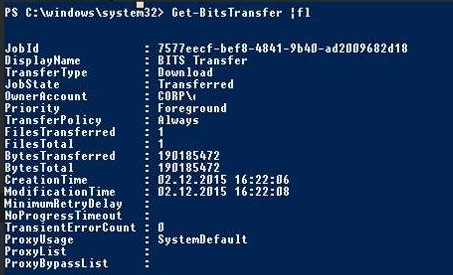
However, because we can’t see the transferring status in this mode, we’ll have to use the Get-BitsTransfer command to find out.
Get-BitsTransfer | fl
You can also check status in a table format:
Format-Table –AutoSize | Get-BitsTransfer | select DisplayName, BytesTotal, BytesTransferred, JobState | Get-BitsTransfer | select DisplayName, BytesTotal, BytesTransferred, JobState
When you use the asynchronous mode, a temporary file is created (.tmp). Use the following command to return to the original file:
Get-BitsTransfer | Complete-BitsTransfer

The downloading procedure will be completed after that, and you will see it in the list.
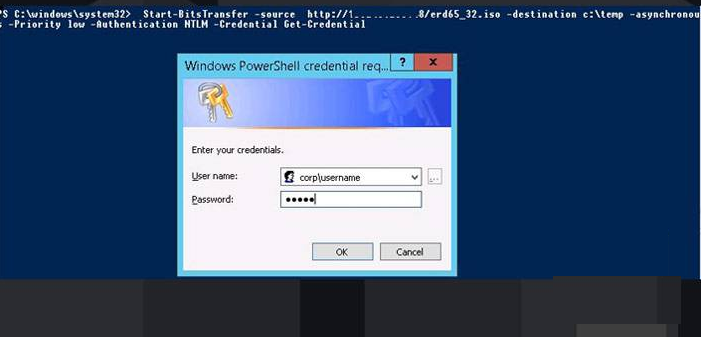
Use the following command to open an authentication window if the server requires user authentication:
Start-BitsTransfer -source http://10.2.2.148/erd65_32.iso -destination c:temp -asynchronous -Priority low -Authentication NTLM -Credential Get-Credential
You can use a simple script that checks the status and displays the transferring percentage on the screen to make the process of outcome tracking easier.
The script will convert the file to its original format after it has been transferred:
Import-Module BitsTransfer
$job = Start-BitsTransfer -Source http://10.2.2.148/erd65_32.iso -Destination c:temp -Asynchronous
while( ($job.JobState.ToString() -eq ‘Transferring’) -or ($job.JobState.ToString() -eq ‘Connecting’) )
{
Write-host $Job.JobState.ToString()
$Pro = ($job.BytesTransferred / $job.BytesTotal) * 100
Write-Host $Pro “%”
Sleep 3
}
Complete-BitsTransfer -BitsJob $job
Using BITS to copy the contents of the directory
As previously stated, the BITS protocol does not necessitate the use of a full-fledged IIS server. That is, we can copy files from other Windows workstations or shared directories directly:
Start-BitsTransfer -Source msk-rep01osrhel-server-7.0-x86_64-dvd.iso -Destination c:temp –Asynchronous
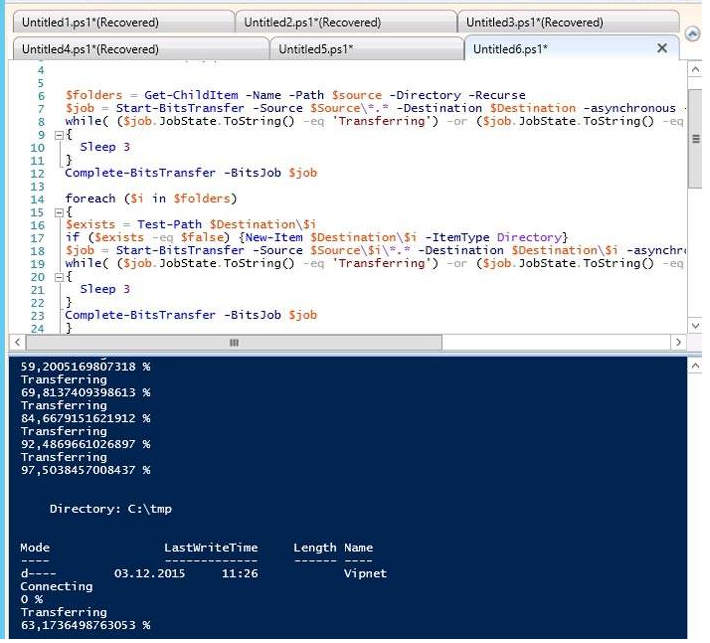
BITS is unable to copy files and folders from a given directory in a recursive manner. This script should be used to copy all files with subfolders from a given network directory:
Import-Module BitsTransfer
$Source=”msk-rep01os”
$Destination=”c:tmp”
$folders = Get-ChildItem -Name -Path $source -Directory -Recurse
$job = Start-BitsTransfer -Source $Source*.* -Destination $Destination -asynchronous -Priority low
while( ($job.JobState.ToString() -eq ‘Transferring’) -or ($job.JobState.ToString() -eq ‘Connecting’) )
{
Sleep 3
}
Complete-BitsTransfer -BitsJob $job
foreach ($i in $folders)
{
$exists = Test-Path $Destination$i
if ($exists -eq $false) {New-Item $Destination$i -ItemType Directory}
$job = Start-BitsTransfer -Source $Source$i*.* -Destination $Destination$i -asynchronous -Priority low
while( ($job.JobState.ToString() -eq ‘Transferring’) -or ($job.JobState.ToString() -eq ‘Connecting’) )
{
Sleep 3
}
Complete-BitsTransfer -BitsJob $job
}
That’s all there is to it, guys. BITS is a great alternative to using well-known protocols for traditional data transfer. BITS is the best option for transferring huge files (such as ISO files), so give it a shot.