Azure PowerShell is a collection of modules for managing Microsoft Azure using the PowerShell command line. Create and configure cloud services, manage virtual machines, networks, web applications, and other Azure resources with these modules. We’ll show you how to install Azure PowerShell on Windows 10 in this article.
The simplest way to install Azure PowerShell Modules is to use PowerShellGet to get them from the PowerShell Gallery.
There are now two Azure management modules: Azure Az and AzureRM. AzureRM was first released in December of 2018 and is now considered obsolete. As a result, you simply need to use the Azure Az module for the time being. If you have AzureRM installed on your computer, use the command to uninstall it.
Uninstall-Module -Name AzureRm -AllVersionsPrerequisites:
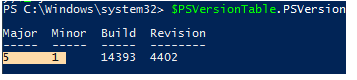
- Your computer should have Windows PowerShell version 5.1 or newer installed. PowerShell 5.1 is pre-installed on Windows 10. The command $PSVersionTable can be used to determine the current PowerShell version. To upgrade to PowerShell 5.1, Windows Management Framework 5.0 must be installed on Windows 8.1 and Windows Server 2012 R2.
- On your device, you must have.NET Framework 4.7.2 or newer installed. If the PowerShell script below returns True,.Net 4.7.2 or higher is installed:
(Get-ItemProperty -Path 'HKLM:\Software\Microsoft\NET Framework Setup\NDP\v4\Full' -ErrorAction SilentlyContinue).Release -ge 461808
- PowerShellGet 1.1.2.0 or higher must be installed on your computer. Check the current version with the command:
Get-Module -Name PowerShellGet -ListAvailable | Select-Object -Property Name,Version,Path
In our example, PowerShellGet version 1.0.0.1 is installed. Update it with the command:
Install-Module PowerShellGet –Force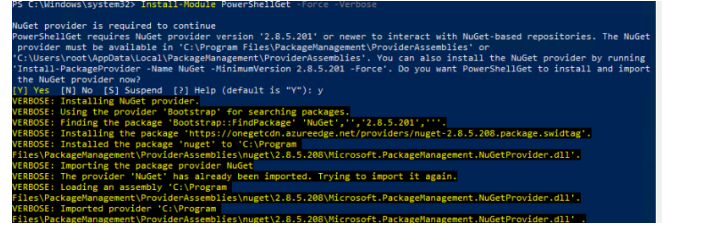
The Azure PowerShell modules can now be installed. Microsoft recommends using the command: Azure PowerShell only for an active user of the computer.
Install-Module -Name Az -AllowClobber -Scope CurrentUser
You will be warned that you are utilising an untrusted repository. Yes or Yes to All must be selected:
Untrustworthy data source
You’re using an untrusted repository to install the modules. If you trust this repository, use the Set-PSRepository cmdlet to update its InstallationPolicy value. Are you sure you want to install the ‘PSGallery’ modules?
The NuGet installation will then be confirmed.
Run the following command to install Azure Module for all users on the computer:
Install-Module -Name Az -AllowClobber -Scope AllUsersTo check if the Azure Az module is installed on your computer (and to check its version) use the command:
Get-InstalledModule -Name Az | select Name, Version

To update the Azure AD PowerShell Module to the latest version, run the command:
Update-Module -Name AzTo import the installed Az module into the current PowerShell session, run the command:
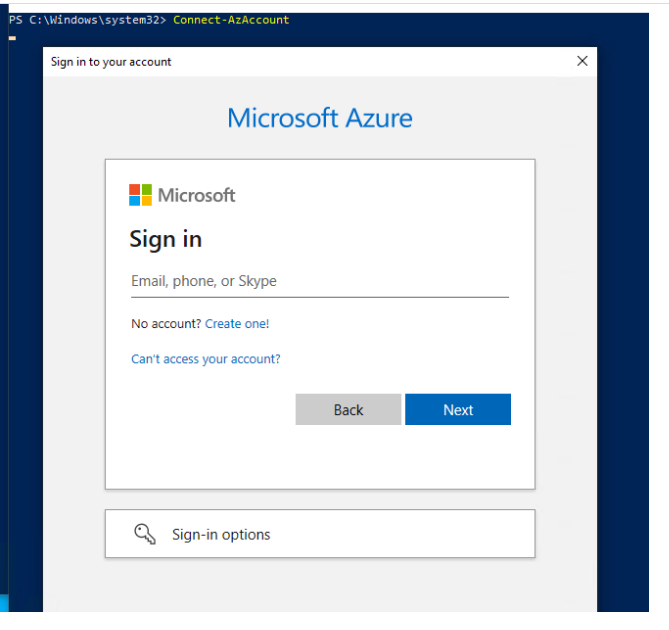
Import-Module -Name AzYou are now ready to connect to your Azure tenant. Run the command:
Connect-AzAccountLog in with your credentials (it’s recommended using MFA).
You can specify the tenant ID to connect if your account is associated with several Azure tenants or your status is Cloud Solution Provider (CSP):
Connect-AzAccount -Tenant '****-****-****-****’
You can use the command to see a list of the subscriptions accessible to your account:
Get-AzSubscription