Using a GUI is the most intuitive approach to enable Remote Desktop on Windows. To activate RDP on a local computer, go to the “System” Control Panel item, select the “Remote Settings” tab, and check the Allow remote connections to this computer box in the Remote Desktop section. This, however, necessitates local access to the machine on which RDP is to be enabled. You can typically ask the user or local technical support for this (local administrator permissions are required). What if no one at the remote branch office knows how to enable Remote Desktop locally? Remote Desktop is disabled by default on both the desktop and server versions of Windows.

We’ll teach you how to use PowerShell to enable Distant Desktop (RDP) on a remote host (server or computer) if you don’t have access to the local device console.
Using Registry Editor, you can enable Remote Desktop on a remote computer. This necessitates:
The remote computer must be reachable over the internet;
You’ll need the credentials for a remote computer account with local administrator permissions;
On the remote computer, the Remote service must be running (you can enable it through the services.msc snap-in or GPO).
Follow these procedures to enable the remote desktop using remote registry:
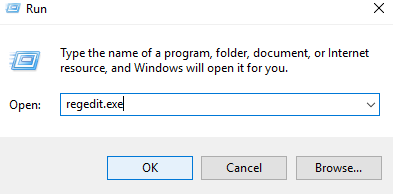
- Press the Win + R key combination and in the Run window type regedit.exe > Ok;
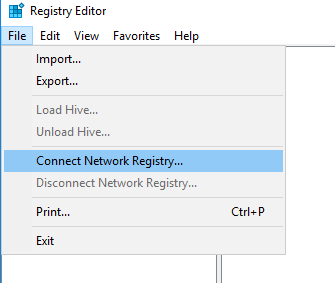
2. In the Registry Editor select File > Connect Network Registry;
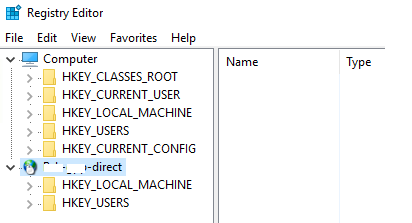
3. Enter the remote computer’s hostname or IP address. You will be required to provide credentials if the remote machine could not authenticate you as the current user.

4. In the registry editor, the remote computer’s registry will show (only the HKLM and HKEY Users hives are visible);
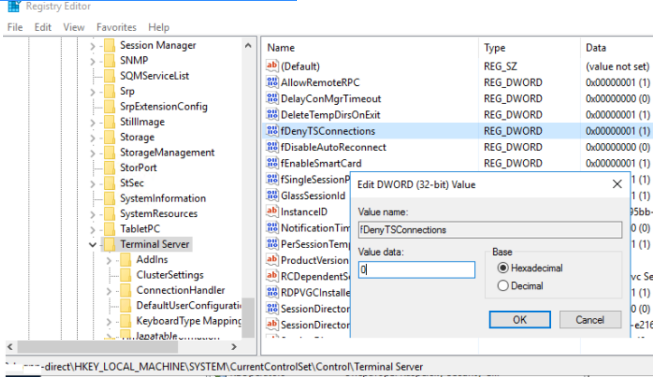
5. Go to the following reg key on the remote computer: HKLM\SYSTEM\CurrentControlSet\Control\Terminal Server. Change the DWORD value of the fDenyTSConnections parameter from 1 to 0;
6. If the remote machine has a firewall, you must enable the rule that enables remote desktop connections. GPO, PowerShell Remoting (explained in the next section of this article), or Psexec can all be used to enable it. The following commands are used in the latter case:
PsExec.exe \\server1 -u contoso\admin -p password cmd

netsh advfirewall firewall add rule name="allow RemoteDesktop" dir=in protocol=TCP localport=3389 action=allow

shutdown –f –r –t 0
7. Connect to the remote computer through RDP after rebooting.
Using PowerShell, enable Remote Desktop.
You must configure and run the WinRM service (Windows Remote Management) on the remote machine to allow RDP remotely. Starting with Windows Server 2012, the WinRM service is activated by default in all versions of Windows Server. WinRM, on the other hand, is turned off by default in client operating systems like Windows 10. To use PowerShell to activate Remote Desktop, the remote machine must match the following requirements:
- The WinRM service should be started;
2. You must have administrator permissions on the remote device;
3. Windows Defender Firewall with Advanced Security must be disabled or the rules that allow remote access with PowerShell Remoting must be enabled; and the WinRM service must be active.
Assume you wish to enable RDP remotely on Windows Server 2012 R2/2016/2019. To connect to your server remotely, open the PowerShell console on your computer and run the following command:
Enter-PSSession -ComputerName server.domain.local -Credential domainadministratorSo you’ve set up a remote session with a computer and can now run PowerShell commands on it. To allow Remote Desktop, just alter the value of fDenyTSConnections in the registry on the remote machine from 1 to 0. Execute the following command:
Set-ItemProperty -Path 'HKLM:\System\CurrentControlSet\Control\Terminal Server'-name "fDenyTSConnections" -Value 0
When RDP is enabled this way (rather than through the GUI), the Windows Firewall rule that allows remote RDP connections is disabled. Run the following command in Windows Firewall to allow inbound RDP connections:
Enable-NetFirewallRule -DisplayGroup "Remote Desktop"On Windows, the TCP/3389 port is used by default for incoming Remote Desktop sessions. Using the PortNumber parameter in the registry key HKEY LOCAL MACHINESYSTEMCurrentControlSetControlTerminal ServerWinStationsRDP-Tcp, you can alter the default RDP port number.
If this firewall rule is missing for some reason, you can manually add it:
netsh advfirewall firewall add rule name="allow RemoteDesktop" dir=in protocol=TCP localport=3389 action=allowYou can establish a custom rule that allows Windows Firewall to only accept inbound RDP connections from specified IP addresses, subnets, or IP ranges if you wish to restrict which hosts or subnets are allowed to connect to Remote Desktop. You must use the following command instead of the previous one in this case:
New-NetFirewallRule -DisplayName “Restrict_RDP_access" -Direction Inbound -Protocol TCP -LocalPort 3389 -RemoteAddress 192.168.1.0/24,192.168.2.100 -Action Allow
Run the following command to enable secure RDP authentication (NLA – Network Level Authentication):
Set-ItemProperty -Path 'HKLM:\System\CurrentControlSet\Control\Terminal Server\WinStations\RDP-Tcp' -name "UserAuthentication" -Value 1You may now use your PC to verify if TCP port 3389 is open on the remote host. Execute the following command:
Test-NetConnection 192.168.1.11 -CommonTCPPort rdpThere should be a result like this:
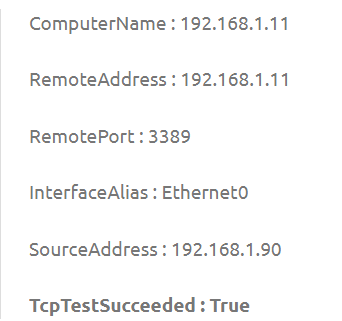
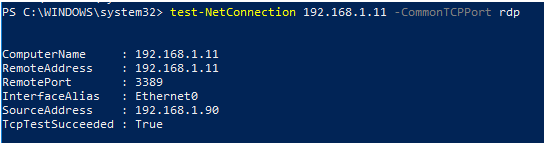
This indicates that RDP is enabled on the remote host, allowing you to connect to it through mstsc.exe, RDCMan, or any other RDP client.
If you need to enable RDP on many remote PCs at the same time, use the PowerShell script below:
$comps = “Server1”, “Server2”, “Server3”, “Server4”

Invoke-Command –Computername $comps –ScriptBlock {Set-ItemProperty -Path "HKLM:\System\CurrentControlSet\Control\Terminal Server" -Name "fDenyTSConnections" –Value 0}

Invoke-Command –Computername $comps –ScriptBlock {Enable-NetFirewallRule -DisplayGroup "Remote Desktop"}
Only members of the local Administrators group can connect remotely using RDP by default. Simply add non-admin users to the local Remote Desktop Users group to allow RDP connections.
Using the Local Users and Groups MMC snap-in, you can add the desired users to the Remote Desktop Users group locally (LUSRMGR.MSC).

You may also use the PowerShell Remoting inside the Enter-PSSession to update the membership of the RD Users group remotely. To add the domain user ASmith to the local group, run the following command:
net localgroup "remote desktop users" /add "contoso\asmith”You can also use another PS Remoting command, Invoke-Command: instead of the Enter-PSSession cmdlet.
Invoke-Command -Scriptblock {net localgroup "remote desktop users" /add "contoso\asmith”

} -Computer Server1.contoso.com
How to Enable Remote Desktop over WMI?
The WMI PowerShell command can be used to activate RDP on a remote machine where WInRM is disabled (for example, on a standard computer running Windows 10).
Run the command (look at the value of the AllowTSConnections property) to determine if RDP access is enabled on the remote machine 192.168.1.90:
Get-WmiObject -Class Win32_TerminalServiceSetting -Namespace root\CIMV2\TerminalServices -Computer 192.168.1.90 -Authentication 6
Run the following command to enable RDP and add a Windows Firewall exception rule:
(Get-WmiObject -Class Win32_TerminalServiceSetting -Namespace root\CIMV2\TerminalService