Make changes to your power settings.
Let’s begin by adjusting your laptop’s power settings.
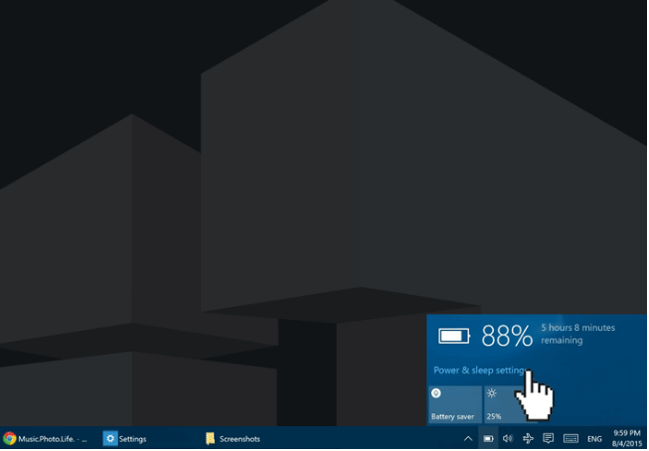
Place your pointer on the Windows 10 Taskbar and left-click the Battery symbol.
Select Power & Sleep Settings from the drop-down menu.
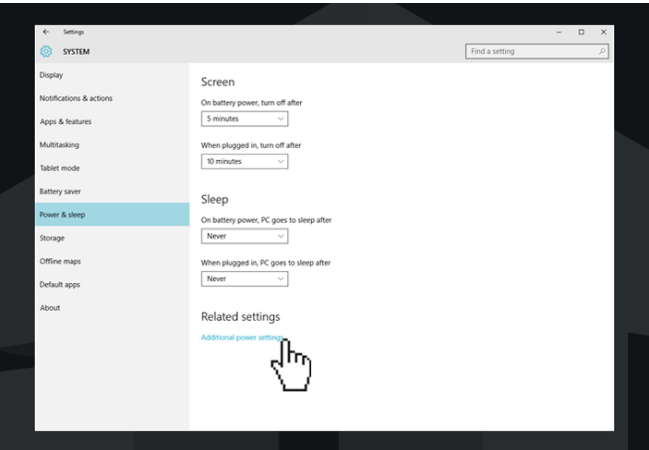
Now go to Settings and select Additional power settings (settings that give you a power options).
Click on the Show additional plans down arrow.
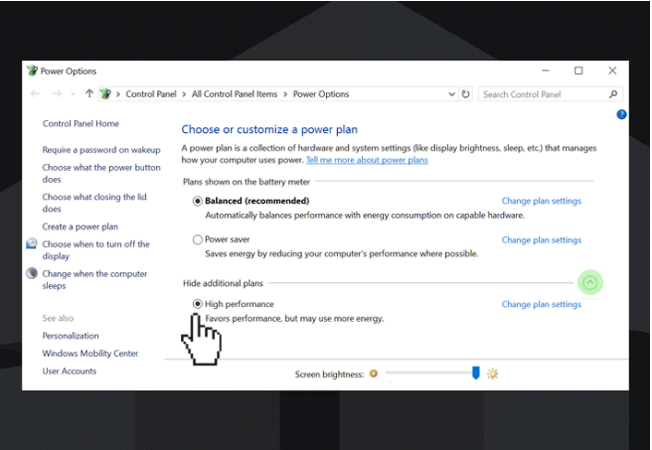
You’ll be able to check your High performance options after that. Select it by clicking on it. Once you’ve done that, your power settings are now set for high performance, and you should notice a big improvement in your work or gaming performance.
Boost Your Performance
There is a Performance option in Windows 10 that can be used to boost performance. You must make use of them.
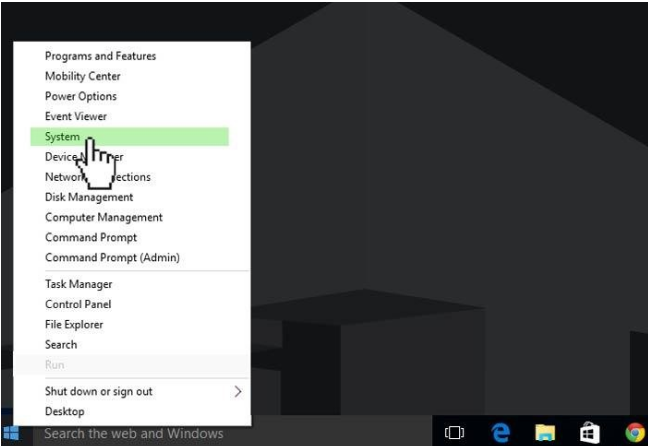
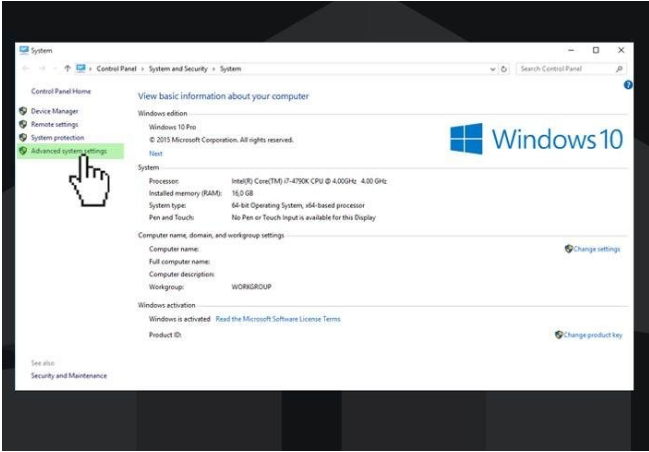
Go to the bottom of the screen and right-click on the Start menu icon to reveal the hidden menu. Then select System.
At System information window click on Advanced system settings. That will open up a System properties windows.
Go to Advanced tab.
Click the Settings button in Performance.
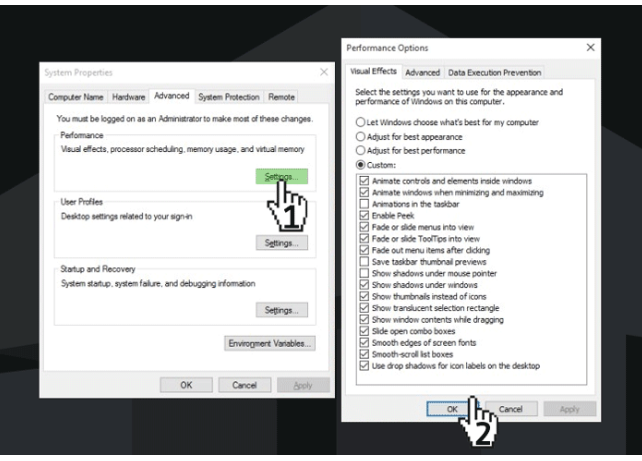
Go to the Visual Effects tab in the next Performance option. The option Let Windows select what’s best for my PC is enabled by default, as you can see. You can either click the box for Adjust for improved performance or manually customise it. Keep in mind that the highest performance allows all of the features to function properly.
Close it by clicking OK once more.
Configure the system as needed.
Let’s go on to the last phase, which is to adjust the system settings.
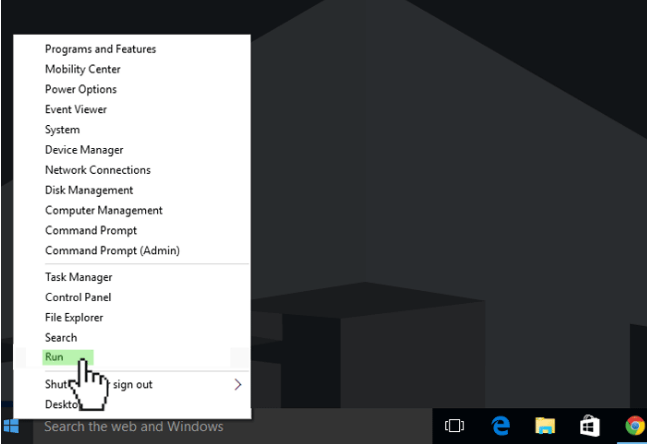
To open the hidden menu, right-click on the Start menu icon and select “Open hidden menu.” Go to the top of the page and select Run.
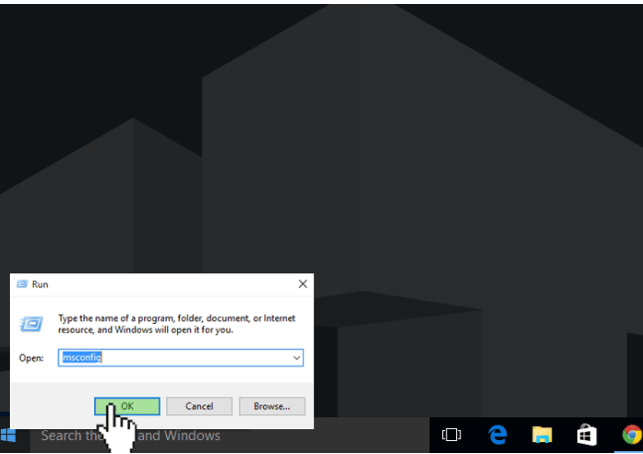
That opens up Run command form and we can go ahead and type msconfig. When you’ve done so go down and click OK button.
Now you opened System configuration window. Click on the Boot tab and you will see the list of OS you are booting.
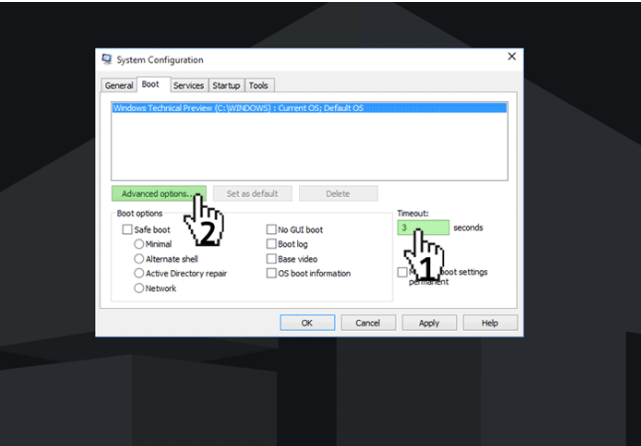
The next step is to modify the default boot time of 30 seconds to something else. We recommend setting the timer to 3-5 seconds, as this will assist your OS to start faster.
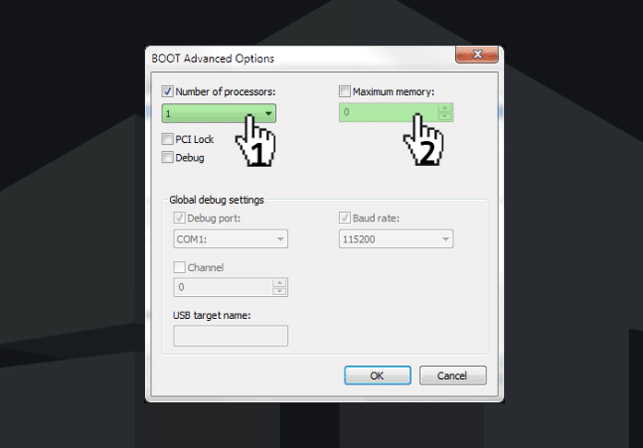
Then select Advanced settings from the drop-down menu. Make sure you’re using the maximum amount of processors possible (check-in Number of processors). Then double-check that you’re using the maximum amount of memory available (check-in Maximum memory).
After that, click OK and then Apply.
After you’ve done that, double-check that you don’t have any apps running that are consuming your resources.
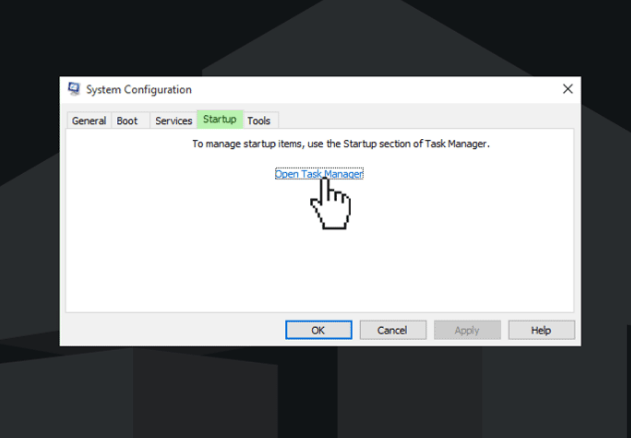
Click the Startup tab in the System Configuration box. Here you may modify, disable, or activate the apps that start up when your computer boots up. Open the task manager by clicking on it.
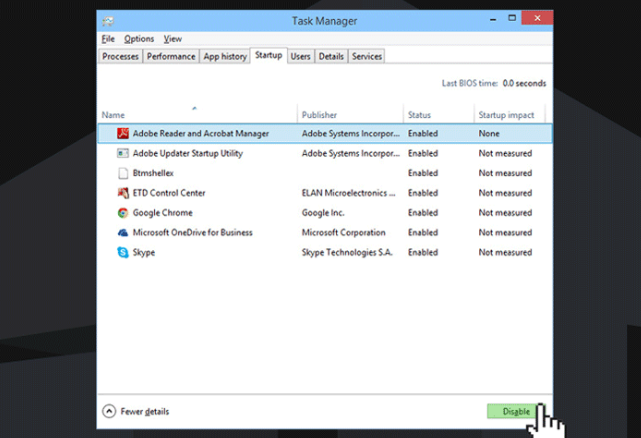
All of your apps that are operating in the background will appear in the Task Manager list. By selecting them and pressing the Enable/Stop button, you can enable or disable your programmes from starting at boot time.
After that, close the window and return to the System Configuration Startup tab. Click the OK button.
After that, you must restart your computer in order for the modifications to take effect. You can do so by selecting Restart from the pop-up notification window.
Always keep your computer system up to date.
Many Windows users are divided on how to perform this technique. Some users believe that upgrades merely slow down the system, while others claim to have noticed an improvement in performance. However, there is some nuance: Microsoft notes what changes have been made, what has been fixed/added, and also upgrades its built-in antivirus with each update.
At the same time, third-party hardware is supported in Windows 10 without the need to manually install drivers. Yes, this does not work with all devices (it does not even function with GNU/Linux), but it virtually always solves the problem with device operation in the system. And, in most cases, new driver versions perform better than prior versions.
Live Tiles should be disabled.
This Start menu item informs the user about programmes available on the Internet or on the local network. Its usefulness is debatable, and for laptops, it may result in increased battery consumption. As a result, this can be disabled.
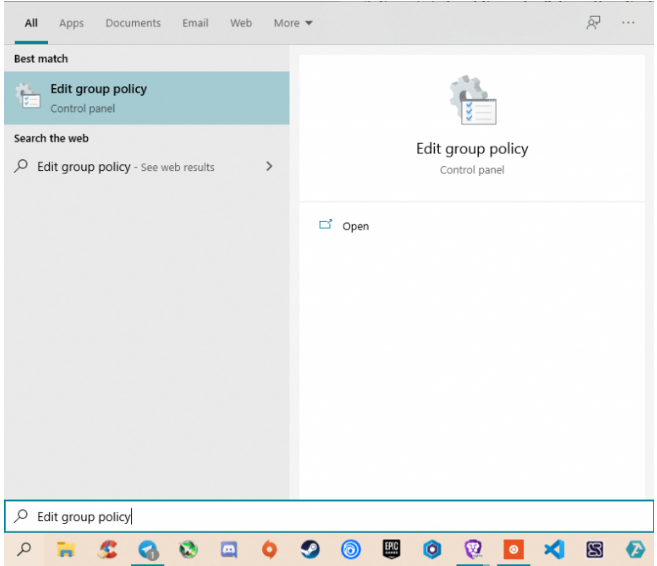
Open the “Edit group policy” via Search bar.
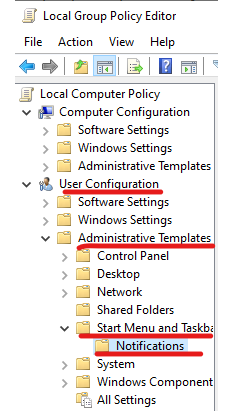
On the left in the partition tree, go to “User Configuration” → “Administrative Templates” → “Start Menu and Taskbar” → “Notifications”.
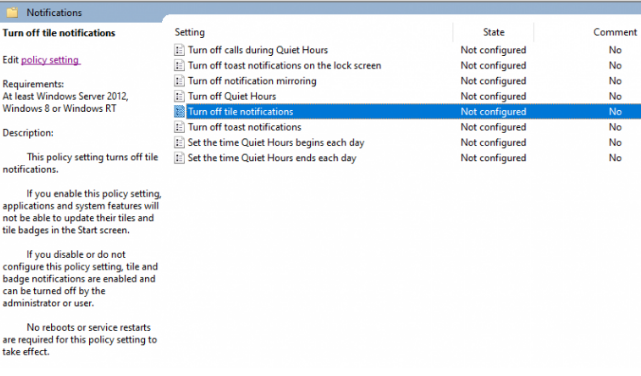
Click the Settings item “Turn off tile notification” via context menu, double click, or “Policy setting” in the centre window.
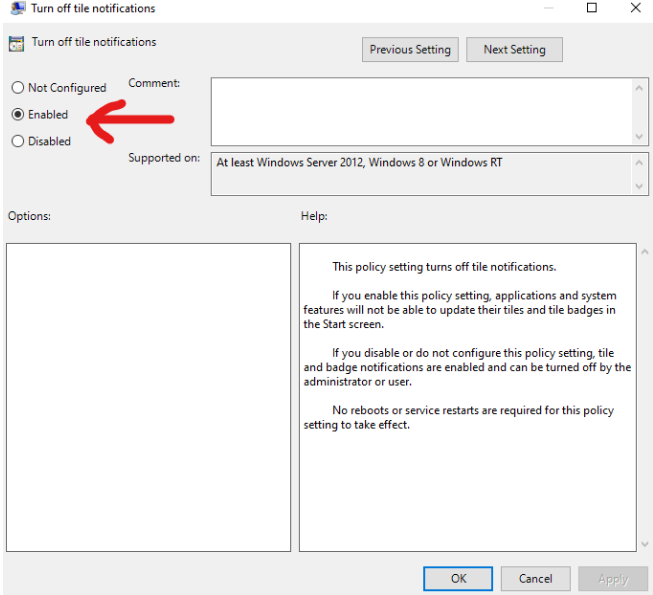
Select “Enabled” and press OK.
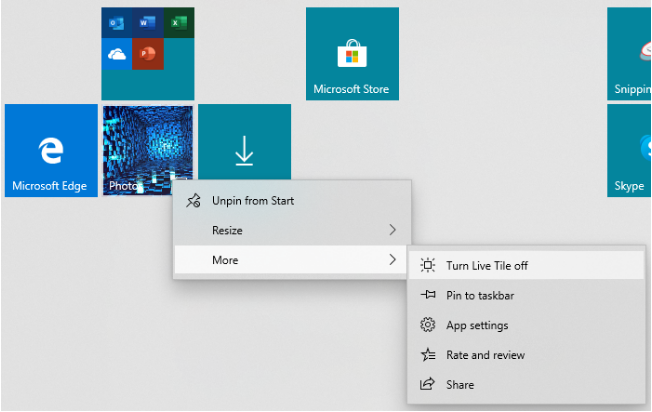
You can also disable Live Tiles manually through the context menu of a specific tile.
Keep track the system drive.
Disk (C:) can become overloaded with time, especially if it’s a little disc. If the free space is less than 1 GB, the system will “slow down” dramatically.
The cache of various programs, such as browsers, temporary system files, and downloaded data from the Internet, takes up the majority of disc space. You can use the system disc cleaning program to completely remove them.
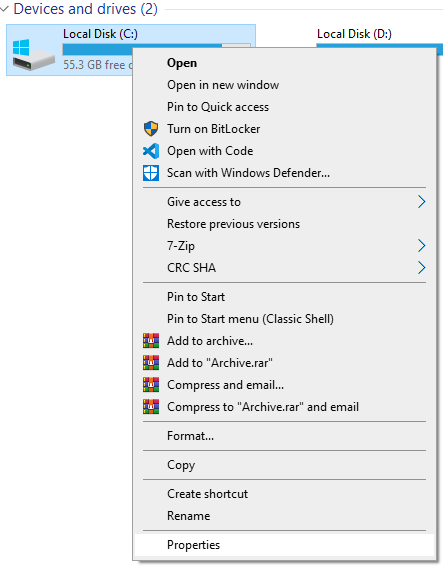
- Open File Explorer.
- Right-click on Disk (C:) → Properties
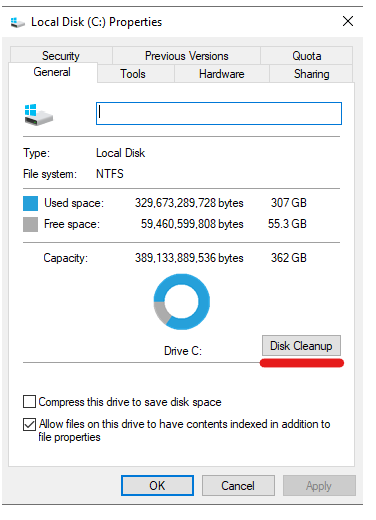
3- Press on “Disk Cleanup”.
4- You can press “Clean up system files” to delete it. After several seconds (or minutes) the list will be updated.
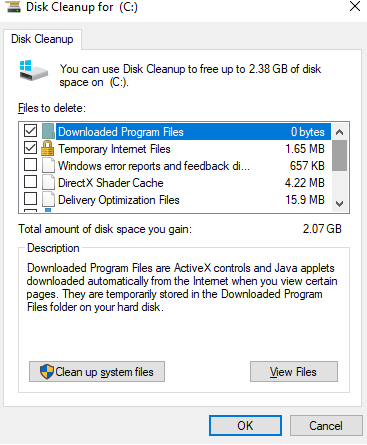
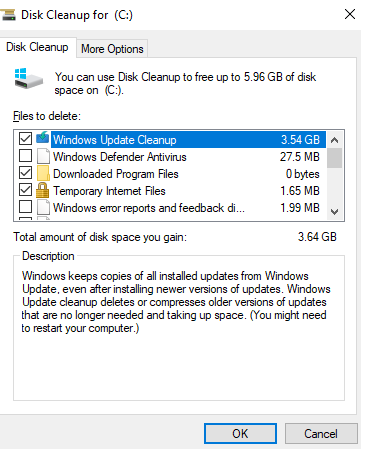
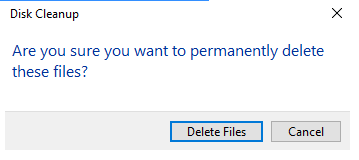
5-Choose the files and press OK. Confirm your decision.
6-Wait for the process to finish.