PHPMyAdmin is a PHP-based web-based open-source application for managing MySQL databases through a web browser. As a result, PhpMyAdmin makes it easier to administer and maintain MySQL databases. PhpMyAdmin offers a simple graphic interface for writing and executing queries, managing databases, tables, fields, relationships, indexes, users, privileges, and exporting and importing data, among other things. You may control individual databases as well as the entire MySQL server with this server PHP script, depending on the user access level. It should be highlighted that the user does not need to be familiar with SQL commands in order to use them. The majority of web hosting companies utilise phpMyAdmin to connect their customers to MySQL databases.
How to Install phpMyAdmin on IIS?
n this article, we will show you how to install and configure phpMyAdmin on IIS (Internet Information Services) Web Server on Windows 10 or Windows Server 2016. It assumed that you have already configured IIS with PHP support and installed and run MySQL instance on your Windows device.
First of all you have to download the latest version of phpMyAdmin. You should download a file with all languages (the file name ends with *all-languages.7z or *all-languages.zip). For example—phpMyAdmin-4.8.3-all-languages.zip. File size is about 10 MB.
Extract the files from the archive to phpmyadmin folder (C:\inet\pub\www\root\phpmyadmin).
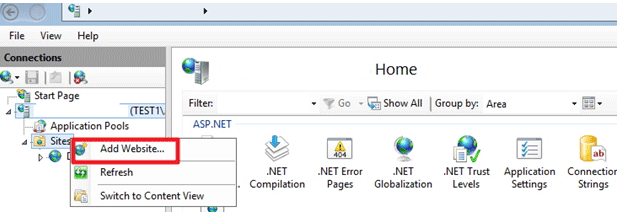
You can install the phpMyAdmin in the folder of the current IIS website, and create a separate site for it, we recommend the last option (IIS manager > Sites > Add Website > Specify site name and path to the phpmyadmin folder).
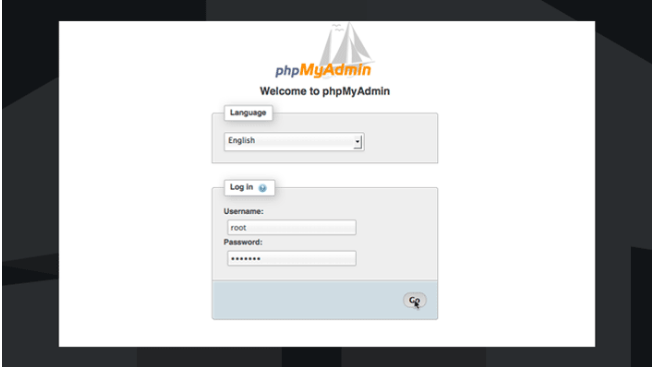
In general, the installation of phpMyAdmin has been completed. Now we should open a browser and double-check that the installation went smoothly. Go to http://localhost/phpmyadmin/ and you’ll see a window that looks like this:
Now we have to configure phpMyAdmin. Before you connect to the SQL server, you should create a configuration file. This file can be created manually (simply use a text editor), but we will use another method (by using GUI). Visit http://localhost/phpmyadmin/setup/ in your browser.
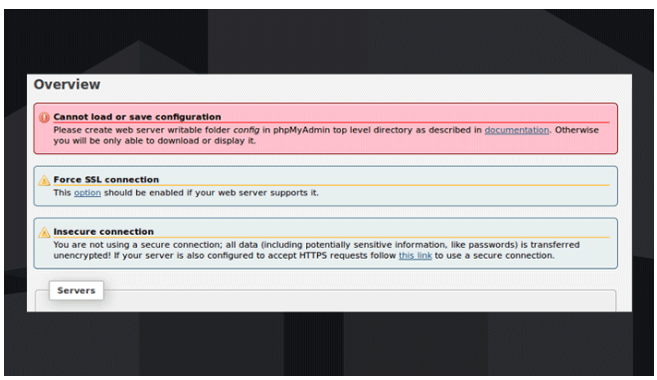
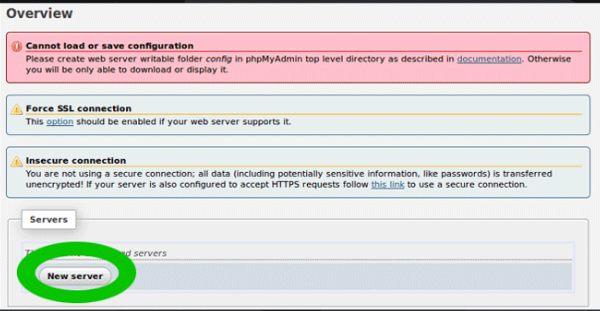
An error message will appear during your first session:
Please follow the instructions in the documentation to create a web server readable folder configuration in the phpMyAdmin top level directory. Otherwise, you’ll only be able to see or download it.
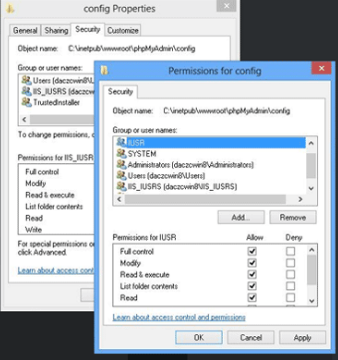
To solve this, problem you should create folder (C:\inet\pub\www\root\phpmyadmin\config). After that grant full access NTFS permissions for local group IIS_IUSRS and user IUSR.
Return to the phpMyAdmin config window. To configure the MySQL connection settings click on the “New Server” button.
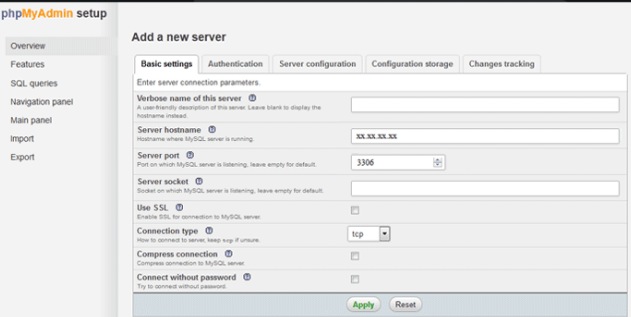
Enter the verbose (user-friendly) name of the SQL server, and then specify your mySQL server hostname. If necessary, you can specify other settings.
Save the settings and then the PhpMyAdmin will redirect you to the previous page. Choose:
- the default language—English
- the default server—127.0.0.1
- end of the line—Windows ( r n)
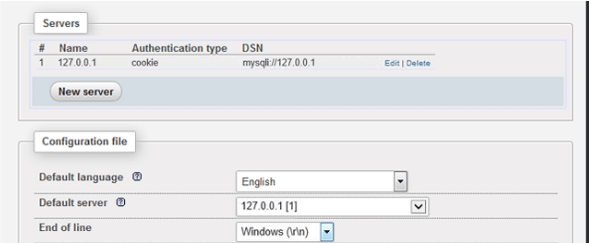
Click Save, and then download the config file. The received file (config.inc.php) you should save to the root directory (C:\inet\pub\www\root\phpmyadmin).
Tip. You can use the PhpMyAdmin configuration file template (..phpMyAdminconfig.sample.inc.php) to create your own config.inc.php configuration file manually. Just rename config.sample.inc.php file to the config.inc.php and edit it.
Login with the root account in the authorization window (http://localhost/phpmyadmin/) (for authorization, use the credentials of your MySQL server). You can delete the config folder if you see the start phpMyAdmin page.
Some of PhpMyAdmin’s settings, history, statistics, and other data can be saved in a separate MySQL database. In the directory PhpMyAdmin, you’ll find a ready-to-use script file for creating a database. On the main page, click the Import tab, then the Browse button to create a new config database. Click Go after selecting the C:inetpubwwwrootphpMyAdminexamplescreate tables.sql file.
Note. If create_tables.sql file is missing in the C:\inet\pub\www\root\phpMyAdmin\examples folder, then check if it is present in the following path—C:\inet\pub\www\root\phpMyAdmin\examples\create_tables.sql (as we understand this directory is used in phpMyAdmin-4.4.4 and newer).
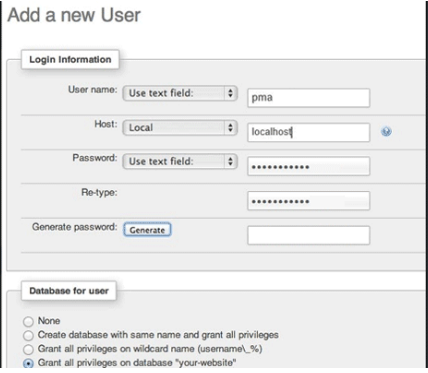
We recommend you to create account like this:
- User name: pma
- Host: localhost
- Password: sTr0ngPmapa$$
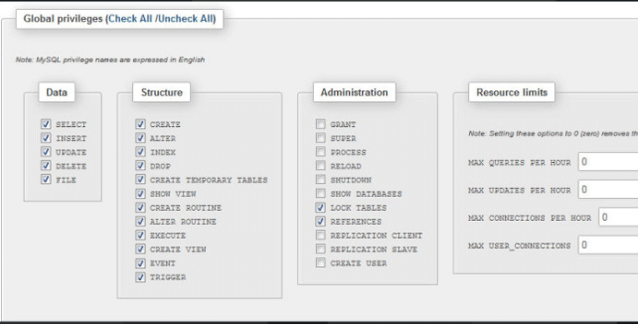
After that you should grant all database privileges to this new user.
Finally, using any text editor you have to uncomment (remove “//”) and edit the following lines in the phpMyAdmin config file (config.inc.php):
$cfg[‘Servers’][$i][‘controluser’] = ‘pma’;
$cfg[‘Servers’][$i][‘controlpass’] = ‘sTr0ngPmapa$$’;
$cfg['Servers'][$i]['pmadb'] = 'phpmyadmin';
$cfg['Servers'][$i]['bookmarktable'] = 'pma_bookmark';
$cfg['Servers'][$i]['relation'] = 'pma_relation';
$cfg['Servers'][$i]['table_info'] = 'pma_table_info';
$cfg['Servers'][$i]['table_coords'] = 'pma_table_coords';
$cfg['Servers'][$i]['pdf_pages'] = 'pma_pdf_pages';
$cfg['Servers'][$i]['column_info'] = 'pma_column_info';
$cfg['Servers'][$i]['history'] = 'pma_history';
$cfg['Servers'][$i]['tracking'] = 'pma_tracking';
Save the changes to the config.inc.php file.
And that’s it. We have completed to install phpMyAdmin on IIS web server running on Windows 10 and Windows Server 2016. Now you can proceed with the databases management.